

Last Updated: September 5, 2026
Activity 12: Baseline Project
In Activity 12 of the MS Project Master Class, you will get your project ready for execution by setting an approved baseline. This baseline records your planned schedule, costs, and work details. As your project moves forward, you can use it to compare your actual results with your original plan and spot any differences.
This Activity Workspace guides you through the full baselining process. You will do a final review of your project, set up a way to manage rebaselining, and save the approved baseline in Microsoft Project. You will also learn how to use multiple baseline sets, keep a backup, look at interim plans, and use the Compare Projects feature to find differences between project versions.
By the end of this Activity, your Master Project will be reviewed, approved, technically sound, and baselined. It will be ready to serve as your main reference point when you start executing your project.
New to the MS Project Master Class?
If you found this page through a search engine or external link, use the Start Here button below to learn about the Free and Complete MS Project Master Classes, the Learning Portal, Project MAP framework, Activity Workspaces, exercises, and the Master Project.
Figure 4.1 Adopt PM/MS Project Standards Activity in Project MAP.
Activity 12 Workspace Outline
Activity 11: Create Compliance Plan < Activity 12: Baseline Project > Activity 13: Update Project
Complete this Activity in the order presented. Begin by understanding the workflow, then reinforce the concepts through the exercises before reviewing your work and completing the Activity assessment. Each section builds on the previous one and prepares you for the next stage of the Project MAP framework.

This entire Activity Workspace should take 4 hours and 58 minutes to complete.
This Activity Workspace is part of the MS Project Master Class learning system and the companion Master Class Book available on Amazon. Many students also complete the Master Class with the assistance of a Master Class Coach or Trainer.
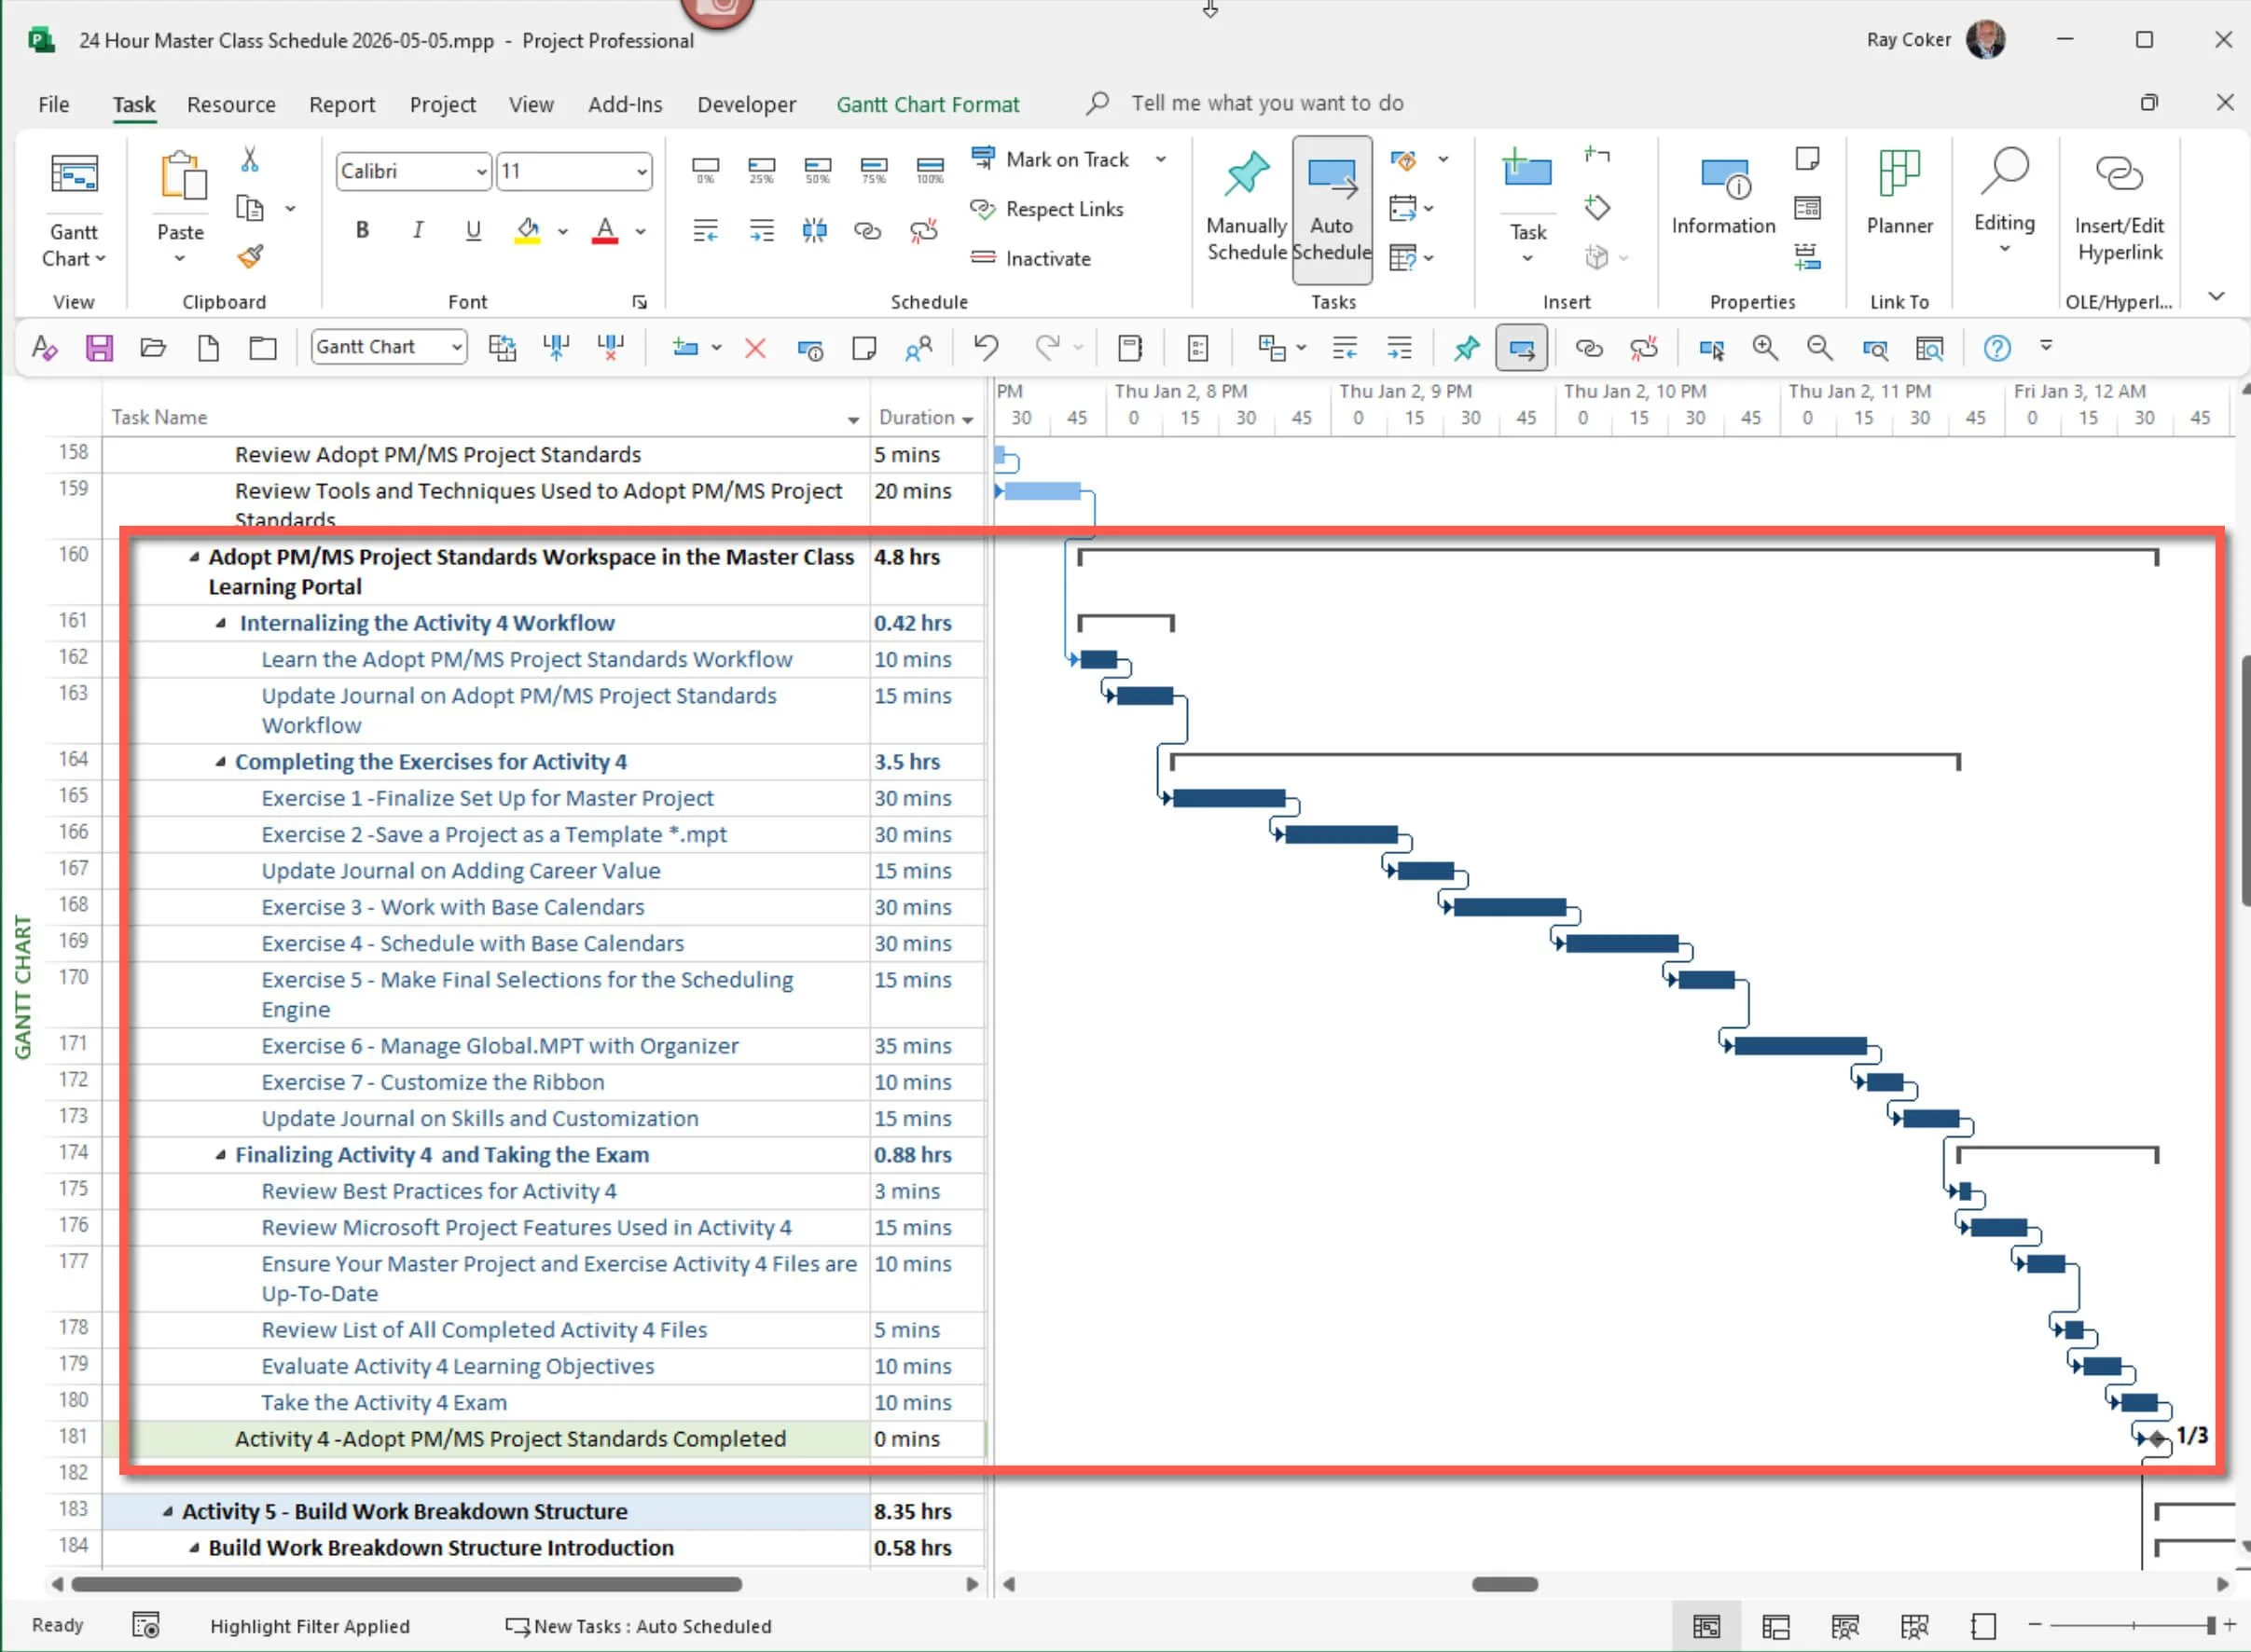
Figure 5.2 Workspace schedule.
The project baselining, performance measurement methods, and best practices shared in this Activity Workspace come from over 35 years of experience teaching Microsoft Project, training consultants, deploying Project Server, and helping professionals around the world.
Workflow
Internalizing the Activity 12 Workflow (25 minutes)
Overview and What You Will Learn
Before you begin the exercises in this Activity Workspace, take a moment to look over the Activity 12 Workflow. It explains the key decisions and Microsoft Project tools you will use to set up an approved project baseline and prepare your project for launch.
In this Activity, you will do a final check of your project plan to make sure it is complete, accurate, realistic, and ready for approval. You will review key planning details like scope, schedule, resources, costs, work, dependencies, constraints, risks, estimates, and stakeholder expectations before you set the plan as your baseline.
You will also decide how to manage rebaselining if major approved changes happen later. You will learn why you should not change a baseline just because actual results are different from the plan, how Microsoft Project's multiple baseline sets can keep approved versions of your plan, and how the Compare Projects feature helps you spot changes between project versions.
Finally, you will set the project's timing, cost, and work details as a baseline in Microsoft Project. You will learn how to save and manage baselines, use multiple baseline sets, keep baseline information safe, and see the difference between a baseline and an interim plan. These skills will help you compare your approved plan with how the project actually performs later on.
This Activity focuses on an important idea from the MS Project Master Class: a baseline is more than just a saved copy of your schedule. It is the approved reference point for measuring and controlling your project’s progress. Once you set the baseline, Microsoft Project can help you find differences in schedule, cost, and work, and show how actual results compare to what was approved.
Learn Adopt PM/MS Project Standards Workflow (10 minutes)

Preparing to Cast Off: Baseline Project
Picture the sailing trip is about to start. The plan is set, the route is mapped, time and effort are estimated, risks are reviewed, and the crew is ready. But before leaving the dock, the captain does one last check of the whole plan and writes down what everyone agreed to.
This is a key moment. Once the trip starts, things can change. Winds might be different than expected, weather could force a new route, equipment might break, or some parts of the trip could take longer. If the original plan is not saved, the captain has nothing to compare the actual trip to the plan.
Activity 12 works the same way. Before starting the project, the approved plan is checked, rules for changing the baseline are set, and Microsoft Project saves the schedule, cost, and work details as the reference for measuring how the project actually goes.

Final Inspection Before Departure: Conduct a Final Review
Before leaving, a good captain does a final check of the trip. Is the route right? Are the time and distance estimates realistic? Is the boat stocked with what it needs? Is the crew ready and assigned to the right jobs? Have you reviewed weather, hazards, rules, communication, and backup plans? Has anything important been missed?
The goal is not just to go through a checklist. It is to make sure the plan is complete, accurate, realistic, and ready before the crew and boat set out.
This is similar to the Final Review step in Activity 12. Before saving the baseline, the project manager checks that the data is correct, resources are assigned well, the scope and risks are clear, estimates are solid, stakeholders agree, objectives and documents are in order, and the Microsoft Project plan is technically accurate. Once approved, this plan is used to measure project performance.

Changing the Voyage Plan: Determine Process for Rebaselining
Once the trip has started, the captain does not make a new plan every time there is a headwind, a delay, or a late arrival. These differences are useful because they show how the real trip compares to the plan.
Sometimes, big changes happen during the trip. A main stop might change, a port could close, or an approved change could really change the route. In these cases, a new plan may be needed, but the original should be kept so the captain can see what changed and why.
This is like the step for deciding when to rebaseline. The project baseline should not change just because the project is not going exactly as planned. Rebaselining should only happen when an approved change makes the current baseline no longer a good reference. Before starting, the project manager sets out what changes allow rebaselining, who can approve them, and how old baselines will be kept.

Recording the Departure Plan: Baseline Timing, Cost, and Work
Right before leaving, picture the captain taking a snapshot of the approved plan. This includes the route, planned departure and arrival times, how long each part should take, needed supplies and resources, and other details that show how the trip should go.
Once the boat leaves, that snapshot does not change. The captain can now compare the real trip to the planned one.
This is what a baseline does in Microsoft Project. After the project plan is finished and approved, Microsoft Project saves the planned schedule, costs, and work details for tasks, resources, and assignments. As real project data is added during the project, the baseline remains the reference for measuring any differences.
By the end of Activity 12, you should see that baselining is more than just saving some fields in Microsoft Project. It is the moment when the approved project plan becomes the standard for measuring how the project is carried out. The plan is approved, the reference is saved, and the project is ready to begin.

Field Note: “So, how did that look?”

Teaching a workshop for plant shutdown managers at a Weyerhaeuser facility, I asked the participants, “Has anyone been to a high school reunion?” I wanted to use the idea of a reunion to illustrate part of the concept of a project baseline. One participant responded that he had just attended his 20th reunion the previous weekend.
I asked him, “How did she look?” and paused.
He looked at me for a moment and then said softly, slowly, and with a touch of dreamy intensity, “She was beautiful.”
Then he put his head down between his arms, folded on the desk, and began making prolonged, low sounds that seemed to come from genuine pain. At first, I thought he was pulling my leg, but I soon realized he was actually distraught. From between his arms, I heard him mutter, “I should have married her. That was the worst mistake of my life!”
Realizing I had unexpectedly struck a nerve, I tried to change the subject. I asked where the reunion had been held, hoping to get his mind off this beautiful woman he believed he should have married.
He raised his head and, again in that soft, slow, intense voice—this time with a note of bitter disbelief—replied: “At her resort!”


Best Practice
Consider preserving several elements of the approved project plan as part of the baselining process, rather than thinking of a baseline only as the information saved in Microsoft Project. The goal is to preserve a complete record of what was approved so you can later understand what changed and why.
Consider preserving:
Project objectives and charter information.
Risk management plans and risk information.
Requirements, assumptions, and other key project documents.
The approved Microsoft Project baseline.
An archived copy of the project .mpp file at the time the baseline is established. You can later compare this preserved version with the current project using Microsoft Project's Compare Projects feature to identify how the project plan has changed over time.
Together, these records provide a more complete picture of the approved project plan at the time it was baselined, rather than relying solely on the baseline fields stored within Microsoft Project.

Activity 12: Baseline Project Workflow Chart
Before beginning the exercises in this Activity Workspace, take time to carefully review and internalize the Activity 4 Workflow Chart. This workflow represents more than a sequence of software steps. It reflects the logical process used to establish the PM/MS Project Standards that will govern how your Master Project is planned, calculated, organized, and managed.
As you work through this Activity, continually return to this workflow and use it to understand how the pieces fit together. The goal is not simply to complete exercises, but to develop a repeatable planning approach you can apply to future projects. Over time, this workflow should become second nature—helping you think more systematically about project setup, Calculation Engine configuration, Project Elements, and the overall project management environment before detailed planning begins.
The remaining Planning Activities depend on these standards being established correctly. Internalize the workflow now, and the rest of the Master Class will become far easier to understand and apply.
Figure 12.3 Baseline Project Workflow.

Download
Click the Download icon above and open the Baseline Project Workflow.pdf file.

Update Journal on Baseline Project Workflow - 15 minutes
Journal Questions: Reflecting on the workflow for adopting PM/MS Project Standards described above:
Exercises
Completing the Exercises for Activity 12 (#####)
In these Activity exercises, you will learn how to set up and keep an approved project baseline. First, you will review the project and see what information needs to be saved when creating the baseline. Next, you will use Microsoft Project to save, review, manage, and protect this baseline information so you can use it as a reference for tracking the project's progress.
While working through the exercises, you will see how Microsoft Project saves baseline schedule, cost, and work details. You will also learn how to view and compare this information with your current project plan. You will use the Baseline Table to save a baseline, create extra baseline sets, clear or copy baseline data, and check how project updates affect differences from the baseline.
You will also review interim plans and see how they differ from full baselines. You will save a copy of your project file and use the Compare Projects feature in Microsoft Project to spot differences between project versions. These exercises show different ways to keep approved project information and track changes as the project moves forward.
After finishing these exercises, you will know how to set a baseline in Microsoft Project and why it is important to keep the baseline unchanged once the project starts. The project plan will keep changing as work is done and real data is added, but the baseline stays the same so you can measure schedule, cost, and work performance against it.

Definitions
Baseline: A saved copy of the approved project’s schedule, cost, and work information used as the reference for measuring project performance and variance.
Baseline 0: The primary baseline, identified as Baseline in Microsoft Project. It normally represents the approved project plan against which project performance is measured.
Baseline 1–10: Ten additional baseline sets available in Microsoft Project for preserving additional approved versions or reference points without replacing the original Baseline.
Baseline Fields: Microsoft Project fields that store information captured when a baseline is saved, including Baseline Start, Baseline Finish, Baseline Duration, Baseline Work, and Baseline Cost.
Current Plan: The project information currently calculated and displayed in Microsoft Project. Current information changes as the project is revised and updated.
Actual Information: Information describing what has actually occurred during project execution, such as Actual Start, Actual Finish, Actual Work, Actual Duration, and Actual Cost.
Variance: The difference between baseline information and current or actual project information, used to identify where project performance differs from the approved plan.
Rebaselining: Establishing a revised baseline after an approved change significantly alters the project and the existing baseline is no longer an appropriate performance reference.
Interim Plan: A limited reference plan that saves task Start and Finish dates into selected Start/Finish fields. Unlike a baseline, it does not preserve comprehensive work and cost information.
Archived Project File: A preserved copy of the .mpp project file representing the project at a particular point in time, such as when the approved baseline was established.
Compare Projects: A Microsoft Project feature that compares two project files and identifies differences in task and resource information. It supplements, but does not replace, baseline variance analysis.
Performance Reference: The approved project information against which current and actual project performance is evaluated. A baseline establishes this reference within Microsoft Project.

Exercise 12.1 Baseline Project Workflow (15 minutes)
In this exercise, you will work through the Baseline Project Workflow from final project review through establishing the baseline and using it to evaluate project performance. Before setting the baseline, you will examine the project for completeness, accuracy, technical quality, resource allocation, scope, risk, estimates, and stakeholder alignment. You will also use the Pre-Baseline Checklist to evaluate whether your own Master Project is ready to be baselined.
You will then establish the baseline and examine the relationship between Current, Baseline, Actual, and Variance information in Microsoft Project. After making several project updates, you will see how Microsoft Project preserves the approved baseline while recalculating the current schedule and displaying the resulting schedule, work, and cost variances. By the end of the exercise, you should be able to look beyond individual fields and tell the story of project performance—what changed, how actual performance compares with the approved plan, and what the current schedule now predicts.
Just as importantly, you will consider the governance side of baselining. You will review when re-baselining may be appropriate, why a baseline should not be changed simply to eliminate unfavorable variances, and why significant baseline changes should be authorized and the previous baseline preserved.
The objective is not simply to learn how to click Set Baseline. It is to understand how an approved project plan becomes the performance reference used to control the project.
To start this exercise, download the Baseline Workflow.mpp file using the icon above and open it in Microsoft Project. Ensure your global settings in Project Options are correct, and use Microsoft Project 2019 or later for best results.
Conduct a Final Review
As mentioned in the Baseline Project Workflow Chart above, before saving a baseline, conduct a final review to confirm that the project plan is complete, accurate, realistic, and approved. Verify the project's scope, schedule, resources, costs, work, dependencies, constraints, risks, and other planning assumptions. Once the plan has been approved, Microsoft Project can save its schedule, cost, and work information as the baseline against which project performance will later be measured. Answer these questions before baselining:
Check Data Accuracy: Are task details, resources, durations, estimates, dependencies, and other project data complete and accurate?
1) Check Data Accuracy: Are task details, resources, durations, estimates, dependencies, and other project data complete and accurate?
2) Resource Allocation: Are resources assigned correctly, and have resource conflicts and overallocations been identified and resolved?
3) Review Scope: Does the project scope align with the approved project objectives, and have any unauthorized scope changes been identified and addressed?
4) Risk Assessment: Have project risks and uncertainties been identified, assessed, and appropriately addressed?
5) Estimates: Have duration, work, cost, and resource estimates been reviewed and confirmed as reasonable and complete?
6) Stakeholder Alignment: Have the appropriate stakeholders reviewed and approved the project plan that will become the baseline?
7) Project Objectives and Charter: How will approved project elements outside the Microsoft Project plan—such as objectives, charter information, requirements, and other project documents—be preserved and controlled as approved project references?
8) Technical Accuracy: Has the project been reviewed for technical accuracy and confirmed to meet the standards established for a Master Project?
For instance, you always need to make sure your project plan in Microsoft Project is technically correct and adheres to best practices.
This Baseline Workflow.mpp project has not been baselined. One of the first things to do before baselining a project is to conduct a final technical review. This review might include assessing the project plan unique to your organization and an external assessment such as DMCA 14-Point Assessment.
You can, of course, review a project and ensure it is built consistently with the Best Practices we have reviewed in this Master Class. There are also add-ins available for Microsoft Project that will assess your project against industry standards. One tool is Schedule Inspector by Barbecanna. In the figure below,
Figure 12.4 Conditions in Schedule Inspector.
Schedule Inspector applies up to 31 conditions or quality checks. Some of the basic conditions are:
Duplicate task names
Manually scheduled tasks
No predecessors
No resources
No successors
Summary tasks with relationships
Summary tasks with resources
Tasks with redundant predecessors
This tool was used to assess the Baseline Workflow.mpp file.
Figure 12.5 Technical accuracy correction.
In the example above, Activity 1 has no predecessor. Technically, the first milestone or activity has no predecessor, and the last has no successor, so this is not an issue. But it reminds me that the first line item in a project’s first phase should be a Project Start milestone. Add a Project Started milestone and make it a predecessor to Activity 1.
The Pre-Baseline Checklist.docm helps you decide if your project is ready for its baseline. It includes 58 statements covering the General Review and the Initiating, Planning, Execution, and Closing phases. This checklist shows which areas are complete, which need more work, and what issues could affect baseline approval.
Rate each statement from 1 (Strongly Disagree) to 10 (Strongly Agree), using the information and evidence you have for your project. Once you finish rating, click the Calculate Score button. This will show your section and overall scores, update the results table, and give you a percentage out of a maximum score of 580.
The checklist supports your professional judgment, stakeholder review, and the required baseline approval process, not replace them. The suggested readiness scores can help you spot concerns, but even a high score does not guarantee your project is ready for baselining. If important issues remain unresolved, it may still be best to delay approval.
Fill out the checklist before you set the baseline. Review any items with low ratings, and resolve or formally address any major concerns before moving forward.
Figure 12.6 Pre-baseline checklist score.
Click the download button above, then download and open the Pre-Baseline Checklist.docm file, and calculate the score for your Master Project to determine if you are ready to set the baseline.
Determine Process for Rebaselined
A project baseline lets managers compare actual performance against the approved plan. You should not change the baseline just because the project is running late, over budget, or needs more work than expected. These are called variances, and tracking them is a key reason for having a baseline.
Sometimes, rebaselining is the right choice. The U.S. Government Accountability Office (GAO) says baseline changes should be rare and occur only when the current baseline no longer provides useful information about cost, schedule, or performance. The GAO also notes that big changes in scope or formal replanning can justify updating the baseline (U.S. Government Accountability Office, 2015, 2014).
Microsoft Project lets managers keep up to 11 different baseline sets: Baseline and Baseline 1 through Baseline 10. Microsoft explains that extra baselines help when major changes to tasks or costs make the old baseline less useful for tracking the project (Microsoft, n.d.).
Criteria for Rebaselining
Think about rebaselining your project if these conditions apply:
A significant change has been officially approved. Rebaseline only after an authorized change or a formal decision to replan, not because of normal project variances.
The approved change significantly affects the project plan. It affects key elements such as the project’s scope, goals, requirements, schedule, cost, work, resources, and other planning details.
The current baseline is no longer a useful way to measure performance. The approved change is so significant that using the old baseline would produce misleading or unhelpful results.
The new baseline has been checked and approved. The updated project plan should be realistic and must be reviewed and authorized by whoever is responsible for approving the project’s baseline.
The previous baseline will be kept. The organization should decide how to save the old baseline and other approved project details so the project’s history is not lost when a new baseline is set.
A helpful way to decide is to ask yourself these questions:
Has a significant project change been formally approved?
Does the approved change materially alter the project plan?
Has the change made the existing baseline an inappropriate or misleading reference for measuring future performance?
Has the appropriate authority approved establishing a new baseline?
Will the previous baseline be preserved so that the project's history can still be evaluated?
If you meet these conditions, rebaselining might be the right step. Remember, rebaselining is a controlled project management decision, not just a regular Microsoft Project task.

Note
Do not rebaseline just to remove negative schedule, cost, or work variances. This can hide the real project performance compared to the approved plan and defeats the purpose of having a baseline.
When you need to rebaseline, save the original baseline in one of Microsoft Project’s extra baseline sets and keep an archived copy of the project file. This way, the new baseline helps manage the rest of the project, while you still have a record of the original approved plan.
The last step in the workflow is to finally Set the Baseline.
If you have closed the Baseline Project Workflow.mpp file, open it again. Note the fields in the table applied in the active view. It has three sections: Duration, Cost, and Work.
This first section (in red) is called Current. The current duration, cost, and work are associated with each WBS element.
The green section is Baseline or Planned. The baseline hasn’t been set, so all values are zero.
The last section shows variances between Current and Baseline.
Figure 12.6 Table in Microsoft Project showing current (duration, cost, work), baseline, and any variance between current and baseline.
To Set the Baseline
Select the Project tab on the ribbon and Set Baseline to set the baseline. Set the baseline for this project using the default Baseline for the Entire Project.
Figure 12.6
Once the baseline has been set, notice in the figure below that the Baseline and Variance data have changed. Also notice that Baseline-formatted taskbars appear under the Current taskbars. If you open Bar Styles and scroll down to the bottom of the list, you will notice that there is a condition for displaying a bar for Normal Tasks, from the Baseline Start to the Baseline Finish.
Figure 12.7 Current, Baseline, and Variance data in a Gantt Chart view.
You can do a lot with baseline data, and we'll explore several options. One thing I want to mention before we go on is that you can edit any baseline values.
For instance, as shown in the figure below, change the Baseline Duration and Work at the project summary level to 15 days and $40,000. Then change the Baseline Work for Activity 1 to 60hrs. Notice the changes to the corresponding variance fields. I am not recommending this practice, but it is good to know if needed. If I had a good reason to make these edits, I would likely also change the Baseline Work on the summary level to 204 hrs.
Figure 12.7 Edits to baseline data.
Let’s make some simple updates to the project, but first, add three fields to the table applied in the view. Add % Complete, Actual Duration, Actual Cost, and Actual Work, and place them in that order before the Duration field, as shown below.
Then, in the taskbar area, remove the date field for milestones and for Tasks, replace the Resource Names field with the % Complete field.
Last, add a Deadline date of 1/19/28 for the Project Finished milestone.
Figure 12.8 % Complete and Actual Duration, Cost, and Work added to the table.
After making these changes to the table, view, and Project Finished milestone, make the following changes and updates:
Make sure all of the WBS elements are automatically scheduled. That is always a good thing to check before baselining and updating.
Add the Finish Variance field or column at the end of the table.
Let’s say you decided to get a jump on the project and start during the holidays. In Project Information, change the Project Start Date to 12/27/27. Notice:
The entire schedule shifted back to that start date.
The baseline taskbars stayed the same.
There are now -5 working days of variance.
Mark the Project Started milestone as 100% complete
Enter a duration of 7 days for Activity1 and then mark it as 100% complete. You can do this in either the Actual Duration or Duration fields. If you enter 7 days in the Actual Duration field, the calculation will automatically mark the activity as 100% complete. If you enter 7 days in the Duration field, you will also have to enter 100%. I hope you can see why. Notice:
The schedule shifted forward.
There is now -3 days of Finish Variance.
There is a 2 day Duration Variance for the activity.
There is a Cost Variance of $5,600 because of an increase of 52 hours of Work.
There is a rollup calculation of $5,200 on the project summary level. (Do you know why?)
The taskbar for this activity is displayed as complete. A black bar all the way through the activity.
Assign Ted at 100% to Activity 2 along with Alice, enter a duration of 2 days, and then mark it as 100% complete. Notice:
There is a -1 day Duration Variance.
There is an increase Cost Variance of $2,000. Do you know why? Take a look at Alice and Ted’s standard rates.
The project is scheduled to finish 4 working days early.
Enter 25% complete for Activity 3.
Save the project.
Can you tell the story? This update could be easily summarized by saying, “The project started a week early. We are over budget by $7,200, and we have spent 40 more hours of effort than planned. We expect to finish four working days early.”
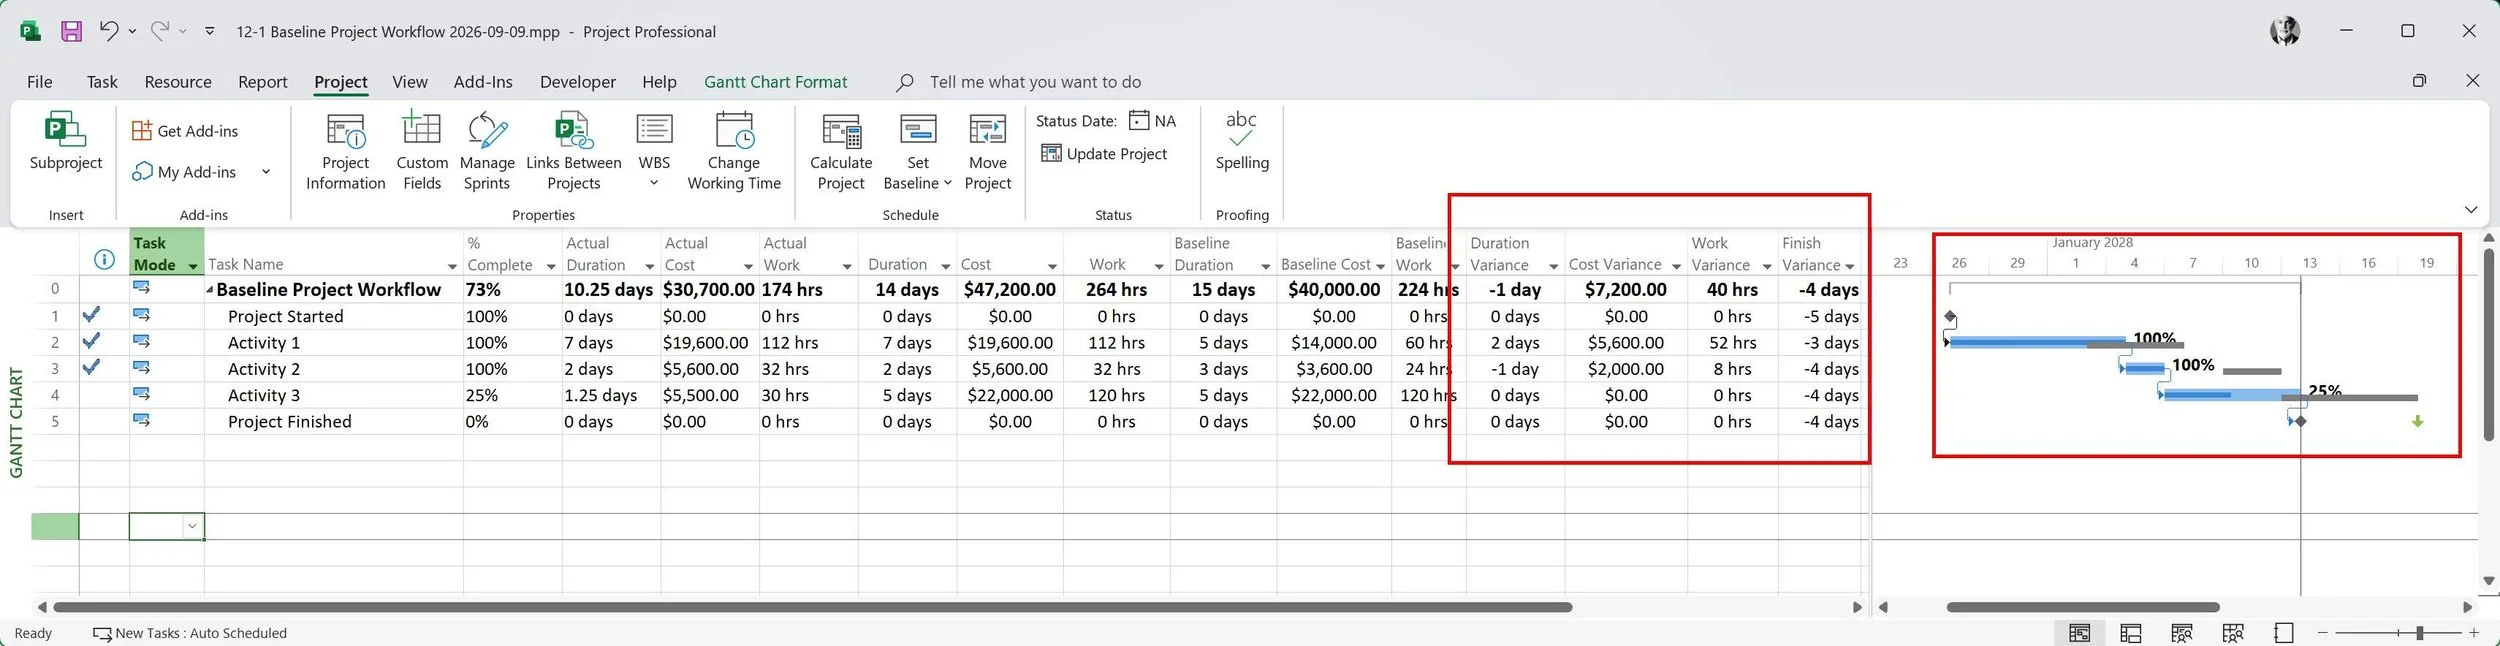
Figure 12.9 Exercise 12.1 results when finished.
When Finished with Exercise 12.1
You completed the Pre-Baseline Checklist.docm to help evaluate your Master Project regarding readiness to baseline your project.
You made these changes to the Baseline Project Workflow.mpp file:
Added the Project Started milestone.
Set the baseline for the entire project.
Manually changed the Baseline Duration to 15 days, the Baseline Cost to $40,000, and the Baseline Work for Activity 1 to 60 hours.
Edited the taskbar section to show % Complete for normal taskbars.
Added a Deadline date.
Added the following fields or columns to the table being used:
% Complete
Actual Duration
Actual Cost
Actual Work
Finish Variance.
Last, you updated the project. You should see the same variances in the figure above.

Field Note: Re-Baselining Is a Governance Decision
While consulting for Siemens and IBM, I came across project-control manuals nearly two inches thick. These manuals detailed every step, approval, and document needed to re-baseline a project. From this, I learned that re-baselining is much more than just saving a new baseline in Microsoft Project. It is often a major governance and contractual decision.
For large capital projects, the original baseline often becomes part of the statement of work, contract, or funding agreement. Before setting this baseline, the project usually goes through a detailed readiness review to make sure the scope, estimates, resources, schedule, risks, and communications are solid. The main goal of the pre-baseline review in Activity 12 is to carefully check the plan before using it to measure future performance.
After the baseline is set, it should not be changed just because the project is running late, costs have gone up, estimates were off, or actual results differ from the plan. Changing it for these reasons would remove the variance information the baseline is meant to track. Instead, most organizations use a formal change-management process. This process documents the reason for re-baselining, evaluates the impact, gets approval from the right people, and keeps the old baseline for future comparison.
That is why Activity 12 recommends setting re-baselining criteria before the project starts. The Workspace treats this as a key part of disciplined project control, rather than something to figure out later if problems come up.
The main takeaway is straightforward: setting a baseline creates accountability, and re-baselining changes it. Review both steps carefully, justify them in writing, and get proper approval.
Exercise 12.2 Baseline Activities (30 minutes)
Exercise 12.2 takes you deeper into the Microsoft Project mechanics behind baseline management. A baseline is not a single value or field. Microsoft Project maintains multiple sets of baseline information for tasks, resources, work, costs, dates, and other project data, and those values can appear differently depending on the view and fields being examined.
Using the Set Baseline.mpp exercise file, you will investigate existing baseline information from several perspectives, including the Gantt Chart, Resource Sheet, and Task Usage Baseline views. You will identify existing baseline data, clear selected baseline sets, verify that the information has been removed, and then establish a new baseline for the entire project.
Finally, you will learn an important baseline-management practice: preserving the original baseline before making significant changes or re-baselining. Microsoft Project provides the primary Baseline plus Baseline 1 through Baseline 10. In the exercise, you will copy the newly established baseline into another baseline set, giving you a preserved reference to compare with later versions of the project.
Exercise 12.1 establishes why the baseline matters and how it supports project control. Exercise 12.2 shows you how to manage that baseline information deliberately so the project's history and approved performance references are not accidentally lost.
To start this exercise, download the Set Baseline.mpp file using the icon above and then open the file in Microsoft Project.
You can always clear the baseline if you want to ensure there is no baseline information, and you can check several views to ensure no remnant baseline data remains. First, let’s check whether any baseline information exists.
First, there are many different baseline fields: 10 baseline sets of fields and 10 related interim sets of fields. In total, without counting, I estimate there are about 140 baseline fields. For instance, for the Baseline set of fields, which will likely be the ones you will most likely use most of the time, these fields are in this set:
Baseline Budget Cost
Baseline Budget Work
Baseline Cost
Baseline Deliverable Finish
Baseline Deliverable Start
Baseline Duration
Baseline Estimated Duration
Baseline Estimated Finish
Baseline Estimated Start
Baseline Finish
Baseline Start
Baseline Work
As you know, you can enter baseline data in any of these baseline fields, so if you are working with a file that has baselines set and want to rebaseline, review it and make sure the baseline data has been cleared.
To Clear Baselines and Interim Plans
Click the Set Baseline command under the Project tab on the ribbon. Select Clear Baseline, then select the baseline or interim data you want to clear. No command clears all baseline and interim plan data across all sets.
Figure 12.10 Clear Baseline command.
Microsoft Project does indicate when baselines or interim plans have been set, as shown in the next figure. It does not indicate that an interim plan has been set.
Figure 12.11 Baselines that have been last saved.
Before we clear any baseline data, let’s apply a couple of views and review some data sets.
In the Gantt Chart view for the Set Baseline.mpp file, there are three baseline data sets displayed in the table.
For the Baseline data set, six fields are showing no data.
For the Baseline3 data set, Baseline3 Duration has data.
For the Baseline6 data set, Baseline6 Duration has data.
Figure 12.12 Baseline data sets in the Gantt Chart view.
Apply the Resource Sheet view.
For the Baseline data set, two fields are showing no data.
For the Baseline3 data set, Baseline3 Work has data.
For the Baseline6 data set, Baseline6 Work has data.
Figure 12.13. Baseline data sets in the Resource Sheet view.
Apply the Task Usage Baseline view.
For the Baseline data set, two fields are showing no data.
For the Baseline3 data set, Baseline3 Work has data.
For the Baseline6 data set, Baseline6 Work has data.
Figure 12.13 Baseline data sets in the Task Usage Baseline view.
Now clear the baseline for Baseline3 and Baseline6 datasets. When you’re done, check each of these three views and notice that there are no baseline values.
Set the Baseline
Next, set the baseline for the entire project. Notice that the date the baseline has been set has been added.
Figure 12.14 Baseline set.
Saving a Backup of a Baseline
Let’s say you want to keep a backup of the original baseline. You can easily copy the baseline into one of the other 10 baselines.
Field Note: Why I Always Preserve the Original Baseline
A customer once told me that whenever they set a project baseline, they would immediately copy it into one of Microsoft Project’s extra baseline fields, like Baseline 10, as a backup. At the time, I thought this was unnecessary, maybe even a bit silly. Why back up a baseline? After all, you’re not supposed to change it.
I soon found out why this mattered.
I was managing a complex project on a property I co-owned with others in Guanacaste, Costa Rica, between Sámara and Nosara. The land sat about three kilometers inland as the crow flies, up in the hills with a view of the Pacific Ocean.
Guanacaste isn’t the lush rainforest most people imagine when they think of Costa Rica. Instead, much of it is tropical dry forest with a long dry season. Many trees lose their leaves to save water, then turn bright green again when the rains return. From our property, the hills stretched toward the Pacific, offering amazing coastal views. It felt as close to paradise as I’d ever been.
The project itself was far from perfect. It was complicated, involved several owners, and changed many times. At one point, I realized that the baseline values for some tasks had been altered. I had just argued with the project manager about related issues and was sure the original baseline supported me. I went back to my cabin, opened the Microsoft Project plan, and started checking the numbers.
Then I had an unpleasant realization: I had no proof to support my case.
I could see the current baseline, but I couldn’t prove what it had said before. I didn’t have an untouched copy to compare. So there I was, in paradise, surrounded by dry forest and looking out at the Pacific, scratching my head and trying to figure out what happened to those original baseline values.
Suddenly, that customer’s idea didn’t seem silly anymore.
Microsoft Project gives you Baseline plus Baseline 1 through Baseline 10, so you have 11 sets of baseline fields. Now, before I change or re-baseline a project, I save the current baseline in one of those extra sets. The goal isn’t to create different versions of the truth, but to keep a record of what was approved before anything changes.
This lesson ties in with Activity 12. A baseline is more than just saved dates and numbers. It shows the approved schedule, work, and cost expectations that future performance will be measured against. The Activity Workspace stresses the importance of reviewing the project carefully before setting the baseline and deciding ahead of time how to handle re-baselining if big changes happen.
What I learned in Guanacaste was simple: never assume an important baseline will stay the same. Always save the original before making changes. Storage is cheap, but rebuilding history later can be impossible.
Copying a Baseline
You can of course save another baseline into one of the other baseline data sets to make a backup. You can also copy one baseline set into another. To do that, click the Set Baseline command, and then Set interim plan. Copy your baseline Into Baseline6, for instance.
For the Set Baseline.mpp file, copy the baseline into the Baseline6 data set. The Baseline6 fields in your views will match your baseline values.
Save the project.
Figure 12.15 Copy a baseline.
When Finished with Exercise 12.2
The Set Baseline.mpp file should have two baseline date sets that match: Baseline and Baseline 6. All other baselines should be clear.
The Master Project is the central Microsoft Project schedule developed throughout the MS Project Master Class and Project MAP framework. Each Activity Workspace expands and refines the Master Project as new planning elements, estimates, scheduling logic, resources, costs, controls, and reporting features are introduced. If needed, review the Master Project Explanation page for additional information about how the Master Project is structured and used throughout the Learning Portal. #FFFFCC
Figure 4.7 Start New Project Template.
When Finished with Exercise 4.1
You should have selected the project you will work on during this MS Project Master Class. This project will be your Master Project.
Exercise 4.2: Save a Project as a Template *.mpt (30 minutes)
In this next exercise, you will review and save a project as a Microsoft Project template file.
Update Journal on Adding Career Value - 15 minutes
Final Steps
Finalizing Activity 4 and Taking the Exam (53 minutes)
In this final section, you will bring together the work completed while adopting PM/MS Project Standards.
Take some time to review the best practices for project management and using Microsoft Project. Think about the main ideas of project management and how you use them in Microsoft Project, especially with the Calculation Engine, Organizer, and working with views and tables.

Review Best Practices for Activity 4 (5 minutes)
Best practices are proven methods and decision rules that improve the likelihood of achieving project objectives. In the MS Project Master Class, these practices support the Initiating, Planning, Executing, and Closing phases of Project MAP, while Controlling continues across the project. The following Activity practices help project managers assign the right people, evaluate capacity, resolve workload conflicts, and use Microsoft Project as a decision-support tool rather than as a substitute for professional judgment.

Review Microsoft Project Features Used in Activity 4 (15 minutes)
Calculation Engine
By effectively managing vacation time and availability adjustments in Microsoft Project, you ensure that your

Ensure Your Master Project and Exercise Activity 4 Files are Up-To-Date (10 minutes)
Your Master Project has been used in some of the exercises. This Master Project will be updated throughout the MS Project Master Class.
When finished with Exercises 4.1 - 4.7, you should have the following:
Exercise 4.1: If this is the first Activity (chapter) in your MS Project Master Class Journey, you should have selected the project you will work on during this MS Project Master Class. This project will be your Master Project.


If you are working with a coach or plan to earn a certificate, use this file folder system to store your files.
Review List of All Completed Activity 4 Files (3 minutes)
The files used in this Activity Workspace include:
Your Master Project.mpp.
Template Exercise.mpt.
Calendar Rules.mpp.
Schedule.mpp.
Screenshot of Your Ribbon and Bridge Toolbar.
Your Updated Journal.
Adopt PM/MS Project Standards Learning Objectives.xlsx.
PDF of Your Exam Results.

What to Do with Your Files
After you finish this Activity, remember to save your files and keep them organized.
If you are working with a Master Class Coach:
Put all the files listed above into your folder structure as suggested.
Zip these folders before your next session.
Email the zipped file to your Master Class Coach.
You don’t need to send your files to a Certified Master Class Reviewer to earn a certificate; your coach will review your work.
If you are NOT working with a Master Class Coach (Certificate Path):
Put all the files listed above into your folder structure.
Zip the files to archive them and keep everything organized.
When you’re ready, send all your Activity files together to a Certified Master Class Reviewer for evaluation.
Important
As you work through all Activities, you’re building a complete set of project files. Keep everything organized since you’ll need the full set for review.
Evaluate Activity 4 Learning Objectives (10 minutes)
At this point, the goal is not just to recognize the steps in the workflow, but to understand how and why each step affects the final project schedule. Based on the learning objectives presented in the Activity Chapter in the Master Class Book on evaluating risk, here are some questions you could ask to help determine if you have met the learning objectives:
Identify Communication Requirements: Can I identify the information requirements, reporting needs, communication frequency, and communication responsibilities for the stakeholders involved in a project?
Create a Communication Network: Can I organize stakeholders into meaningful groups and define the communication relationships needed to support project execution and decision-making?
Define a Reporting Cycle: Can I establish a reporting cycle that determines when project information will be collected, updated, reviewed, and communicated throughout the project life cycle?
Establish Reporting Standards: Can I determine the reports, views, dashboards, formats, and communication methods needed to communicate project information consistently and effectively?
These questions assess your understanding of the chapter's content, gauge your ability to apply the concepts to practical scenarios, and reflect on the implications of these standards and customizations in project management. If you can explain these ideas in your own words and apply them in Microsoft Project, you are beginning to think like a professional project manager using the software as intended.

Before taking the exam, click the Download icon above and open the Learning Objectives for Adopt PM/MS Project Standards.xlsx and complete this evaluation of the learning objectives.

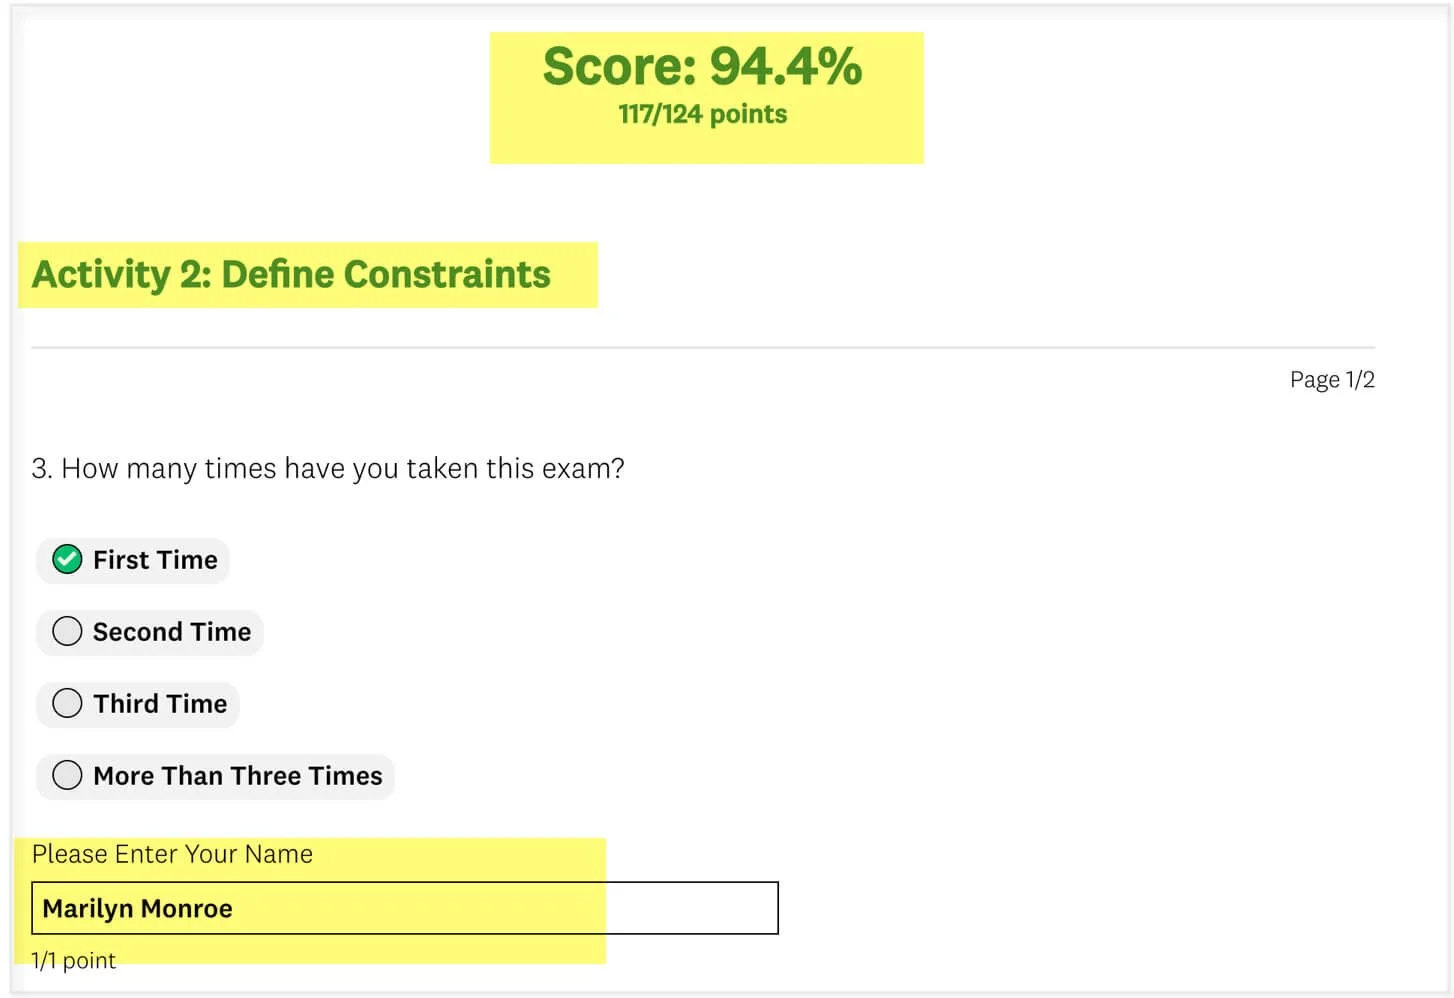
Final Score
When you are finished, print your score and exam results as a PDF file if you are working with a Coach or plan to earn a certificate.
Take the Activity 4 Exam (10 minutes)
Complete this Activity by taking the exam. Take the exam by clicking on the Exams button below.
Here are some essential guidelines for taking the exam:
Approach the exam as a closed-book assessment, relying solely on your memory and grasp of the subject matter.
Always select the most appropriate answer.
Keep in mind that answers carry different weights.
Feel free to attempt the exam multiple times to refine your understanding.
To attain the MS Project 24 Hour Master Class Certificate of Completion, achieve a final score of 80% or higher.

Return to the Master Class Book, complete the Activity 4 Summary section, and then continue to Activity 5: Build Work Breakdown Structure.
Suggestions and Corrections
Please help us make this MS Project Master Class Book and the Master Class Learning Portal better. Click on the Comments button below to send us suggestions and corrections.