

Last Updated: July, 22, 2026
Activity 6: Enter Estimates in Microsoft Project
This Activity Workspace is part of the MS Project Master Class, a practical training program that helps project managers, schedulers, students, trainers, consultants, and organizations create well-structured project plans using Microsoft Project and the Project MAP framework. In this Activity, you will learn how to enter and manage estimates in Microsoft Project by working with duration, work, cost, and resource estimates for activities in the Work Breakdown Structure you built in the previous Activity Workspace.
You will also see how Microsoft Project uses the Calculation Engine to link estimates, resources, calendars, and scheduling to produce useful project calculations and schedule details. Through step-by-step exercises, workflows, and real-world examples, this Workspace will help you build reliable project estimates that support accurate scheduling, resource planning, budgeting, forecasting, and project control for the rest of the Master Class.
New to the MS Project Master Class?
If you found this page through a search engine or external link, use the Start Here button below to learn about the Free and Complete MS Project Master Classes, the Learning Portal, Project MAP framework, Activity Workspaces, exercises, and the Master Project.
Figure 6.1 Enter Estimates Activity in Project MAP. This figure illustrates where Activity 6: Enter Estimates fits within the Project MAP (Model, Activities & Phases) framework and its relationship to the preceding and following Activities. Use this roadmap to understand how estimating builds on the completed Work Breakdown Structure and prepares the project for determining schedule logic in the next Activity.
Activity 6 Workspace Outline
Activity 5: Build Work Breakdown Structure < Activity 6: Enter Estimates > Activity 7: Determine Schedule Logic
Workflow (25 minutes)
Exercises (4 hours 50 minutes) jump to
Exercise 6.1: Enter Scope (30 minutes) jump to
Exercise 6.2: Review Estimating Approaches (20 minutes) jump to
Exercise 6.3: Complete PERT Customization (40 minutes) jump to
Exercise 6.4: Enter Estimates for Master Project (30 minutes) jump to
Exercise 6.5: Define Resources (30 minutes) jump to
Exercise 6.6: Define Resources for the Master Project (30 minutes) jump to
Exercise 6.7: Complete Assignment Calculations (10 minutes) jump to
Exercise 6.8: Determine Calculation Selections for Master Project (10 minutes) jump to
Exercise 6.9: Assign Resources (45 minutes) jump to
Exercise 6.10: Assign Resources to Master Project (30 minutes) jump to
Update Journal on Entering Estimates (15 minutes) jump to

This entire Activity Workspace should take about 6 hours and 7 minutes
This Activity Workspace is part of the MS Project Master Class learning system and the companion Master Class Book available on Amazon. Many students also complete the Master Class with the assistance of a Master Class Coach or Trainer.
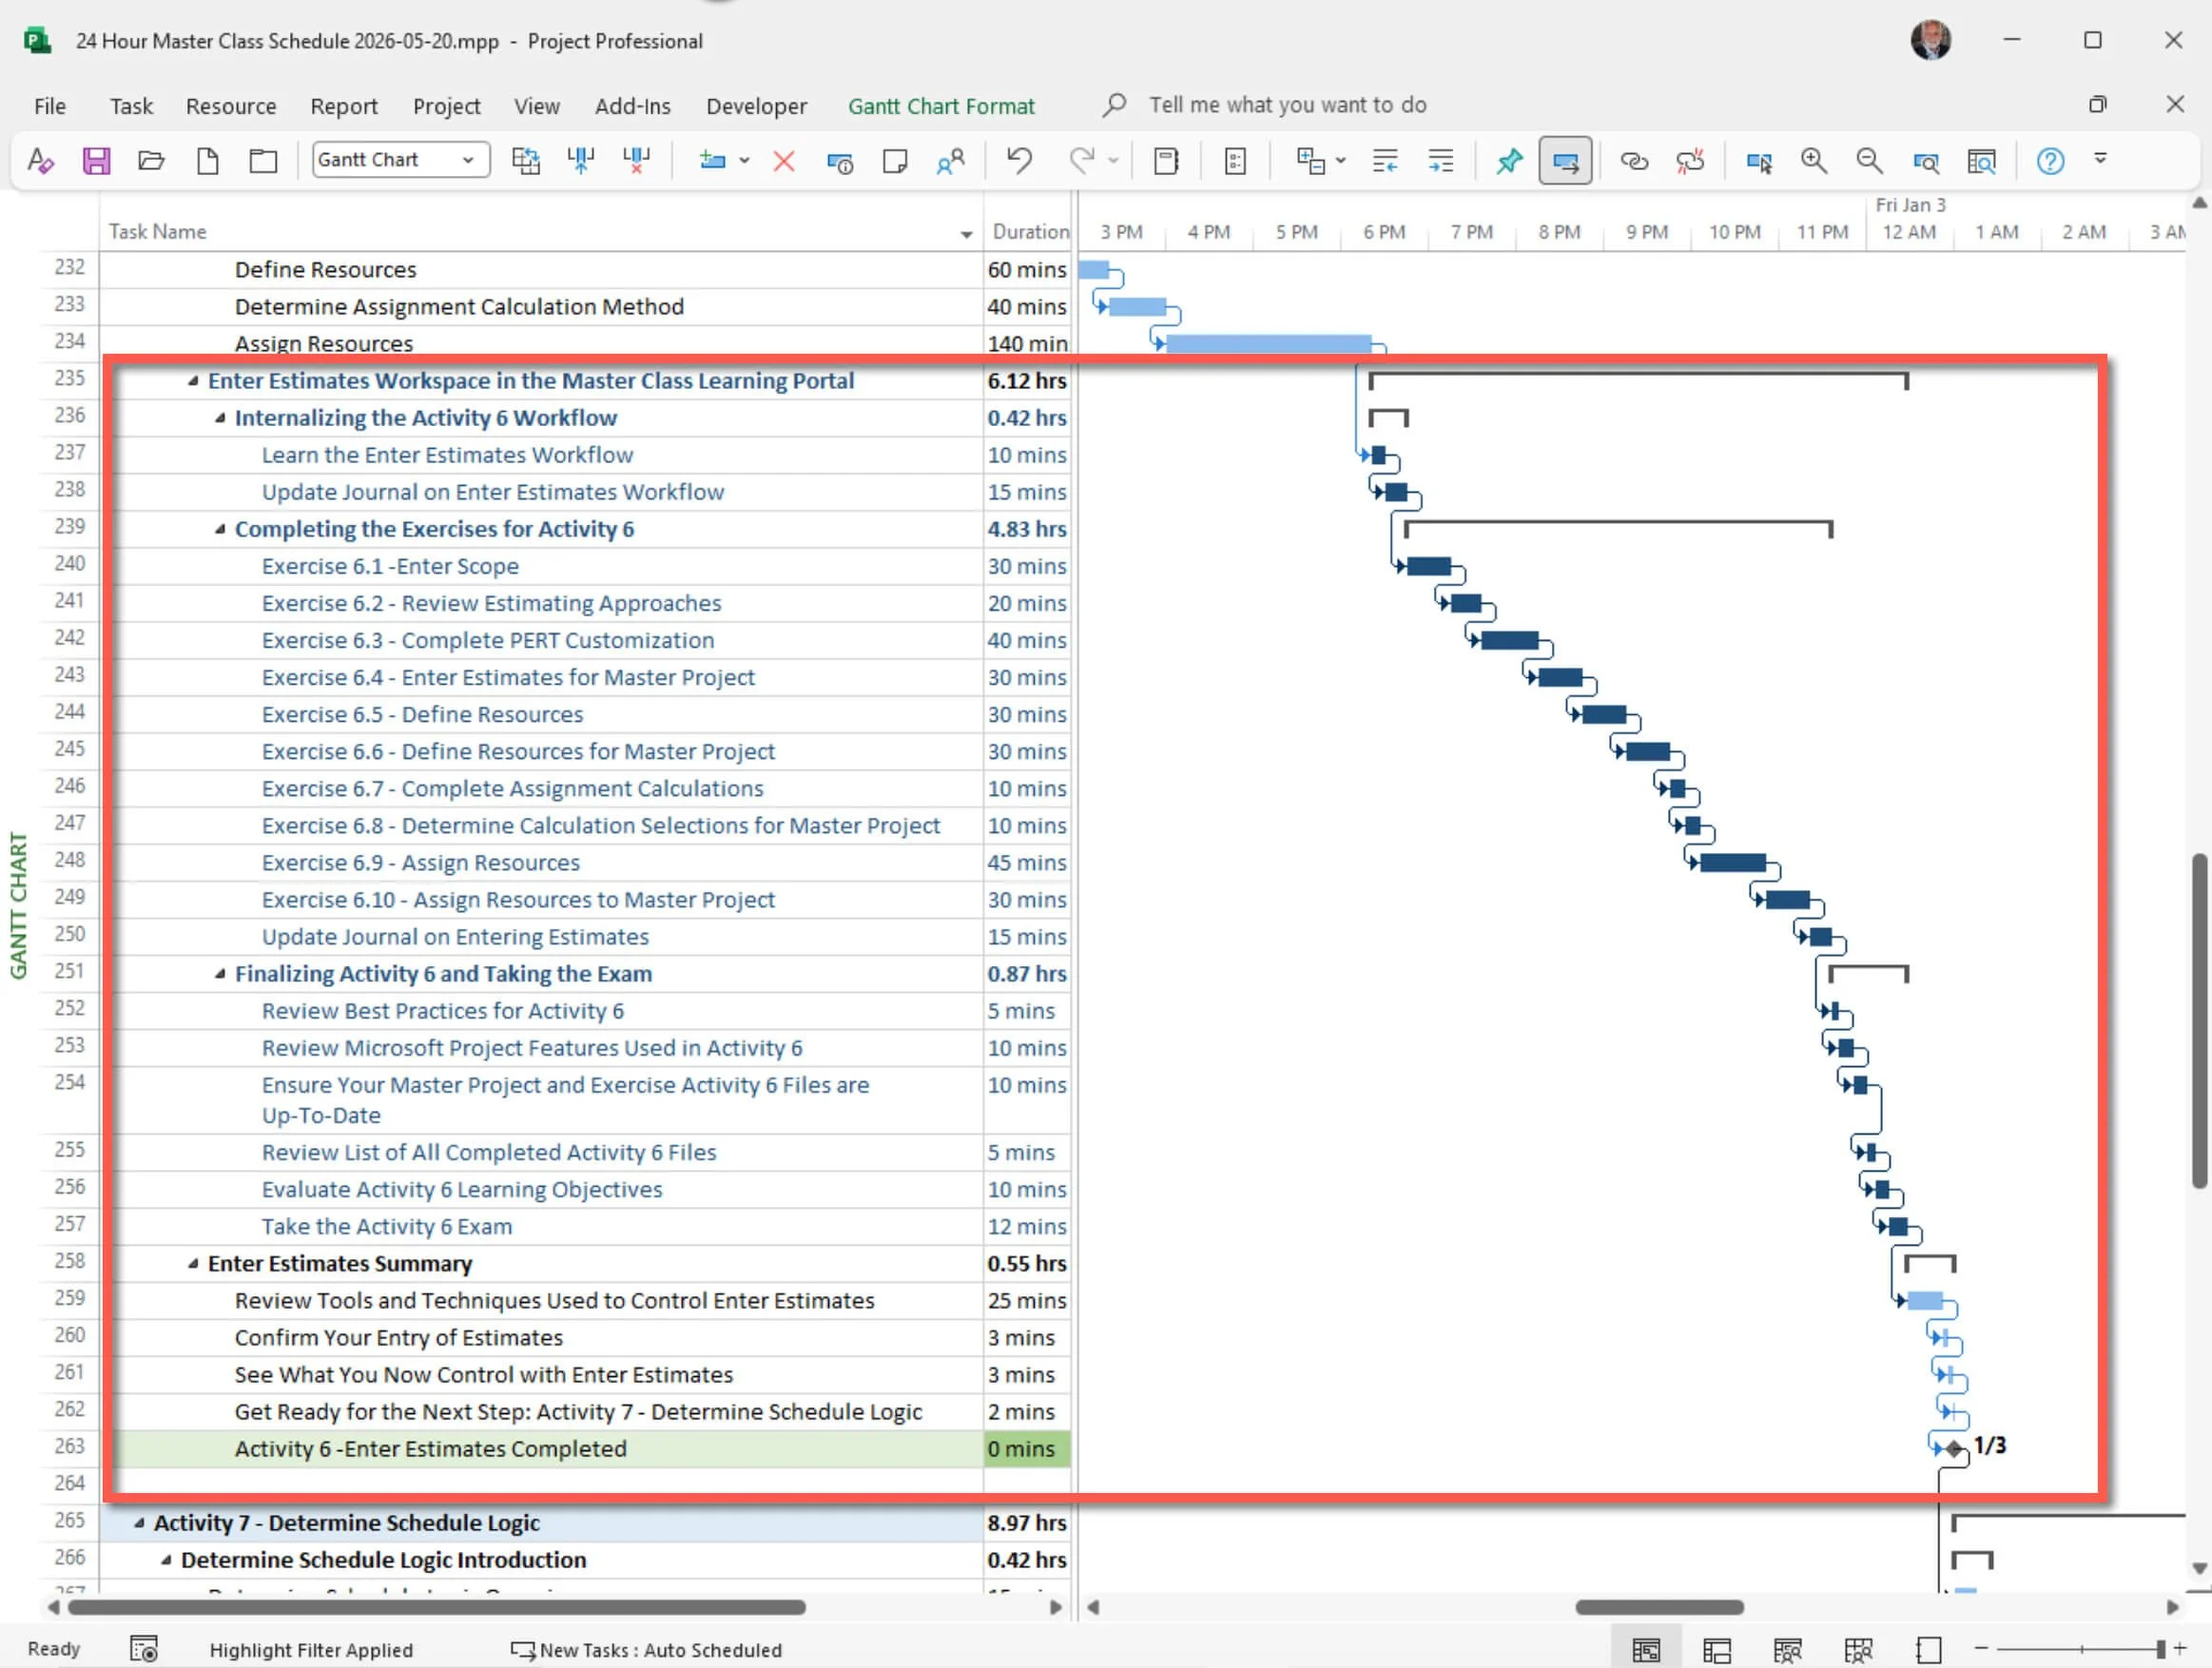
Figure 6.2 Enter Estimates Workspace Schedule. This figure displays the complete Activity 6 Workspace schedule, including the workflow, exercises, case examples, and estimated completion times for each section. Use this schedule to plan your study time, track your progress, and complete each estimating exercise in the recommended sequence.
The project estimating and scheduling methods and best practices shared in this Activity Workspace come from over 35 years of experience teaching Microsoft Project, training consultants, deploying Project Server, and helping professionals around the world.
Workflow
Internalizing the Activity 6 Workflow (25 minutes)
Overview and What You Will Learn
Before you begin the exercises in this Activity Workspace, take a moment to review the Activity 6 Workflow. It shows that estimating in Microsoft Project is more than just entering numbers. You are actually building a project model that links scope, duration, work, resources, and cost.
In this Activity, you will create the estimates that turn your Work Breakdown Structure into a working project plan. You will define the details for each Activity, make duration and work estimates, set up resources, and assign them so Microsoft Project can calculate your schedule and costs.
You will also learn how Microsoft Project uses Task Type and Effort Driven settings to calculate assignments. These settings control how changes to resources affect duration, work, and cost, and are key to understanding how the software works. As you go through the exercises, you will see how assignments, resource availability, calendars, and calculation choices affect your schedule.
In this Activity Workspace, you will do exercises to:
Define the scope of Activities using Notes fields.
Create duration estimates using the PERT method.
Set up work, material, and cost resources.
Adjust task calculation settings.
Assign resources and review the calculated results.
These exercises will help you understand not only how to enter estimates, but also why you do so. You will see how experienced project managers use Microsoft Project to make realistic, reliable, and flexible estimates as project needs change.
This Activity also highlights a key idea from the MS Project Master Class: Microsoft Project is more than a place to store project data. It is a professional tool for planning and calculations. When you enter estimates, resources, and assignments correctly, the software can give you reliable information for scheduling, forecasting, and managing your project.
Learn Enter Estimates Workflow (10 minutes)
Enter Scope Details: Define the Requirements for Each Sailing Operation

Before making estimates for a sailing voyage, the captain needs to be clear about what each operation includes. For example, docking at a busy marina, navigating a shallow inlet, sailing overnight offshore, getting through customs, or crossing open water during storm season all require different skills, preparation, equipment, communication, safety measures, and effort.
Experienced captains know that unclear work leads to poor estimates. If the sailing operation is not well-defined, it is hard to know how much time, resources, risk, or effort will be required.
This is similar to entering Scope Details in Microsoft Project. Before you can estimate Activities correctly, you need to clearly define the work, assumptions, and requirements, so you can estimate duration, work, cost, resources, risks, and performance expectations accurately.
Enter Duration and/or Work Estimates: Estimate the Time and Effort Required for the Voyage Operations

After the sailing operations are clearly defined, the captain estimates how much time and effort each one will take. Some activities are based mostly on elapsed time, like a six-hour harbor transit or a two-day offshore crossing. Others depend more on crew effort, such as loading supplies, fixing rigging, performing maintenance, or preparing safety equipment.
The captain also knows that estimates depend on factors such as weather, tides, the vessel's performance, crew experience, and other constraints. A trip that takes one day with good winds might take much longer if conditions are tough.
This matches the step of entering Duration and/or Work Estimates in Microsoft Project. Depending on the Activity, estimates might be based on duration, work effort, or both. Microsoft Project’s Calculation Engine then figures out the other values.
Define Resources: Identify the Crew, Vessel Resources, and Voyage Supplies

Once the captain has estimated the sailing operations, they identify what resources are needed to complete them. These might include crew members, navigation experts, fuel, food, safety gear, docking services, spare parts, communication tools, charts, or special sailing equipment. I haven’t been on a sailing trip without beer. Running out would be dreadful.
Each resource has features that can affect the trip. Crew members have different skills and may not always be available. Supplies can run low. Equipment might need repairs or replacement. Some resources are only available at certain ports or under certain weather conditions.
This is like the step of defining Resources in Microsoft Project. You need to properly identify and organize resources so Microsoft Project can accurately calculate work, costs, availability, assignments, and resource use.
Determine Assignment Calculation Method: Decide How the Sailing Work Will Be Calculated and Distributed

Experienced captains know that adding more crew does not always make the work go faster. Some tasks can be sped up with more sailors, but others are limited by the boat, safety rules, weather, or the nature of the job.
For example, more sailors can help load supplies faster, but adding crew will not always make transit through a narrow harbor quicker or improve navigation in bad weather. The captain needs to know how effort, time, and limits work together in each activity.
This is similar to the step of choosing Assignment Calculation Methods in Microsoft Project. The project manager needs to understand how duration, work, effort-driven scheduling, task types, and resource assignments fit together so that the Calculation Engine produces realistic schedules.
Assign Resources: Assign the Crew and Equipment to the Voyage Operations

After the sailing operations, estimates, and resource needs are clear, the captain assigns crew, equipment, supplies, and support to each voyage activity. The aim is to ensure every operation is conducted safely and efficiently with the right mix of people, tools, and materials.
Bad assignments can cause overloads, delays, safety problems, or conflicts during the trip. Good captains balance workload, skills, availability, and timing when assigning resources throughout the voyage plan.
This matches the step of assigning Resources in Microsoft Project. Resources are assigned to Activities so Microsoft Project can calculate work, costs, schedules, assignments, and resource use throughout the project.

Best Practices
Combine Bottom-Up with Other Estimating Techniques
Combine bottom-up estimating with other methods to get a well-rounded perspective. Bottom-up gives you detailed estimates for each activity, while top-down approaches like analogous or parametric estimating offer a broader view and help validate your numbers. Using both makes your estimates more accurate and credible.
Engage the Project Team in Bottom-Up Estimation
Bottom-up estimating is most effective when the team members who will do the work help create the estimates. Their hands-on experience with the activity, challenges, and effort involved yields more realistic and reliable estimates of time, effort, and costs.
Regularly Review and Revise Estimates
Estimates need to be updated as the project evolves. Review your bottom-up estimates whenever the scope shifts, new risks emerge, or you receive additional information. Updating your estimates regularly helps keep your plan in line with what’s really happening and makes your project model more reliable.

Activity 6: Enter Estimates Workflow Chart
Figure 6.3 Enter Estimates Workflow. This figure presents the complete workflow for Activity 6, showing the sequence of steps used to define scope, calculate estimates, assign resources, and prepare a project for scheduling. Use this workflow to internalize the estimating process before completing the hands-on Microsoft Project exercises.

Download
Click the Download icon above to open the Enter Estimates Workflow.pdf file.

Update Journal on Enter Estimates Workflow - 15 minutes
Thinking about how well you estimate in Microsoft Project is an important step in growing as a project manager.
Journal Question: How do you see estimating duration, work, and cost as a key part of project management? How will you use scope definition, estimating, and resource allocation in Microsoft Project to create a solid and flexible project plan?
Exercises
Complete the Exercises for Enter Estimates (4 hours 50 minutes)
In these Enter Estimates exercises, you will go through five main steps to build a project plan in Microsoft Project.
Enter Scope: First, you will define detailed scope information for each activity in an exercise and then in your Master Project.
Calculate PERT: You will create custom fields to calculate PERT-based duration estimates during an exercise, and then use those estimates in your Master Project.
Define Resources: You will identify the work, material, and cost resources needed to complete the project, both in an exercise and in your Master Project.
Make Calculation Selections: Set Task Type and Effort Driven options for all activities in an exercise, then apply these settings to your Master Project.
Assign Resources: Finally, you will assign resources to all Activities in an exercise and then in your Master Project. This allows the Calculation Engine to determine duration, work, and cost.

Definitions
Bottom-Up Estimating: Bottom-up estimating means estimating each part of the Work Breakdown Structure (WBS) separately for duration, work, and cost. After making these detailed estimates, you add them up to get the total project estimate. Since this method starts at the activity level, it usually gives more accurate and reliable results.
Activity Decomposition: Activity decomposition means breaking the whole project scope into smaller, easier-to-manage parts. In a WBS, this goes down to the activity level, where you can estimate, assign, schedule, and control the work. Decomposition clarifies things, supports accurate estimates, and enables smooth project execution.
Scope: In a WBS, scope refers to all the work needed to complete the project. The WBS organizes this by breaking deliverables into smaller parts, down to the activity level. This way, you can define and manage work, duration, cost, and resource needs for each part. The scope of an activity describes all the work required to complete that activity, and this information is usually entered in the Task Notes field.
Duration: Duration is the total time required to complete an activity. It is shown in units such as minutes, hours, days, weeks, or months, depending on the project calendar. Duration is different from work because it shows how long something takes, not how much effort it needs.
PERT (Program Evaluation and Review Technique): PERT is a method for estimating durations when there is uncertainty. It works by using three inputs to calculate an expected duration:
The expected time (TE), or duration, is calculated by adding the optimistic estimate, four times the most likely estimate, and the pessimistic estimate, then dividing the total by 6.
This weighted average gives a more realistic estimate for activities with uncertain durations.
Work (Effort): Work, or effort, is the total amount of effort needed to finish an activity, usually measured in hours. It shows how much time is planned for the activity and is calculated from resource assignments, units, and duration. Work is a key input for the Calculation Engine.
Cost: Cost is the total expected or actual expense for an activity, resource, or assignment. It is figured out using resource rates, assignments, and any fixed costs. Usually, the Calculation Engine works out the cost, but you can also enter it directly if needed.
Resources: Resources are the people, equipment, materials, and costs needed to complete project work. In Microsoft Project, resources are grouped as:
Work resources (people or equipment that perform work)
Material resources (consumables)
Cost resources (financial costs applied to activities)
Resources are the starting point for figuring out work, duration, and cost.
Fixed Duration: Fixed Duration is a task type in which the activity’s duration remains constant. If you change resource assignments, it will affect the work and cost, but not the activity's duration. This is useful when the time frame cannot change.
Fixed Work: Fixed Work is a task type in which the total effort remains constant. If you add or remove resources, the duration and cost will change, but the total work does not. This is best when you know exactly how much effort is needed.
Fixed Units: Fixed Units is a task type in which the assignment units, or the percentage of a resource’s capacity, remain the same. Any changes to work or duration are based on these fixed units. This is the default task type in Microsoft Project.
Effort Driven: Effort Driven is a setting that controls how work is shared when you add or remove resources. When this is turned on, the total work remains the same but is distributed among the assigned resources, which usually changes the duration.
How Fixed Duration, Fixed Work, Fixed Units, and Effort Driven interact and work depends on how you set up activities, define resources, and make assignments. It’s important to understand these settings in concept, not just memorize them as fixed rules.

The MS Project Master Class Index page provides organized links to Microsoft Project concepts, features, workflows, Activities, exercises, downloads, and supporting learning materials throughout the Learning Portal.
These exercises can also be incorporated into Microsoft Project workshops, classroom instruction, and organizational training programs. Many students complete these estimating exercises under the guidance of a Master Class Coach or Trainer.

Exercise 6.1: Enter Scope (30 minutes)
Timing, work, and cost estimates are summarized at the project level. The WBS defines and organizes the project scope.
At the terminal element, often referred to as an activity in this Master Class or a work package by PMI, Microsoft Project designates it as a detailed task. Each activity will include estimates of time, work, and cost. However, Microsoft Project lacks a feature to capture the scope of a detailed task beyond the task's name and the information in the Notes field.
Figure 6.4 Project Scope. This figure illustrates the relationship among project scope, timing, costs, and the Work Breakdown Structure used to organize project work. Use this diagram to understand how decomposing scope into manageable WBS elements supports more accurate duration, work, resource, and cost estimates.
Download
Click the Download icon above to open the Scope Statement.mpp file.
This project is already set up for entering scope statements in the note field.
This project's window is split between a Gantt Chart view on top and a Task Form on the bottom. The Note field is in the table applied to the Gantt Chart. It can display up to 256 characters, although the notes field will hold thousands of characters and graphics. The indicator field will show a little note icon if a task has notes.
You can always double-click a task. The Task Information dialog box will open, and the Note field will be shown under the Notes tab.
To apply the Notes theme to the Task Form view at the bottom of the split window or other themes for this type of view, select the view and right-click in the grey area to the right. The list of themes or details will open. Alternatively, select the view and then the Format tab on the ribbon.
You can split a window by going to the View tab on the ribbon and checking the Details box in the Split View group. Alternatively, if you can find the little line in the bottom right corner of Microsoft Project, you can click, hold, and drag the bottom view open or closed.
Figure 6.5 Split window in the scroll bar. This figure shows how to enable Microsoft Project's split window so the Gantt Chart and Task Form views can be displayed simultaneously. Use this feature to navigate project activities while entering detailed Notes and other task information without changing views.
Figure 6.6 Notes theme or detail applied to the Task Form view. This figure shows the Task Form configured to display the Notes field for documenting detailed scope information about individual activities. Use this view to record activity descriptions, assumptions, constraints, deliverables, and other planning information directly within Microsoft Project.
With these views open, you can easily navigate your WBS from the top view and add your scope statements to each detail task.
The Notes field is designed for anything you want to add, but we think it is the perfect place for scope statements. It offers basic formatting, and you can copy and paste between fields.
Let’s say Task 3 will be the perfect weekend you have been looking forward to. Rename the task Perfect Weekend. You must spend an entire weekend doing exactly the things you love to do the most.
Then, enter notes and fully define this perfect weekend. Your definition categories could be:
Description
Deliverable
Constraints
Assumptions
Tasks (Activities)
Figure 6.7 Task Notes field used to fully define activities. This figure demonstrates how the Notes field can be used to document complete scope details for individual project activities. Use this field to capture descriptions, deliverables, assumptions, constraints, and supporting information that improves estimate quality and project documentation.
There is no reason to save this project.
Open your Master Project. Enter the scope for each of your activities and milestones. The scope is already defined if you have Project SMART-A Objectives as milestones.
If you enter information in the Notes fields for several activities, it is easiest to split your view, apply the Task Form view as the bottom view, and use the Notes detail to see the Notes field.
The Master Project is the central Microsoft Project schedule developed throughout the MS Project Master Class and Project MAP framework. Each Activity Workspace expands and refines the Master Project as new planning elements, estimates, scheduling logic, resources, costs, controls, and reporting features are introduced. If needed, review the Master Project Explanation page for additional information about how the Master Project is structured and used throughout the Learning Portal.
Figure 6.8 Notes detail in a Task Form view. This figure shows the Notes detail applied to the Task Form in a split Microsoft Project window, with the selected activity displayed above and its scope information entered below. Use this view to move through the Work Breakdown Structure while documenting scope statements for individual activities and milestones.
When Finished with Exercise 6.1
All activities and milestones in your Master Project should have a defined scope.
(3)
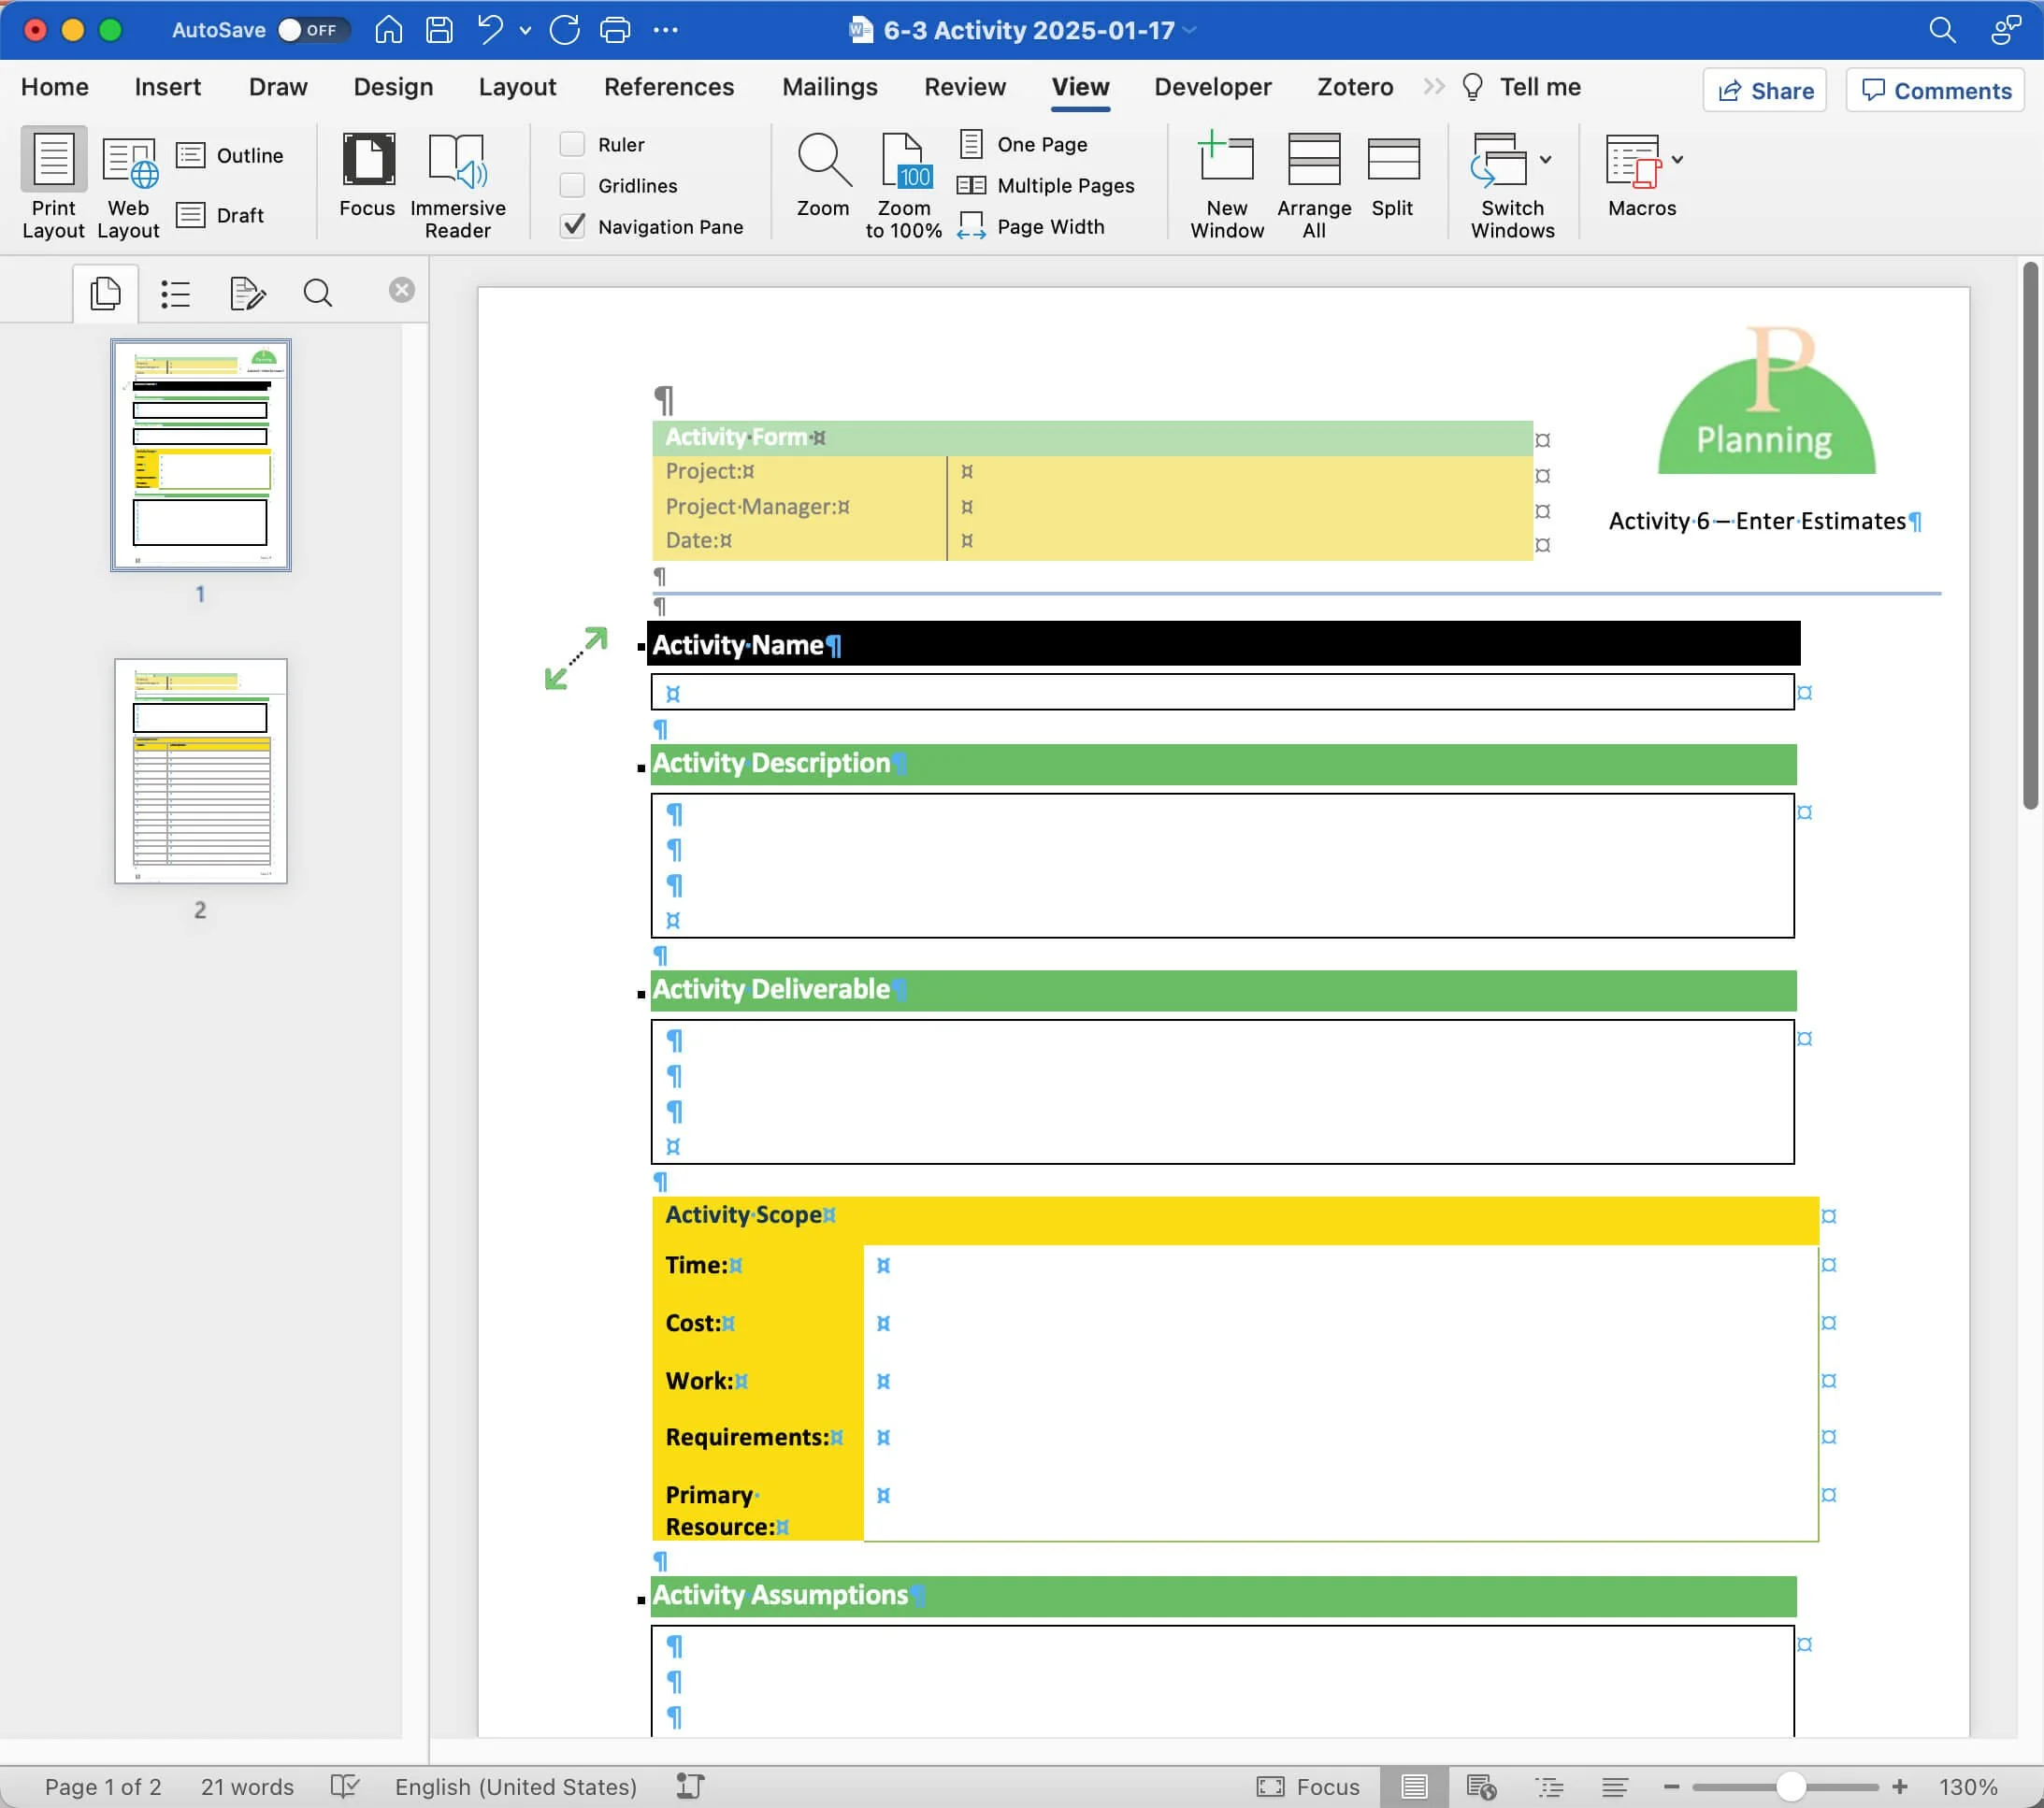
Figure 6.9 Activity.docx form. This figure shows the downloadable Activity.docx template used to document detailed activity information when additional decomposition is needed beyond the Microsoft Project Notes field. Use this form to capture supporting planning details that improve estimating accuracy and provide additional project documentation.
If you do not break down the scope of an activity in the Notes field, consider using a document like the Activity.docx. Click the image above to download this form.

Case Example
WBS Decomposition: Two examples of setting limits.


I once reviewed a project plan at MacDill Air Force Base where a single activity had a budget of several million dollars. The commander pointed out that the project was broken down to a level more suited for a billion-dollar program. For this activity, the scope was fully defined, with detailed notes and ample documentation. In other words, the activity (work package) was thoroughly broken down, just not within the Microsoft Project WBS. This shows that decomposition is not limited to the WBS structure. The WBS should be detailed enough to support estimating, assignment, and control, but an extra breakdown can and often should be included in supporting documents. In this case, breaking down the WBS further would have created thousands of activities, slowed performance, and made the schedule harder to manage.
At CP Ships, the IT team used a similar approach but made it more formal. Management set a rule that activities in the Microsoft Project WBS must be no shorter than 5 days or 40 hours of work. They believed that breaking things down too much in the WBS made Microsoft Project plans too detailed to manage across many projects. Instead, they used the appropriate level of WBS detail for planning and control and kept additional details outside the WBS when needed.
These examples show an important point: WBS decomposition should match the level of control you need, not just aim to capture every detail in the schedule. The WBS provides the structure for estimating and managing the project, while additional details can be kept in other documents to avoid a complex schedule.
Exercise 6.2: Review Estimating Approaches (20 minutes)
We will examine resource assignment calculations more in-depth, but generally, two approaches exist for entering estimates and completing estimates by assigning resources. The first approach is to enter work estimates, decide how we want activities to be calculated, and then allocate resources. The second approach is to enter duration estimates, determine how we want activities to be calculated, and then assign resources.
In this exercise, you will review those two approaches.
Download
Click the Download icon above and then open the Estimating Approaches.mpp and Chart 3 - Estimating Approaches.pdf files.
Start by reviewing the Chart 3 - Estimating Approaches Chart.pdf file. While Microsoft Project offers five ways to calculate activity estimates once resource assignments are made, most people use just two main methods. These two are called estimating approaches because they align with how project managers typically estimate and assign work.
In practice, this Master Class suggests starting with one of two options:
If you enter a Duration estimate, Microsoft Project will calculate Work and Cost once you assign resources.
If you enter a Work estimate, Microsoft Project will calculate the Duration and Cost after you assign resources.
The 6 - 2 Estimating Approaches.mpp file contains three resources with different cost (standard) rates.
Ted at $150 an hour
Ben at $175 an hour
Susan at $200 an hour
Figure 6.10 Resource standard rates. This figure shows the Standard Rate field in Microsoft Project's Resource Sheet, where hourly or unit costs are assigned to project resources. Use this field to establish resource cost rates, so Microsoft Project can automatically calculate labor costs and overall project estimates.
Approach 1: Enter a Duration Estimate. This is often called Fixed Duration estimating.
The estimated duration of Task 1 is 10 days. In the Resource Names column, check Ben and Ted to assign them to the activity.
The total assignment time is 10 days, or 160 hours if they work full-time on the activity, and the work cost is $26,000.
Figure 6.11 Fixing the duration estimate. This figure shows a 10-day task in Microsoft Project with Ben and Ted assigned, producing 160 hours of work and a calculated cost of $26,000 while the duration remains fixed. Use this example to understand how the Calculation Engine determines work and cost from a fixed duration estimate and assigned resources.
Approach 2: Enter a Work Estimate. This is often called Effort-Driven estimating.
All detail tasks have a 1-day duration by default. If you are going to do effort driven estimating, just leave the 1-day duration. You could also enter a duration estimate like the example, but the work estimate is fixed. An estimate of 80 hours was entered.
Assign Ben and Susan to the activity.
The duration stays at 5 days for $15,000.
Assign Ted to the activity. The duration goes to 3.33 days at $14,000.
Remove Ben from the activity. The duration goes back to 5 days, and the cost remains unchanged.
Figure 6.12 Fixing the work estimate. This figure demonstrates how Microsoft Project maintains a fixed work estimate while recalculating task duration as resource assignments change. Use this example to understand how the Calculation Engine adjusts schedules when work remains constant but resource availability changes.
We will go into much more detail on how to refine these assignments and work with the calculation settings, but with a broad brush stroke, these are the two basic approaches to working with our estimates in Microsoft Project.
Let's look at two more things before moving to a new step or section. First, do you remember where Microsoft Project determines how to convert a duration so that if you say an activity is two weeks and you want to see the duration in days, it knows how to make the correct conversion?
Go to the Project tab and select the Change Working Time command. The conversion is a function of the interaction between the project calendar's definition and schedule settings in Options. Click the Options… button.
Remember, as a general rule that we covered earlier in the MS Project Master Class Book on the Calculation Engine, the calendar definition should match the selections:
Default start time
Default finish time
Hours per day
Hours per week
Days per month
In Options, in this same Schedule category, find the Duration is entered in: and Work is entered in:
These selections perform two distinct functions: first, they are the default setting for entering duration and work, and second, they determine how data is displayed for duration and work.
Let’s play with these a bit. Do the following:
Let’s say you want the default task duration to be in weeks. Before you make this change, look at your tasks. The durations are all in days. On the detail level, you can use days, but you can also use minutes, hours, weeks, and months. On the summary level, the units used will be the default setting.
Change the Duration is entered in: to Weeks. Click Ok and then Ok again.
Notice a couple of things: first, the duration conversion on the summary level turned to weeks, and the detail task that Microsoft Project calculated the duration turned to wk (weeks).
Create Task 3, make it auto scheduled, and then type 3 in the Duration field. The default unit is now weeks, not days.
This feature works a little bit differently with Work. Change Work is entered in: and select Days. Note the difference in the detail and summary level. For Task 3, enter 20 in the work field. 20 is now 20 days by default, not 20 hours.
Best Practice
You can enter estimates for duration, work, and cost without assigning resources. If you prefer to skip calculations, you can link resource names to activities with a custom field. However, if you want to manage resources, it’s important to understand how resource assignments work.
When you assign resources, Microsoft Project’s Calculation Engine links duration, work, and cost. The remaining estimates are automatically calculated, so you don’t have to update them manually. This also makes it easier to manage workloads and find overallocations.
It’s a good idea to use all the features in the software rather than skipping them.
When Finished with Exercise 6.2
The Estimating Approaches.mpp should have the same duration and work column values, as shown in the figure below. The cost data should also be the same.
(3)
Figure 6.13 Duration and Work default values selected in Project Options. This figure shows Microsoft Project displaying Duration values in weeks and Work values in days after changing the default units in the Project Options Schedule settings. Use this example to verify that your default Duration and Work entry units are configured correctly so the Calculation Engine displays and interprets estimates consistently throughout the project.
Exercise 6.3: Complete PERT Customization (40 minutes)
Breaking down the scope of a project and then estimating on the detail level is a bottom-up estimating technique. Another common technique is to account for uncertainty with your detailed estimating. In general, this is referred to as a three-point estimating or PERT.
Three-point estimating is a technique used in project management to estimate the duration or cost of a task or project. It's beneficial in situations where uncertainty or risk is high. This method involves considering three estimates to gain a more realistic view of the future. Here's a breakdown of the three key estimates used:
Optimistic Estimate (O): This is the best-case scenario. It assumes everything goes as well as possible, without any delays or unexpected costs. It's the minimum amount of time or money that it could take to complete the task or project.
Pessimistic Estimate (P): This is the worst-case scenario. It considers all possible challenges and obstacles, leading to the most extended duration or highest cost. This estimate is typically much higher than the optimistic estimate, reflecting the risk of significant delays or overruns.
Most Likely Estimate (M): This is the most realistic estimate based on the most probable events. It considers the usual, expected challenges and hiccups that might happen during the project's lifespan.
Once these three estimates are established, they can calculate an average or weighted average, giving a more balanced and realistic estimate. A popular way to combine these estimates is through the PERT (Program Evaluation and Review Technique) formula:
Expected Time (E)=(O+4M+P)/6
This formula assigns more weight to the most likely estimate, considering it four times, and treats the optimistic and pessimistic forecasts equally but with less weight. This weighted average helps balance the potential for over-optimism or over-pessimism.
Three-point estimating improves risk management and decision-making by providing a range of potential outcomes rather than a single, potentially inaccurate figure. It's widely used in project management methodologies and is particularly valuable in complex or novel projects where uncertainty is a significant factor.
Several industries use three-point estimating because simulations can be run with these estimates to predict an expected outcome. Three-point estimating can be used with duration, cost, and work estimates, but it is most common in project management with duration.
In the following exercise, you will work with custom fields to make these calculations for duration.
Download
Click the Download icon above to open the PERT.mpp file.
This file has a macro, so enable macros if asked when opening the file. If you have macros disabled, select Disable all macros with notification, close the project, reopen, and enable macros.
Regarding security issues, disabling all macros with notifications is the best option. You can select that in Options / Trust Center / Trust Center Settings.
Figure 6.14 Disable all macros with notification. This figure shows the Microsoft Project Trust Center Macro Settings dialog with Disable all macros with notification selected. Use this setting to improve security while allowing trusted project files containing macros, such as the PERT customization exercise, to be enabled when needed.
In this step, we will customize a few basic fields so that you can quickly use the PERT calculation for any activity when there is some uncertainty related to the duration of an activity. While we do this, we are going to:
Create a view.
Create a table that can be placed in a task-based view that uses tables like the Gantt Chart view.
Take a peek at the Visual Basic Editor.
Attach some macros and place them as commands on the Quick Access Toolbar.
Customize six fields.
Manage all of the customizations in the Organizer.
The primary fields we are going to customize are for the PERT formula. One field will be a variance field, which we will use later in this MS Project Master Class. These are the custom fields we are going to use. They are duration fields, and there are 10 custom duration fields available:
Duration5
Duration6
Duration7
Duration8
Duration9
We will want a task table to use the PERT calculation, so we will create a new view and a new table to apply to that view.
A table in Microsoft Project is a collection of fields or columns. Since a table is applied to a view, we will create it first.
Follow these steps to create a new Table:
On the ribbon, select the View tab / Tables command / More Tables….
Select the Entry table and select Copy.
Name this Table PERT Table. Spell and space the name correctly, as we will use the view in a macro in the file you just downloaded.
In the fields below, use the Table editing buttons (Cut, Copy, Paste, Insert and Delete) to create a table that has these fields displayed:
ID
Indicators
Task Mode
Name
Duration
Duration5
Duration6
Duration7
Duration8
Duration9
Click OK to save this new view. There is no need to apply the table at this time.
Your custom table should look like the figure below.
Figure 6.15 Creating a Table that can be used in a task-based view that uses tables or sheets. This figure shows the custom PERT Table containing the standard task fields together with custom Duration fields used for three-point estimating. Use this table to display the PERT estimating fields required to calculate optimistic, most likely, pessimistic, and calculated duration values within a task-based view.
Follow these steps to create a new Gantt Chart type of view that you will apply the PERT Table.
On the ribbon, go to the Task tab, select the lower part of the Gantt Chart command, and then select More Views.
Select the New button.
This is going to be a Single view. A Combination view is a split window with views on both the top and bottom.
Name the new view PERT View. Spell and space the name correctly because we will use the view in a macro.
The first decision is what type of view or screen to use for this new view. We will use the Gantt Chart screen, but look at the list. Microsoft Project has 17 different types of views, and there is no practical limit to the number of views based on these 17 types.
For this new view, select the PERT Table, the No Group Group, and the All Tasks filter and Show in menu.
When finished, Click OK to save this new view, then Apply the view.
Figure 6.16 Creating a new view. This figure shows the New View dialog configured to create a PERT View using the Gantt Chart screen type, the PERT Table, the No Group grouping, and the All Tasks filter. Use this view to display the custom PERT estimating table in a Gantt Chart format for entering and reviewing three-point duration estimates.
Tip
When creating a new view that might include a new table, group, and filter, use the same naming convention so that you remember what element goes with what element.
Note
Many people get confused about the All Tasks and All Resources filters in resource-based views, so let’s clear that up.
In Microsoft Project, filters are used in every view except the Timeline view, which does not use filters. When you are working in a view and want to apply a filter or show everything again, you will not see the All Tasks or All Resources filters. Instead, Microsoft Project calls these filters [No Filter].
However, if you create or change a view and edit a filter, you might still see the older names. In that case, All Tasks or All Resources may appear as options. These work the same as [No Filter]; they show all tasks or all resources with no limits.
This inconsistency is simply a naming difference in the software, not a functional difference.
Using the Table Definition dialog box, you created the PERT Table in this new view. You can edit this table in that dialog box or when it is applied to a view. For instance, you can rearrange or add/hide columns with the table applied. Either way, you are permanently changing the table in either location.
The field customization we will do is pretty simple, so we will run a macro that does most of the work to save some time. Then, you will manually create one custom field for practice.
In this next section, you will also work with macros and run those macros from a custom command on the Quick Access Toolbar.
If you record a macro or write code, that information is available in the Visual Basic for Applications Editor. To access the editor, press Alt+F11 on your keyboard. Other ways to open the VBA Editor are to edit the ribbon, display the Developer tab, and then click on the Visual Basic command, or select the View tab, select the bottom part of the Macros command at the end of the ribbon, and select Visual Basic.
In the VBA editor, click View and select Project Explorer to view your list of projects. At least two projects will show in the explorer: the Global.MPT and the PERT.mpp, unless you have other *.mpp files open. Under the PERT.mpp, expand the macros or Modules folder. There are two macros there.
Figure 6.17 VBA Editor, showing macro that will change the name of custom fields and add a formula to a custom field. This figure shows the Microsoft Visual Basic for Applications (VBA) Editor displaying a macro that automatically renames custom Duration fields and assigns the PERT calculation formula used throughout this exercise. Use this macro to automate repetitive customization tasks, ensure consistent field names and formulas, and reduce manual setup when preparing Microsoft Project for PERT estimating.
Tip
When you open the VBA Editor, look for the Save button on the toolbar. You can use it to save your work whenever you need to, just like in other Microsoft programs.
Previously, you saw that changes to the Global.MPT file are usually saved when you close Microsoft Project. In the VBA Editor, you have a quicker way. In the Project pane, find Global.MPT, select it, and click Save to keep your changes right away without closing the program.
Next, double-click on the Apply_PERT_View macro. This macro will apply the new table and view you just created regardless of what view you currently have applied. That is why you were asked to name them correctly. If you named them differently, you can edit the names or change the code in the macro. Or, in the Organizer, you can edit the name of the table and/or View.
These two macros are the type of macros you are likely to run routinely, such as before your weekly reports are due. One macro may make the appropriate checks or computations, and the other runs the correct reports. Completing this weekly routine only requires clicking a couple of commands, so recording or writing the macros is almost always worth the time.
Close the VBA Editor.
Figure 6.18 Macro in VBA that applies a view. This figure shows the Microsoft Visual Basic for Applications (VBA) Editor displaying a macro that automatically applies the custom PERT View created during the exercise. Use this macro to automate switching to the correct custom view, reduce repetitive setup tasks, and ensure a consistent PERT estimating environment whenever the project is opened or reviewed.
Next, we will attach these macros to the Quick Access Toolbar. Macros can be attached to the toolbar, to any “custom” group under each of the ribbon tabs, or to a new custom tab. Follow these steps to attach the macros.
First, use the Organizer to add the two macros and the view and table you created to the Global.mpt. In addition, to make things less confusing in the next step, delete the macros from the PERT.mpp project in the Organizer once added to the Global.mpt.
Next, we will add these to macros to the Quick Access Toolbar as commands.
Open Options and select Quick Access Toolbar.
In the Choose commands from the drop-down menu, select Macros.
Find and then select the two macros we just looked at. Add them to the toolbar, moving them to the very top of the toolbar.
ApplyPERT_View
PERT
Select the PERT macro and click the Modify… button. Name this macro Run PERT Macro.
Select the ApplyPERT_View macro and click the Modify… button. Name this macro Apply PERT View, and select the calculator icon to represent this command.
Figure 6.19 Adding a macro to the toolbar. This figure shows the Microsoft Project Customize Quick Access Toolbar dialog, where the ApplyPERT_View and PERT macros are added to the Quick Access Toolbar and assigned custom names and icons. Use this configuration to make your custom PERT macros immediately available, allowing you to apply the PERT View and run the PERT calculation with a single click.
Click OK to save your edits to the toolbar.
Then, follow these steps to calculate PERT and enter the calculation into the duration field.
First: On the toolbar, click the Apply PERT View icon to apply the PERT view and click on the Run PERT Macro icon. If you have done everything correctly, your custom duration columns will have custom names, and the Expected column will contain the formula.
([Duration2]+(4*[Duration3])+[Duration4])/6
Second: For Task 1, enter these estimates to test the Expected Duration formula; enter these values:
Optimistic Duration = 3 days
Most Likely Duration = 6 days
Pessimistic Duration = 10 days
The Expected Duration should be calculated at 6.17 days.
Third: Enter that expected duration into the Duration field for Task 1.
The last thing to do is move the custom fields to the Global.MPT file so you can use them with any project you have open. Once you have done that, you can remove the Run PERT Macro from the toolbar; you will no longer need it. You can also delete that macro from the Global.MPT file.
Save the project.
Figure 6.20 Custom fields for PERT calculation. This figure shows the Custom Fields dialog box used to create and manage custom duration fields for PERT estimating in Microsoft Project. Use this dialog to rename custom fields, assign formulas, and build reusable PERT calculations that support more accurate duration estimates and risk analysis.
Try the PERT calculation in a different project. Open your Master Project. Add Task 1, make it Auto Scheduled, and enter these duration estimates.
Optimistic = 10 days
Most Likely = 12 days
Pessimistic = 20 days
If everything works correctly, you should have a calculated Expected Duration of 13 days. If this were an actual activity for which you used the PERT formula, you would enter 13 days in the Duration field.
Let’s examine the Expected Duration field closely. Select the column header, right-click, and select Custom Fields.
Let’s review a couple of things about this dialog box.
First, notice there are custom Task, Resource, and Project fields (if you are working in the enterprise). Each category has several fields, such as cost, date, duration, finish, etc.
You can Rename a custom field or Delete the customization for one of these fields. You can not delete the actual field or create a new type of field for a category. Some fields, such as the Duration 1-10 fields, are available for customization in Microsoft Project. Using four of these custom duration fields means you only have six available for customization. You can also Import a custom field from another project into a custom field in the active project.
The contents of the custom field can have attributes like selections from a Lookup… table that you create. For instance, you might have liked to specify any of the 120 store locations where the work could be performed for each activity. Those 120 locations would appear in a drop-down list to choose from.
In the case of our Expected Duration custom field, the macro added a Formula. This is why the radio button is selected for Formula. To view or edit the formula, select the Formula… button.
You can write a formula for a custom field. Otherwise, the Field and Function buttons will help you search for the fields you need and add the functions you want.
Figure 6.21 Custom field and formula. This figure shows a custom duration field configured with a formula that automatically calculates PERT values in Microsoft Project. Use this formula to automate expected duration and variance calculations, reducing manual effort while ensuring consistent estimating throughout the project.
As mentioned in the MS Project Master Class Book, PERT estimates are also an important input for risk analysis. Uncertainty increases risk, and risk analysis involves mitigating that risk by determining the cause. The difference between Optimistic and Pessimistic can be valuable if you have the following PERT estimates.
Optimistic Duration = 10 days
Most Likely Duration = 12 days
Pessimistic Duration = 20 days
The Optimistic estimate assumes that all risk has been mitigated. The pessimistic estimate assumes that everything that could go wrong will go wrong.
None of us have the time or money to address every perceived risk, but when there is a large gap between Optimistic and Pessimistic estimates, we should mitigate the risk.
Suppose you want Microsoft Project to flag you when the gap is over a certain amount of time. To do this, follow these steps:
Rename the Duration9 field to PERT Variance.
Using the Formula button, Add the simple formula, Pessimistic minus Optimistic, to the field.
Next, flag any activity with a difference greater than five days. To do that, select the Graphical Indicators button and add the selections to the figure below.
Before you save and close this project, move this last custom field to the Global.MPT file.
Last, open the VBA Editor and save the Global.MPT project.
Figure 6.22 Graphical indicator for a formula in a custom field. This figure shows the Graphical Indicators dialog box used to display visual indicators based on values returned from a custom formula. Use this feature to highlight activities that exceed defined thresholds, making estimating issues and potential risks easier to identify during project reviews.
When Finished with Exercise 6.3
Apply the PERT View to your Master Project. As shown in the figure above, it should have custom fields (Optimistic Duration, Most Likely Duration, Pessimistic Duration, and PERT Variance) for calculating PERT. The calculations should work as expected.
(3)
Exercise 6.4: Enter Estimates for Master Project (30 minutes)
By now, you should have a good idea of the best estimating approach for your Master Project.
Enter duration and/or work estimates for all the detailed tasks in your Master Project. Consider entering PERT estimates and the calculated duration in the duration field if you enter duration estimates.
When Finished with Exercise 6.4
Your Master Project should have duration or work estimates for all activities or detail tasks.
Exercise 6.5: Define Resources (30 minutes)
This exercise focuses on defining resources. Microsoft Project defines three types of resources, each with unique characteristics. Please take a minute to review these types and their characteristics, and then define resources as directed.
There are three types of resources in Microsoft Project.
Work Type
A base calendar allows for exceptions, such as shifts, workweeks, days off, family leave, and vacation.
Work is calculated when assigned to an activity.
The cost (standard) rate is calculated in minutes, hours, days, weeks, months, or annually.
Cost tables are available.
Workloads are shown across the timeline.
Most people are Work type resources. However, if you have to schedule any resource, like a lab, meeting room, or equipment, around availability, they will have to be a Work resource.
Figure 6.23 Examples of Work type resources with a rate, base calendar, availability and description. This figure shows Work resources defined with standard rates, calendars, availability, and descriptive information in the Resource Sheet. Use this view to define the people and equipment that perform project work so the Calculation Engine can accurately calculate work, costs, and schedules.
Material Type
There is no issue with availability.
No work is calculated.
The cost (standard) rate is per unit.
Cost tables are available.
The resource is charged per unit.
Figure 6.24 Examples of Material type resources with the standard label and a cost per unit. This figure shows Material resources configured with unit labels and cost-per-unit values in the Resource Sheet. Use this resource type to estimate consumable materials that do not perform work but contribute material costs to the project.
Cost Type
There is no issue of availability.
No work is calculated.
No Cost (standard) rate, cost entered when the resource is assigned.
These resources do not have a cost rate. Rather, the cost of the resource is assigned when the assignment is made to an activity.
Figure 6.25 Examples of Cost type resources. This figure shows Cost resources that allow fixed expenses to be assigned directly to activities without affecting work or scheduling calculations. Use this resource type to track expenses such as travel, permits, training, or subcontractor fees while keeping project costs organized and accurate.
Case Example
Variable Resource: A Missing Resource Type in Microsoft Project
Microsoft Project does not have a Variable resource type, even though it would be useful. This missing feature is especially noticeable in Activity 6: Enter Estimates, where you define resources and the Calculation Engine determines duration, work, and cost.

In real projects, some resources need to be scheduled and costed, but they should not create work hours. A Variable resource would have these features:
A base calendar for defining availability and exceptions.
No work (effort) calculated.
Cost calculated using standard rates (hourly, daily, weekly, monthly, or annual).
Cost rate tables are available.
Availability is visible across the timeline.
Microsoft Project does not offer this resource type directly. Instead, users must use Work, Material, or Cost resources to fill the gap, but each option has its own limits.
At Abbott Laboratories, one team used Microsoft Project to schedule lab usage. The software was good for scheduling, but they did not want work hours calculated because it would make their project data less accurate. They needed a scheduling resource that could be added to the timeline and costed, but without adding work to the model. Older project management tools, including some I used at Symantec in the late 1980s, supported this type of resource more directly.
We have also used Microsoft Project to schedule training and consulting work. This method is not typical, but it works very well. Microsoft Project is a strong tool for time-based planning, but it is not used enough for scheduling events like training programs, street fairs, music festivals, and large coordination projects. For example, one client, a large paper company, used it to schedule engineering work at three plants being built in three different countries.
This idea matters even more in industries where time affects revenue. In pharmaceutical companies like Amgen, Eli Lilly, Bayer, and Johnson & Johnson, getting products to market quickly is a main reason for using project management. Patent timelines start early, often during discovery or the first clinical trials, and last through the long FDA approval process. Every delay shortens the time a product can be sold and lowers potential revenue.
When I taught at Abbott, I once saw several project management classes happening at the same hotel at the same time. This showed how important careful planning and scheduling had become for the company.
This example highlights two key points in Enter Estimates:
First, Microsoft Project is not a complete estimating tool.
Second, not all resources work the same way, and not all of them should be used in calculations the same way.
Knowing how Microsoft Project defines and uses resources, and where it has limits, helps you make better choices when entering estimates. Sometimes, you will need to work around the software’s limits to make sure your model matches real life, not just the Calculation Engine’s default settings.
Download
Click the Download icon above to open the Resource Definition.mpp file.
In this exercise, suppose your company provides training and development and has sold a training workshop to a customer that must be developed from scratch, and you are the project manager. The job is time and materials, so the rates are the ones you will bill the customer. At the top of the next column, define the list of resources.
As mentioned in the Master Class Book, the best way to learn this functionality is to repeat the cycle 10 times or as many times as it takes to get it. In general, our experience is that it takes most people about 4 attempts.
The steps to cycle through are:
#1 Define Resources.
#2 Determine Assignment Calculation. This is Task Type (Fixed Duration, Fixed Units, and Fixed Work) crossed by Effort Driven (Yes or No).
#3 Assign Resources.
Observe Calculations.
Repeat this process 10 times or until the concept is clear.
Figure 6.26 Define, Determine Calculation, Assign Resource Cycle. This workflow diagram illustrates the repetitive process of defining resources, determining assignment calculations, assigning resources, observing the results, and repeating the cycle until the Microsoft Project Calculation Engine becomes intuitive. Use this workflow to internalize the estimating process so you can accurately model duration, work, and cost by repeatedly testing how different resource definitions and calculation selections affect project schedules.
In the Resource Definition.mpp file, define these additional resources:
Project Manager, Work type, Standard Calendar, set Max Units to 100%, and standard rate at $1,000 per day. Enter the Company in the Group field.
Customer Contact is a little more challenging to define because you do not incur any cost. They have told you they are not available for more than 8 hours weekly, so you want to track their time.
Your company has also taken the initiative to develop a parametric database so that you can give customers a realistic estimate of how much time they will be expected to spend on future projects like this one.
In addition, this resource is on vacation for August 2021. Beginning September 1, 2021, when they hope to wrap up the project, they are available 20 hours a week.
The customer would be a Work type, Standard Calendar, with a Max Unit rate of 20% to start and a standard rate of $0. Enter the Customer in the Group field.
The figure below shows the definition of availability for the Customer Contact resource.
Figure 6.27 Adjusting Resource Available and exceptions to the base calendar. This figure shows the Resource Information dialog box where resource availability percentages and calendar exceptions are defined to reflect changing availability over time. Use this dialog to create realistic resource calendars by defining availability periods, vacations, and exceptions so the Microsoft Project Calculation Engine schedules work according to actual resource capacity rather than ideal assumptions.
If you defined this correctly, you can go to the Resource Usage view, scroll out to August 2021, and zoom in on the monthly timescale; you will see that the Customer Contact resource is available at 20%. They are unavailable for August, and then availability goes up to 50% in September.
Figure 6.28 Resource Usage view showing availability contour. This figure displays the Resource Usage view with time-phased availability, showing how a resource's Max Units change over time as calendar exceptions and availability periods are applied. Use this view to verify that changing resource availability is correctly reflected before assigning work, helping ensure the Calculation Engine produces realistic schedules and workloads.
Go back to the Resource Sheet view and define these additional resources.
Group Facilitator, Work type, Standard Calendar, set Max Units to 100%, and the Standard Rate at $1,200 per day, Enter Contractor in the Group field.
Video Studio Rental, Material type, and the rate is $900 per day, which would be $900 per unit. Weekends are $700 per day; enter $900 in Table A and $700 in Table B.
Each time you book the studio, there is a setup fee, regardless of the number of days. Enter $300 in the Cost/Use field.
Enter Studio as the Material Label.
Enter Non-work in the Group field.
Edit Suite, Material type, $300 per day, would be $300 per unit.
The price is going up to $400 in the fourth quarter of 2021.
Enter VEdit as a Material Label.
Enter Non-work in the Group field.
The setup fee is $100 initially, but it increases to $150 in the fourth quarter.
Focus Group, Work type: you will need 24 people in two locations, and the focus group sessions will be on consecutive Saturdays.
Select the Saturday Calendar and set Max Units to 1,200%. (to allow multiple concurrent assignments)..
You will pay them $100 each for three hours, but mark that up to the customer by 100%.
Enter Contractor in the Group field. This example is typical of the resource definition you must figure out independently depending on how you intend to use the project plan. In this case, let’s say you are going to be giving updates to the customer, so you want to enter a standard rate of $200 per three-hour session. If you round up, you could enter this as $67 an hour.
Lunch for Focus Group. Cost type of resource. Enter Non-work in the Group field.
Transcript Service to record the focus group. Material type: $500 per session, so $500 per unit.
Enter Transcript as a Material Label.
Enter Non-work in the Group field.
Use the flag field to mark the resources and highlight the background in yellow. To create a highlight filter, use one of the flag fields.
If you sort the Group field A - Z, you should have the defined resource list shown below.
Save the project.
When Finished with Exercise 6.5
The Resource Definition.mpp file should have the defined resources in the figure below. The resources you defined are highlighted using one of the flag fields to filter.
(3)
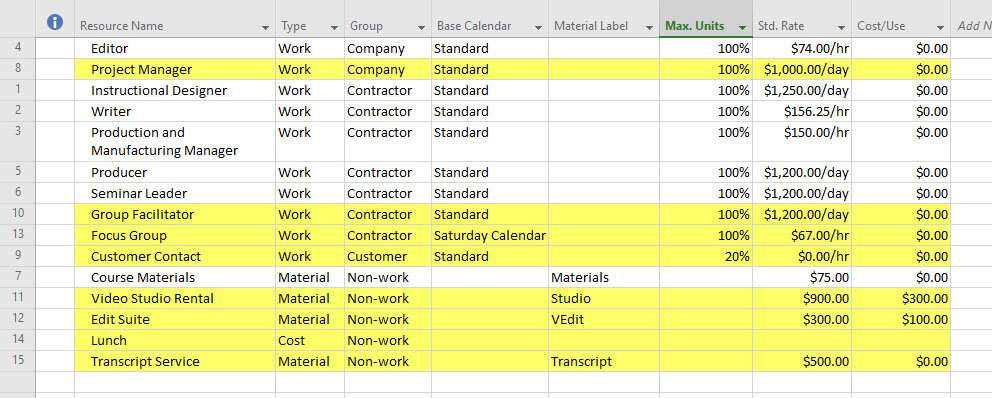
Figure 6.29 Resources flagged and highlighted in the Resource Sheet view. This figure shows the Microsoft Project Resource Sheet with newly defined resources highlighted using a Flag field and organized by resource group to verify that all required resource definitions have been completed correctly. Use this view to validate your resource definitions before assigning resources to activities, ensuring the Calculation Engine has accurate resource information for estimating duration, work, and cost.
Exercise 6.6: Define Resources for Master Project (30 minutes)
Define the resources for your Master Project.
In the Resource Sheet view, apply the Bridge Resources Defined table, and the standard fields for defining resources will be displayed. If you are not using the Standard base calendar, insert the Base Calendar field and make the appropriate selections.
Figure 6.30 Resource defined in the resource sheet view.
When Finished with Exercise 6
Your Master Project should have resources defined.
(3)
Exercise 6.7: Complete Assignment Calculations (10 minutes)
We are on the second step in learning how to complete our estimates by assigning resources. In this exercise, you assign resources to activities representing the five ways activities can be calculated when resources are assigned.
Download
Click the Download icon above to open the Finalize Estimates Routine.mpp file.
Notice in the project’s split window that the Type and Effort Driven fields are shown as columns in the top view. The bottom Task Form view will also display that field information and Notes field. If the Notes field is not showing, select the bottom view and then hover over the grey area to the right and right-click to select Notes.
Figure 6.31 The five possible calculation selections.
Each activity is labeled for one of the five ways estimates are calculated when resources are assigned.
First, notice the appropriate selections for each activity, the Type and Effort Driven fields. For example, task #2 is named Type 2: Fixed Duration, and the Task Type is Fixed Duration and Effort Driven is No.
Second, in the Notes field for each of the five activities, answer these two questions:
Given the calculation selections, what estimate would you start with: work, duration, or both?
What do you expect to happen when you assign resources or adjust resource assignments?
Save the project.
When Finished with Exercise 6.7
For the Finalize Estimates Routine.mpp file, in the Notes field for each detail task, you have answered these two questions:
Given the calculation selections, what estimate would you start with: work, duration, or both?
What do you expect to happen when you assign resources or adjust resource assignments?
Exercise 6.8: Determine Calculation Selections for Master Project (10 minutes)
For all of the detail tasks in your Master Project, determine the calculation selections for each one. Apply the Bridge Task Behavior view as shown in the figure below. For each detail task, determine the Type (Fixed Duration, Fixed Units, and Fixed Work). If the activity is Fixed Duration or Fixed Units, determine whether it is Effort Driven.
Best Practice
When you choose how activities calculate duration, work, and cost after assigning resources, you do not need to follow theoretical models like effort-driven or fixed duration. The important thing is that the calculations fit how you want to manage your project.
In practice, you set up these options so the software works the way you need, giving you results that are consistent, easy to understand, and aligned with how the work will actually be done.
Figure 6.32 Effort Driven and Type selections.
When Finished with Exercise 6.8
Each detail task in your Master Project should have the appropriate calculation selections. This should not be arbitrary; the selections you make should be intentional.
Exercise 6.9: Assign Resources (45 minutes)
The objective of this simulation is not to master all of these calculations. However, you must determine how you want activities calculated when assigning resources and become skilled at doing things your way.
Download
Click the Download icon above to open the Assign Resources.mpp file.
The following is a review of each of the five sets of calculation settings.
Fixed Units
Expand the Fixed Units summary task.
The first thing to do is always glance at your calculation selections. Check to make sure each of these three tasks are Fixed Units.
Apply the Work theme to the Task Form view at the bottom of the split window.
Then open the Assign Resources dialog box, Resources tab / Assign Resources command. This is the only floating dialog box in Microsoft Project, meaning you can always keep it open at the side of your Microsoft Project window, and the contents of the dialog box will reflect the task selected.
Tip
You can double-click on a resource name in the Assign Resources dialog box to define a resource or see how a resource is defined. You can also add a new resource and define them from this dialog box.
Figure 6.33 Defining resources or viewing resource definition from the Assign Resources dialog box.
As you work through this exercise, remember that the undo and redo buttons are on the Bridge Quick Access Toolbar. Toggle back and forth to understand calculations.
Assign the Editor to Task 1.
What was calculated?
Why was the editor assigned at 100%, and why was $2,960 calculated?
Assign the Customer to Task 1.
Why was the Customer assigned at 50%? Be sure to check the project start date.
What happened to duration? But there are two people assigned now?
Why was no additional cost calculated?
Why is the Customer assigned 20 hours of work and the Editor 40 hours?
Assign the Instructional Designer to Task 1. Do those calculations make sense?
These calculations might be what you would expect with Fixed Duration settings. The duration does not change, but the work and cost change based on the assignments. This is the confusing aspect of these calculation settings; it seems like the duration is fixed, as in the Fixed Duration Type. Depending on how you assign resources, one set of selections may seem very much like another.
Figure 6.34 Assignments to a Fixed Units activity when there is an estimate of duration.
Task 2 has both a duration and work estimate.
Assign the Editor, Group Facilitator, and the Producer to Task 2. Do those calculations make sense?
This doesn’t make sense to me. With the first assignment, the work estimate and duration seemed fixed. However, because no theory or principle drives this calculation, some users may want or need to calculate resource assignments this way.
Figure 6.35 Fixed Units calculation when there is a duration and work estimate.
Change the duration estimate for Task 3 to 2.5 days.
Assign the same three resources (Editor, Group Facilitator, and the Producer) to Task 3.
Are the calculations the same?
Is that what you expected?
No, it doesn’t make much sense to me either. Again, it is just a possible calculation.
Figure 6.36 Not all calculations are appropriate or make sense. This activity started off with an estimate of 2.5 days and 200 hours of work.

Warning
Please refer to my earlier review on Setting Up Microsoft Project (https://www.msprojecttraining.online/gettingstarted). The calculations you are experiencing might differ from those in the exercise because of a difference in the Microsoft Project version, service pack, or build.
What if you change the duration or work? Change the duration of Task 1 from 5 days to 3 days.
What if you change the work? Change the work of Task 2 from 120 hours to 60 hours.
Change Task 3 to 2.5 days.
Do calculations make sense? If not, toggle back and forth with undo and redo buttons. It seems now that the Units assigned are fixed, not the duration or work estimates. Perhaps the name of the setting Fixed Units means that once resources are assigned, those units are fixed. This makes sense when you think about it.
Fixed Duration tends to fix the duration estimate
Fixed Work tends to fix the work estimates
Fixed Units tends to fix the units once a resource is assigned.
I use the “tends” because there are always expectations regarding the rules. Microsoft Project is sophisticated software that does a lot and responds to numerous selections and input from the user, so the rules tend to bend.
Figure 6.37 Fixed Units refers to the units resources are assigned. Those units tend to be fixed.
What if you change Units? This is where the idea of Fixed Units starts to make more sense. Remember, for a Fixed Units task, the longest resource assignment determines the duration.
For Task 1, change the Instructional Designer’s assignment to 50%. The task will now be 6 days. Can you explain that calculation?
If the Instructional Designer is going to work 24 hours on the task and can only work 4 hours a day, the task must take 6 days.
Figure 6.38 The duration of a Fixed Unit task is driven by the longest resource assignment.
If you swap out the bottom view with a Task Usage view and zoom in the timescale with the top view displaying every day, you will notice that the Editor works 8 hours for three days. The Customer works 4 hours for the first three days, and the Instructional Designer works 6 hours daily until they have completed 24 hours. At 4 hours a day, it will take 6 days to complete the task. The longest resource Unit assignment determines the duration of the task. It is Fixed Units.
I hope that is starting to make sense.
Figure 6.39 Resource assignment driving the duration of the activity.
Fixed Duration
Next, let’s look at Fixed Duration tasks.
Expand the Fixed Duration summary task.
The first thing to always do is glance at your calculation settings. Check to make sure each of these three tasks has a Fixed Duration.
With this calculation type, the duration estimate stays the same, and the work and cost are adjusted accordingly based on resource assignments.
Assign the Group Facilitator and Instructional Designer to Task 1. What changed?
Adjust the assignments. The instructional designer only needs to work a few hours daily. In the bottom view, change Units to 20% and click OK. For example, if the Group Facilitator conducts five one-day sessions upfront, enter 40 hours in the Work field for this resource in the bottom view and click OK.
Did the duration change? Try this: In the work field at the bottom of the view, assign the Group Facilitator 120 hours on this activity and click OK. The resource will be assigned, but did the Duration change?
No, because the duration estimate is fixed. This makes sense to me and to most people. Because it is easy to understand, it is easy to predict what will happen each time assignments change.
As you use these different selections and make a lot of assignments, I think you will start to notice irregularities or calculations that don’t seem sensible. So, I think that even if the activities in your project plan are effort driven in theory, you may well choose Fixed Duration for your task Type. It is OK to do that, and as I tried to explain in the MS Project Master Class Book, because Microsoft Project used Fixed Units as the default Type, many people misunderstood not only the Type but the purpose behind using Fixed Units/Effort Driven and Fixed Work early in project planning. They also haven’t understood that the calculations do not change unless you make adjustments to assignments if you change Type and Effort Drive.
The necessity of having more control of the calculations later in the planning process leads many, if not most, users to select Fixed Duration eventually.
Figure 6.40 Assignments to a Fixed Duration activity. The duration does not change because it is fixed.
Let’s assign some non-work resources. Material or Cost resources do not change the duration or the work, regardless of the assignment calculations.
Select Task 2.
In the Assign Resources dialog box, filter for Material resources.
Double-click on each resource to review the Standard Rates.
First, assign the Video Studio Rental. We need the studio for 2 days. The Standard Rate for this resource is $900. Can you explain the cost calculation?
Next, we need 75 Course Materials, the Edit Suite for 3 days, and the Transcript Service 4 times.
Then, filter for Cost resources in the Filter by: field. Assign the Lunch resource. We are budgeting $15 for each lunch and expecting 75 participants, so add those cost in the Cost field of the Assign Resources dialog box.
Notice that the duration does not change, and no work has been calculated.
Figure 6.41 Material Type resource assignments.
Last, select Task 3 and filter all of the Work resources, select all of the resources, and assign them to the task.
Did the duration change?
No. You must make the change if you think the duration should be changed based on resource assignments. Change the duration to two days.
Cost and Work change accordingly.
Fixed Duration is a simple, reliable, and consistent way to calculate assignments. Rarely does the rule bend for this Type of task.
Figure 6.42 Fixed Duration activity assignments.
Fixed Work
Fixed Work means that when you assign resources, the work estimate remains constant, and the duration and cost adjust accordingly. The Fixed Work calculation is the closest setting to this Effort-Driven estimating and scheduling idea. Assign more resources to an activity, and the duration decreases; remove resources, and the duration increases.
The selection isn’t as robust as we would like; the setting does not always calculate sensibly in complex situations. However, this is likely the best setting if you want an effort-driven approach. Plus, these settings work very well, as intended, for “what if” assignments of skill resources.
Expand the Fixed Work summary.
The first thing to remember is to glance at your calculation selections constantly. Check to make sure Task 1 is Fixed Work.
Assign the Project Manager. The task will take 10 days because they will spend 80 hours on it.
Assign the Seminar Leader. The duration is cut in half, and both resources share 80 hours of work.
Assign the Writer to Task 1. The duration goes down.
Remove the Writer and the duration goes back up.
Change the Work from 80 hours to 60 hours; what changes?
Change the Project Manager’s Work to 20 hours and click OK. What changes?
Change the Seminar Leader’s Work to 40 hours and click OK. What changes?
As mentioned in the MS Project Master Class Book, this setting can be useful in the early planning phases, especially if you start with Work estimates. With this setting, you could quickly complete a “What if” on a large schedule: “What if I assign five people to this task, three to that task, and seven to that task?”
Of course, real people are not all equal, do not have the same level of skill, and work at the same speed. When you get to the point of assigning the actual people, you could change every task to a Fixed Duration and refine your assignments. If you switch like this, none of the calculations will change until you adjust the assignments.
Figure 6.43 Fixed Work activities. The work estimate is fixed, the duration and cost change based on assignments.
Fixed Units Effort-Driven
The next two selections have no theoretical basis that I am aware of, but they are calculations that may work well for you.
This calculation setting is closely related to Fixed Work. Some users find this calculation suitable, especially since it was the default setting for at least the first 10 versions of Microsoft Project.
Expand the Fixed Units Effort-Driven summary.
The first thing to always do is glance at your calculation settings. Check to ensure that each of these three tasks is set to Fixed Units and that Effort Driven is Yes.
By now, you know which values to watch when you make an assignment:
Duration
Work
Cost
Individual Work assignments
Assign the Project Manager and Seminar Leader to Task 1. Then, adjust the Work on the task to 60 hours, change the Project Manager’s units to 50%, and click OK.
Does this calculate differently than Fixed Work?
To see the difference between these Fixed Units/Effort Driven and Fixed Work, do the following:
Enter 80 hours for Task 2.
Enter 80 hours for Task 3, make the task Fixed Work, and enter 1 day in the duration field.
Assign the Project Manager and Seminar Leader to both tasks. You can select both tasks and resources and assign them all at once. So far, the calculations are the same.
Then, change the Duration of Task 2 and Task 3 to 10 days. Each task calculates differently.
Figure 6.44 Calculation for Fixed Units Effort Driven.
Fixed Duration Effort-Driven
Expand the Fixed Duration Effort-Driven summary.
The first thing to always do is glance at your calculation settings. Ensure these three tasks have a Fixed Duration Type and that Effort Driven is Yes.
Assign the Project Manager and the Seminar Leader to Task 1. The calculations should be self-explanatory.
What is the difference between Fixed Duration Effort Driven and Fixed Duration?
To see a difference between Fixed Duration vs. Fixed Duration Effort Driven, do the following:
Make sure Task 2 and Task 3 are 10 days in duration.
Make Task 3 just Fixed Duration and Effort Driven is No. Again, these selections are what we have called Fixed Duration.
Assign the Project Manager and Seminar Leader to both tasks.
Change the Work for both tasks to 80 hours.
Change the Duration for both tasks to 5 days.
So far, the calculations have been the same. Now, do this:
Assign the Editor to both tasks.
This calculation is a hybrid type of fixed duration. You tell Microsoft Project to keep the Duration fixed but attempt to share the work evenly across the resource assignments when it is Effort Driven.
Save the project.
Figure 6.45 Fixed Duration Effort Driven calculation.
When Finished with Exercise 6.9
The duration, work, and cost data for the Assign Resources.mpp file should be consistent with those in the figure below.
Figure 6.46 Make resource assignments to activities with different Type and Effort Driven selections.
Best Practice
Changing How Activities are Calculated
You can adjust how activities are calculated when you assign resources at any stage of planning. Your current data remains the same, but any new assignments will use the updated calculation method.
It can help to use one calculation method early in planning, then switch to another as your estimates improve and you assign specific resources.
Fixed Duration means an activity takes a set amount of time, no matter how many resources you assign. For example, a human pregnancy lasts about 40 weeks, no matter how many people are involved.
Fixed Work follows the idea of effort-driven scheduling. The total work remains the same, but the time required varies with the number of resources you assign. For example, licking 10,000 envelopes takes less time with more people, and more time with fewer people.
Exercise 6.10: Assign Resources to Master Project (30 minutes)
You have defined resources and made the appropriate calculation selections for your detail tasks in your Master Project. Now, it is time to assign resources.
This is the best setup for making resource assignments:
A - Apply the Bridge Assignments view. This is a view with a Gantt Chart view on the top and a Task Form view on the bottom.
B- Select the bottom view and ensure the Work details is applied to the view.
C - Select the top view and apply the Bridge Duration Work Estimates table.
D - Insert the Cost field after the Work field.
E - Select the top view and open the Assign Resources dialog box.
Begin at any point in your WBS. Make the appropriate resource assignment for all of your detail tasks. When finished, you will have the constraints calculated for Work and Cost. The most important question to ask right now is:
Are those calculated Work and Cost aligned with your project constraints?
If the answer is no, what do you do now?
Figure 6.47 Best setup for making resource assignments.
When Finished with Exercise 6.10
Microsoft Project has calculated the total work and cost for your Master Project. Does the Work and Cost calculated in the Project Summary Task match the project constraints determined for the project?
Update Journal on Entering Estimates - 15 minutes
What do you anticipate doing for future projects?
Journal questions:
PERT calculations are appropriate for estimating duration, work, and cost. Do you see yourself using any of these calculations in the future?
Which general estimating approach do you think best suits the types of projects you are going to be managing?
Final Steps
Finalizing Activity 6 and Taking the Exam (52 minutes)
This is the final section for Enter Estimates.
Take some time to review the best practices for project management and using Microsoft Project. Think about the main ideas of project management and how you use them in Microsoft Project, especially with the Calculation Engine and structured estimating.
Check your Master Project for accuracy. Make sure your Master Project is up to date and demonstrates that you can define the scope, estimate costs, and build a solid, workable plan.
Look over the files you used in this Activity. Review the files from this Activity to help you remember the tools, techniques, and resources you used for estimating.
Check Your Progress on Learning Objectives. Go back to the learning objectives for this Activity and see how well you have met each one. Note any areas where you need more practice.
Take the Activity Exam. Show what you’ve learned by taking the Activity exam. It covers the main ideas and practical skills from the MS Project Master Class Book and this Activity Workspace.

Review Best Practices for Activity 6 (5 minutes)
Best practices in project management, including Microsoft Project, refer to a set of proven techniques, methods, or processes recognized as effective and efficient in achieving project objectives. These practices have evolved through the collective experiences of project managers and organizations across various industries. They are considered the most reliable and successful approach to managing projects and can be applied in different environments. When incorporating Microsoft Project into project management workflows, several specific best practices can further enhance project initiation, planning, execution, closing, and control.
Combine Bottom-Up with Other Estimating Techniques
Combine bottom-up estimating with other methods to get a well-rounded perspective. Bottom-up gives you detailed estimates for each activity, while top-down approaches like analogous or parametric estimating offer a broader view and help validate your numbers. Using both makes your estimates more accurate and credible.
Engage the Project Team in Bottom-Up Estimation
Bottom-up estimating is most effective when the team members who will do the work help create the estimates. Their hands-on experience with the activities, challenges, and effort involved yields more realistic and reliable estimates of time, effort, and costs.
Regularly Review and Revise Estimates
Estimates need to be updated as the project evolves. Review your bottom-up estimates whenever the scope shifts, new risks emerge, or you receive additional information. Updating your estimates regularly helps keep your plan in line with what’s really happening and makes your project model more reliable.
Resource Assignments and Estimates
You can enter estimates for duration, work, and cost without assigning resources. If you prefer to skip calculations, you can link resource names to activities with a custom field. However, if you want to manage resources, it’s important to understand how resource assignments work.
When you assign resources, Microsoft Project’s Calculation Engine links duration, work, and cost. The remaining estimates are automatically calculated, so you don’t have to update them manually. This also makes it easier to manage workloads and find overallocations.
It’s a good idea to use all the software's features rather than skipping them.
Activity Calculations
When you choose how activities calculate duration, work, and cost after assigning resources, you do not need to follow theoretical models like effort-driven or fixed duration. The important thing is that the calculations fit how you want to manage your project.
In practice, you configure these options so the software works the way you need it to, giving you results that are consistent, easy to understand, and aligned with how the work will actually be done.
Changing How Activities are Calculated
You can adjust how activities are calculated when you assign resources at any stage of planning. Your current data remains the same, but any new assignments will use the updated calculation method.
It can help to use one calculation method early in planning, then switch to another as your estimates improve and you assign specific resources.
Fixed Duration means an activity takes a set amount of time, no matter how many resources you assign. For example, a human pregnancy lasts about 40 weeks, no matter how many people are involved.
Fixed Work follows the idea of effort-driven scheduling. The total work remains the same, but the time required varies with the number of resources you assign. For example, licking 10,000 envelopes takes less time with more people, and more time with fewer people.

Review Microsoft Project Features Used in Activity 6 (10 minutes)
Scope
A Work Breakdown Structure (WBS) is a key project management tool for defining scope. It breaks the project into smaller, manageable parts down to the activity level. The WBS covers all project work and helps with planning, execution, and control.
Microsoft Project is great for scheduling, resource management, and cost calculation. However, it does not directly define or manage scope at the activity level, so you need to take extra steps to document scope clearly.
One practical way to capture scope details is by using task Notes. Here’s how:
Select an activity in your project plan.
Open Task Information.
Navigate to the Notes tab.
Enter the scope definition, including deliverables, acceptance criteria, assumptions, and constraints.
Notes Fields
Microsoft Project includes three primary note types that support detailed documentation:
Task Notes. Used to document scope, instructions, and clarifications for a specific activity.
Resource Notes. Used to capture details about a resource, such as skills, constraints, or availability considerations.
Assignment Notes. Used to describe how a specific resource is assigned to a specific activity, including expectations, conditions, or special instructions.
Using these note fields helps you document scope, resources, and assignments in more detail than the activity record shows.
Defining Resources
Resources include everything needed to complete project work. They fall into three categories:
Work resources (people or equipment performing work).
Material resources (consumables).
Cost resources (financial costs applied to activities).
You define resources in the Resource Sheet, where you specify details such as type, rates, and availability.
Setting up resource calendars is an important part of defining resources. These calendars show working times, exceptions, and availability. Accurate calendars help ensure your schedule is reliable.
Cost behavior varies by resource type:
Work resources use standard and overtime rates.
Material resources use cost per unit.
Cost resources apply fixed costs at the assignment level.
Defining resources enables the Calculation Engine to calculate work, duration, and cost accurately.
Task Type
Task Type controls how Microsoft Project calculates duration, work, and units when assignments change. There are three types:
Fixed Units (default setting). Units (the assignment percentage) stay the same. If you change the duration, it affects the amount of work. This is the default setting, but it is not the main focus of this Master Class.
Fixed Work. The total work stays the same. If you add or remove resources, the duration changes. This is useful for 'what-if' analysis, but it often does not match real-world results.
Fixed Duration. The duration stays the same. If you change assignments, it affects work and units. This option gives you the most control and is recommended when you are finalizing resource assignments.
Effort Driven
Effort Driven is a setting that controls how work is shared out when you add or remove resources.
Conceptually: Fixed Work = Effort Driven (total work stays constant)
Microsoft lets you apply Effort Driven to other task types, which can be confusing. The default settings have changed over time, and users often try to make sense of these combinations.
A more practical approach is:
Fixed Duration / Not Effort Driven → aligns with fixed duration activities.
Fixed Work (Effort Driven) → aligns with effort driven activities.
Other combinations are possible, but they are not based on standard project management theory. Still, they might be useful depending on how your organization handles assignments.
For example, Fixed Duration with Effort Driven keeps the duration the same but spreads the work across resources. This might seem unusual, but it can be helpful in certain situations where you want that result.

Ensure Your Master Project and Exercise Activity 6 Files are Up-To-Date (10 minutes)
Your Master Project has been used as the exercise file in the exercises for these Master Class Applications. This Master Project will be updated throughout the MS Project Master Class. In this Workspace on estimating, you should have completed your duration, work, and cost estimates for each activity. The work and cost roll up to the summary level are now considered the project’s constraints. Those may or may not reflect the constraints anticipated at the project's initiation. The project timing constraints will be determined in the next Activity (chapter) when the network diagram is built with dependencies or links.
When finished with exercises 1 - 10, you should have:
Exercise 1:
All detail tasks and milestones in your Master Project should have a defined scope in the task Notes field.
Exercise 2:
The Estimating Approaches.mpp should have the same duration and work column values, as shown in the figure below. The cost data should also be the same.
Figure 6.48 Duration and Work default values selected in Project Options.
Exercise 3:
Apply the PERT View to your Master Project. The figure below shows that it should have custom fields (Optimistic Duration, Most Likely Duration, Pessimistic Duration, and PERT Variance) for calculating PERT. The calculations should work as expected.
Figure 6.49 Custom PERT view with custom fields for calculating PERT.
Exercise 4:
Your Master Project should have duration or work estimates for all activities or detail tasks.
Exercise 5:
The Resource Definition.mpp file should have the defined resources in the figure below. The resources you defined are highlighted using one of the flag fields to filter.
Figure 6.50 Resources flagged and highlighted in the Resource Sheet view.
Exercise 6:
Your Master Project should have resources defined.
Exercise 7:
For the Finalize Estimates Routine.mpp file, in the Notes field for each detail task, you have answered these two questions:
Given the calculation selections, what estimate would you start with: work, duration, or both?
What do you expect to happen when you assign resources or adjust resource assignments?
Figure 6.51 The five possible calculation selections.
Exercise 8:
Each detail task in your Master Project should have the appropriate calculation selections. This should not be arbitrary; the selections you make should be intentional.
Exercise 9:
The duration, work, and cost data for the Assign Resources.mpp file should be consistent with those in the figure below.
Figure 6.52 Master Project with work and cost constraints.
Exercise 10:
Microsoft Project has calculated the total work and cost for your Master Project. Does the Work and Cost calculated in the Project Summary Task match the project constraints determined for the project?
Figure 6.53 Best set up for assigning resources.


If you are working with a coach or plan on earning a certificate, use this file folder system to store your files.
Review List of All Completed Activity 6 Files (5 minutes)
The files used in this Activity Workspace:
Your Master Project.mpp.
Estimating Approaches.mpp.
Resource Definition.mpp.
Finalize Estimates Routine.mpp.
Assign Resources.mpp.
Your Updated Journal.
Enter Estimates Learning Objectives.docx.
PDF of Your Exam Results.

What to Do with Your Files
After you finish this Activity, remember to save your files and keep them organized.
If you are working with a Master Class Coach:
Put all the files listed above into your folder structure as suggested.
Zip these folders before your next session.
Email the zipped file to your Master Class Coach.
You don’t need to send your files to a Certified Master Class Reviewer to earn a certificate; your coach will review your work.
If you are NOT working with a Master Class Coach (Certificate Path):
Put all the files listed above into your folder structure.
Zip the files to archive them and keep everything organized.
When you’re ready, send all your Activity files together to a Certified Master Class Reviewer for evaluation.
Important
As you work through all Activities, you’re building a complete set of project files. Keep everything organized since you’ll need the full set for review.
Evaluate Activity 6 Learning Objectives (10 minutes)
To assess whether you have met the learning objectives outlined for the MS Project Master Class Book, you could review the following questions:
Understanding the Importance of Estimation in Project Management
Can you explain why accurate estimation is critical in project management?
How do estimates impact the planning, budgeting, and control of a project?
In what ways do estimation skills contribute to effective resource allocation and risk management?
Mastering Detailed Scope Definition Using Microsoft Project
Are you able to enter and clarify scope information for activities in Microsoft Project clearly?
Do you understand how to define deliverables within Microsoft Project to ensure clear communication with your project team?
Developing Skills in Duration and Work Estimation
Can you apply historical data, expert judgment, and statistical analysis to create duration and work estimates?
How do you use the Work Breakdown Structure (WBS) to estimate the duration and complexity of activities?
Gaining Expertise in Bottom-Up Estimating Techniques
Are you confident in breaking down a project into smaller components to estimate work and costs?
How accurately can you estimate the resources and financial requirements for each part of a project using the bottom-up approach?
Navigating Resource Definition and Management
Can you effectively identify and define all necessary resources in Microsoft Project for a given project plan?
Do you understand how to categorize and allocate work, material, and cost resources within the software?
Exploring Calculation Methods and Their Impact on Project Estimation
Are you able to choose the appropriate calculation method in Microsoft Project based on the project needs?
How well can you assess the impact of resource allocation changes on the overall project estimates?
Learning to Assign Resources for Optimized Execution Efficiently
Do you know how to assign a mix of resources to project activities effectively?
Can you ensure that each activity is adequately resourced for efficient completion within the project's constraints?
These questions cover a range of cognitive levels, from understanding and application to analysis and synthesis, ensuring a comprehensive assessment of the learning objectives.

Before taking the following exam, click the Download icon above to open the Learning Objectives for Enter Estimates.xlsx and complete this evaluation of the learning objectives.

Final Score
When you are finished, print your score and exam results as a PDF file if you are working with a Coach or plan to earn a certificate.
Take the Activity 6 Exam (12 minutes)
Complete this Activity by taking the exam. Take the exam by clicking on the Exams button below.
Here are some essential guidelines for taking the exam:
Approach the exam as a closed-book assessment, relying solely on your memory and grasp of the subject matter.
Always select the most appropriate answer.
Keep in mind that answers carry different weights.
Feel free to attempt the exam multiple times to refine your understanding.
To attain the MS Project 24 Hour Master Class Certificate of Completion, achieve a final score of 80% or higher.
In this Activity, you moved beyond defining the project's structure and developed the estimates that make it work. You entered duration and work, defined resources, and applied the calculation settings that determine how Microsoft Project calculates results.
Now, your project is more than just a Work Breakdown Structure. It has become a model that calculates duration, work, and cost using the Calculation Engine. This means you can review, adjust, and manage your plan with confidence.
With your estimates ready, the next step is to set up the schedule logic. This involves linking activities to create the right sequence, so Microsoft Project can build a full project timeline.

Return to the Master Class Book, complete the Activity 4 Summary section, and then continue to Activity 7: Determine Schedule Logic.
Enter Estimates FAQs
What Is Project Estimating in Microsoft Project?
Project estimating is the process of determining how much time, work, cost, and resources will be required to complete project activities. In the MS Project Master Class, estimating begins after the Work Breakdown Structure (WBS) has been created and before schedule logic is developed. These estimates become the foundation for scheduling, resource planning, forecasting, and project control.
What Is the Difference Between Duration and Work in Microsoft Project?
Duration is the amount of calendar time required to complete an activity, while Work represents the effort required from assigned resources.
For example, an activity may have a Duration of five days but require forty hours of Work from a resource. Understanding the distinction between Duration and Work is one of the most important concepts in Microsoft Project because the Calculation Engine uses these values when calculating schedules, resource assignments, and costs.
Should I Estimate Duration or Work First?
Either approach can be used depending on the project and available information.
Some organizations estimate Duration first and then assign resources. Others estimate Work first and allow Microsoft Project to calculate Duration after resources are assigned. The important point is to understand how the Calculation Engine uses the entered information and how resource assignments affect the final estimate.
Why Are Resources Defined During the Estimating Process?
Resources determine who will perform the work and often influence the amount of time and cost required to complete an activity.
Microsoft Project uses resource assignments to calculate Work, Duration, Costs, and resource availability. Defining resources during the estimating process helps create more realistic project plans and forecasts.
What Is the Assignment Calculation Method?
The Assignment Calculation Method determines how Microsoft Project recalculates Duration, Work, and resource Units when assignments change.
This behavior is controlled through settings such as Task Type and Effort Driven scheduling. Understanding these settings helps project managers predict how the Calculation Engine will respond when resources are added, removed, or reassigned.
How Does Microsoft Project Calculate Cost Estimates?
Microsoft Project calculates costs using resource rates, work assignments, material resources, cost resources, and fixed costs.
As estimates and assignments are entered, the Calculation Engine automatically calculates project costs and updates forecasts as changes occur.
Why Is Accurate Estimating Important?
Accurate estimates improve schedules, forecasts, budgets, resource plans, and project controls.
Poor estimates often lead to unrealistic schedules, resource conflicts, budget overruns, and inaccurate forecasts. The quality of every project plan depends heavily on the quality of the estimates used to build it.
What Happens If Estimates Change Later?
Estimates often change as projects progress and more information becomes available.
After a project has been baselined, changes to estimates create variances that can be measured and analyzed. Microsoft Project helps project managers compare current estimates against baseline values to evaluate project performance.
How Does Enter Estimates Support the Master Project?
The Enter Estimates Activity transforms the Work Breakdown Structure into a working project plan by assigning durations, work estimates, resources, and costs.
These estimates become the foundation for schedule logic, resource planning, baselines, forecasting, and project control throughout the remainder of the Master Project.
What Makes This Approach Different from Typical Microsoft Project Training?
Many Microsoft Project tutorials focus on entering values into fields in the software without explaining the project management concepts behind them. Nor does most training provide an explanation or model for entering estimates in Microsoft Project.
The MS Project Master Class teaches estimating as part of a complete project management process. Students learn how estimates support scheduling, resource planning, forecasting, baselines, project controls, and the development of a technically sound Master Project.
Suggestions and Corrections
Please help us improve this MS Project Master Class Book and the Master Class Learning Portal. Click on the Comments button below to send us suggestions and corrections.