

Last Updated: August 10, 2026
Activity 10: Acquire Project Team
Acquiring a project team is first and foremost a project management activity, not a software activity. Project managers identify the people needed to complete the work, assign responsibilities, balance workloads, and resolve staffing conflicts before execution begins. Microsoft Project supports these decisions by providing tools that help assign resources, evaluate workloads, identify overallocations, and optimize the schedule. Throughout this Activity, you will learn both the management techniques and the software’s features that support them. The main resource management features are:
Replacing generic or skill resources with named people resources.
Reviewing resource availability and workloads using Resource Views.
Resolving overallocation by reassigning work, adjusting schedules, or modifying resource availability.
Automatically leveling resources using Microsoft Project's Resource Leveling tools.
Sharing and coordinating resources across multiple projects by using Resource Pools and Master Projects.
Together, these techniques form the foundation of effective resource allocation, ensuring the right people are assigned to the right work at the right time while supporting a realistic project schedule.
When planning a project, it’s normal to use generic roles like Programmer, Engineer, or Business Analyst while details are still being worked out. As the project moves forward, you need to replace these placeholders with the actual people who will do the work. Project managers also need to ensure workloads are reasonable, identify any overworked team members, and make changes before the project falls behind.
In the last Activity, Evaluate Risk, you examined project risks and identified possible events that could affect the project's schedule, cost, or success. This analysis helped you prepare for uncertainty by thinking ahead and planning how to respond before problems arise.
In this Activity, start putting your project into action by bringing your team together. Learn how to swap out generic resources for real team members, check workloads, fix overallocations, adjust assignments based on who is available, and use the software’s Resource Leveling tools. Learn how to share resources across projects with Resource Pools and Master Projects, while keeping schedules realistic and workloads balanced.
By the end of this Activity, you'll have transformed your project from a well-planned schedule into one staffed with the people who will actually perform the work. Generic placeholders will be replaced with named team members, workloads will be reviewed and balanced, and your schedule will more accurately represent how the project will be executed. This is the point where your plan begins to reflect the realities of managing a real project team.
New to the MS Project Master Class?
If you found this page through a search engine or external link, use the Start Here button below to learn about the Free and Complete MS Project Master Classes, the Learning Portal, Project MAP framework, Activity Workspaces, exercises, and the Master Project.
Figure 10.1. Acquire Project Team within Project MAP. This Activity begins the Executing Phase by replacing planned resource requirements with named team members, balancing their workloads, and preparing the team to perform the project work.
Activity 10 Workspace Outline
Activity 9: Evaluate Risk < Activity 10: Acquire Project Team > Activity 11: Create Project Compliance Plan
Complete this Activity in the order presented. Begin by understanding the workflow, then reinforce the concepts through the exercises before reviewing your work and completing the Activity assessment. Each section builds on the previous one and prepares you for the next stage of the Project MAP framework.
Workflow (45 minutes)
Exercises (3 hours 10 minutes) jump to
Exercise 10.1: Replace Resources and Replace Resource Assignments (15 minutes) jump to
Exercise 10.2: Define Resource Availability (15 minutes) jump to
Exercise 10.3: Examine Resource Workloads (30 minutes) jump to
Exercise 10.4: Automatically Level Resources (25 minutes) jump to
Exercise 10.5: Share and Level Resources Across Projects (30 minutes) jump to
Exercise 10.6: Level Your Master Project (60 Minutes) jump to
Update Journal on Acquire Project Team (15 minutes) jump to

This entire Activity Workspace should take 5 hours and 3 minutes to complete.
This Activity Workspace is part of the MS Project Master Class learning system and the companion Master Class Book available on Amazon. Many students also complete the Master Class with the assistance of a Master Class Coach or Trainer.
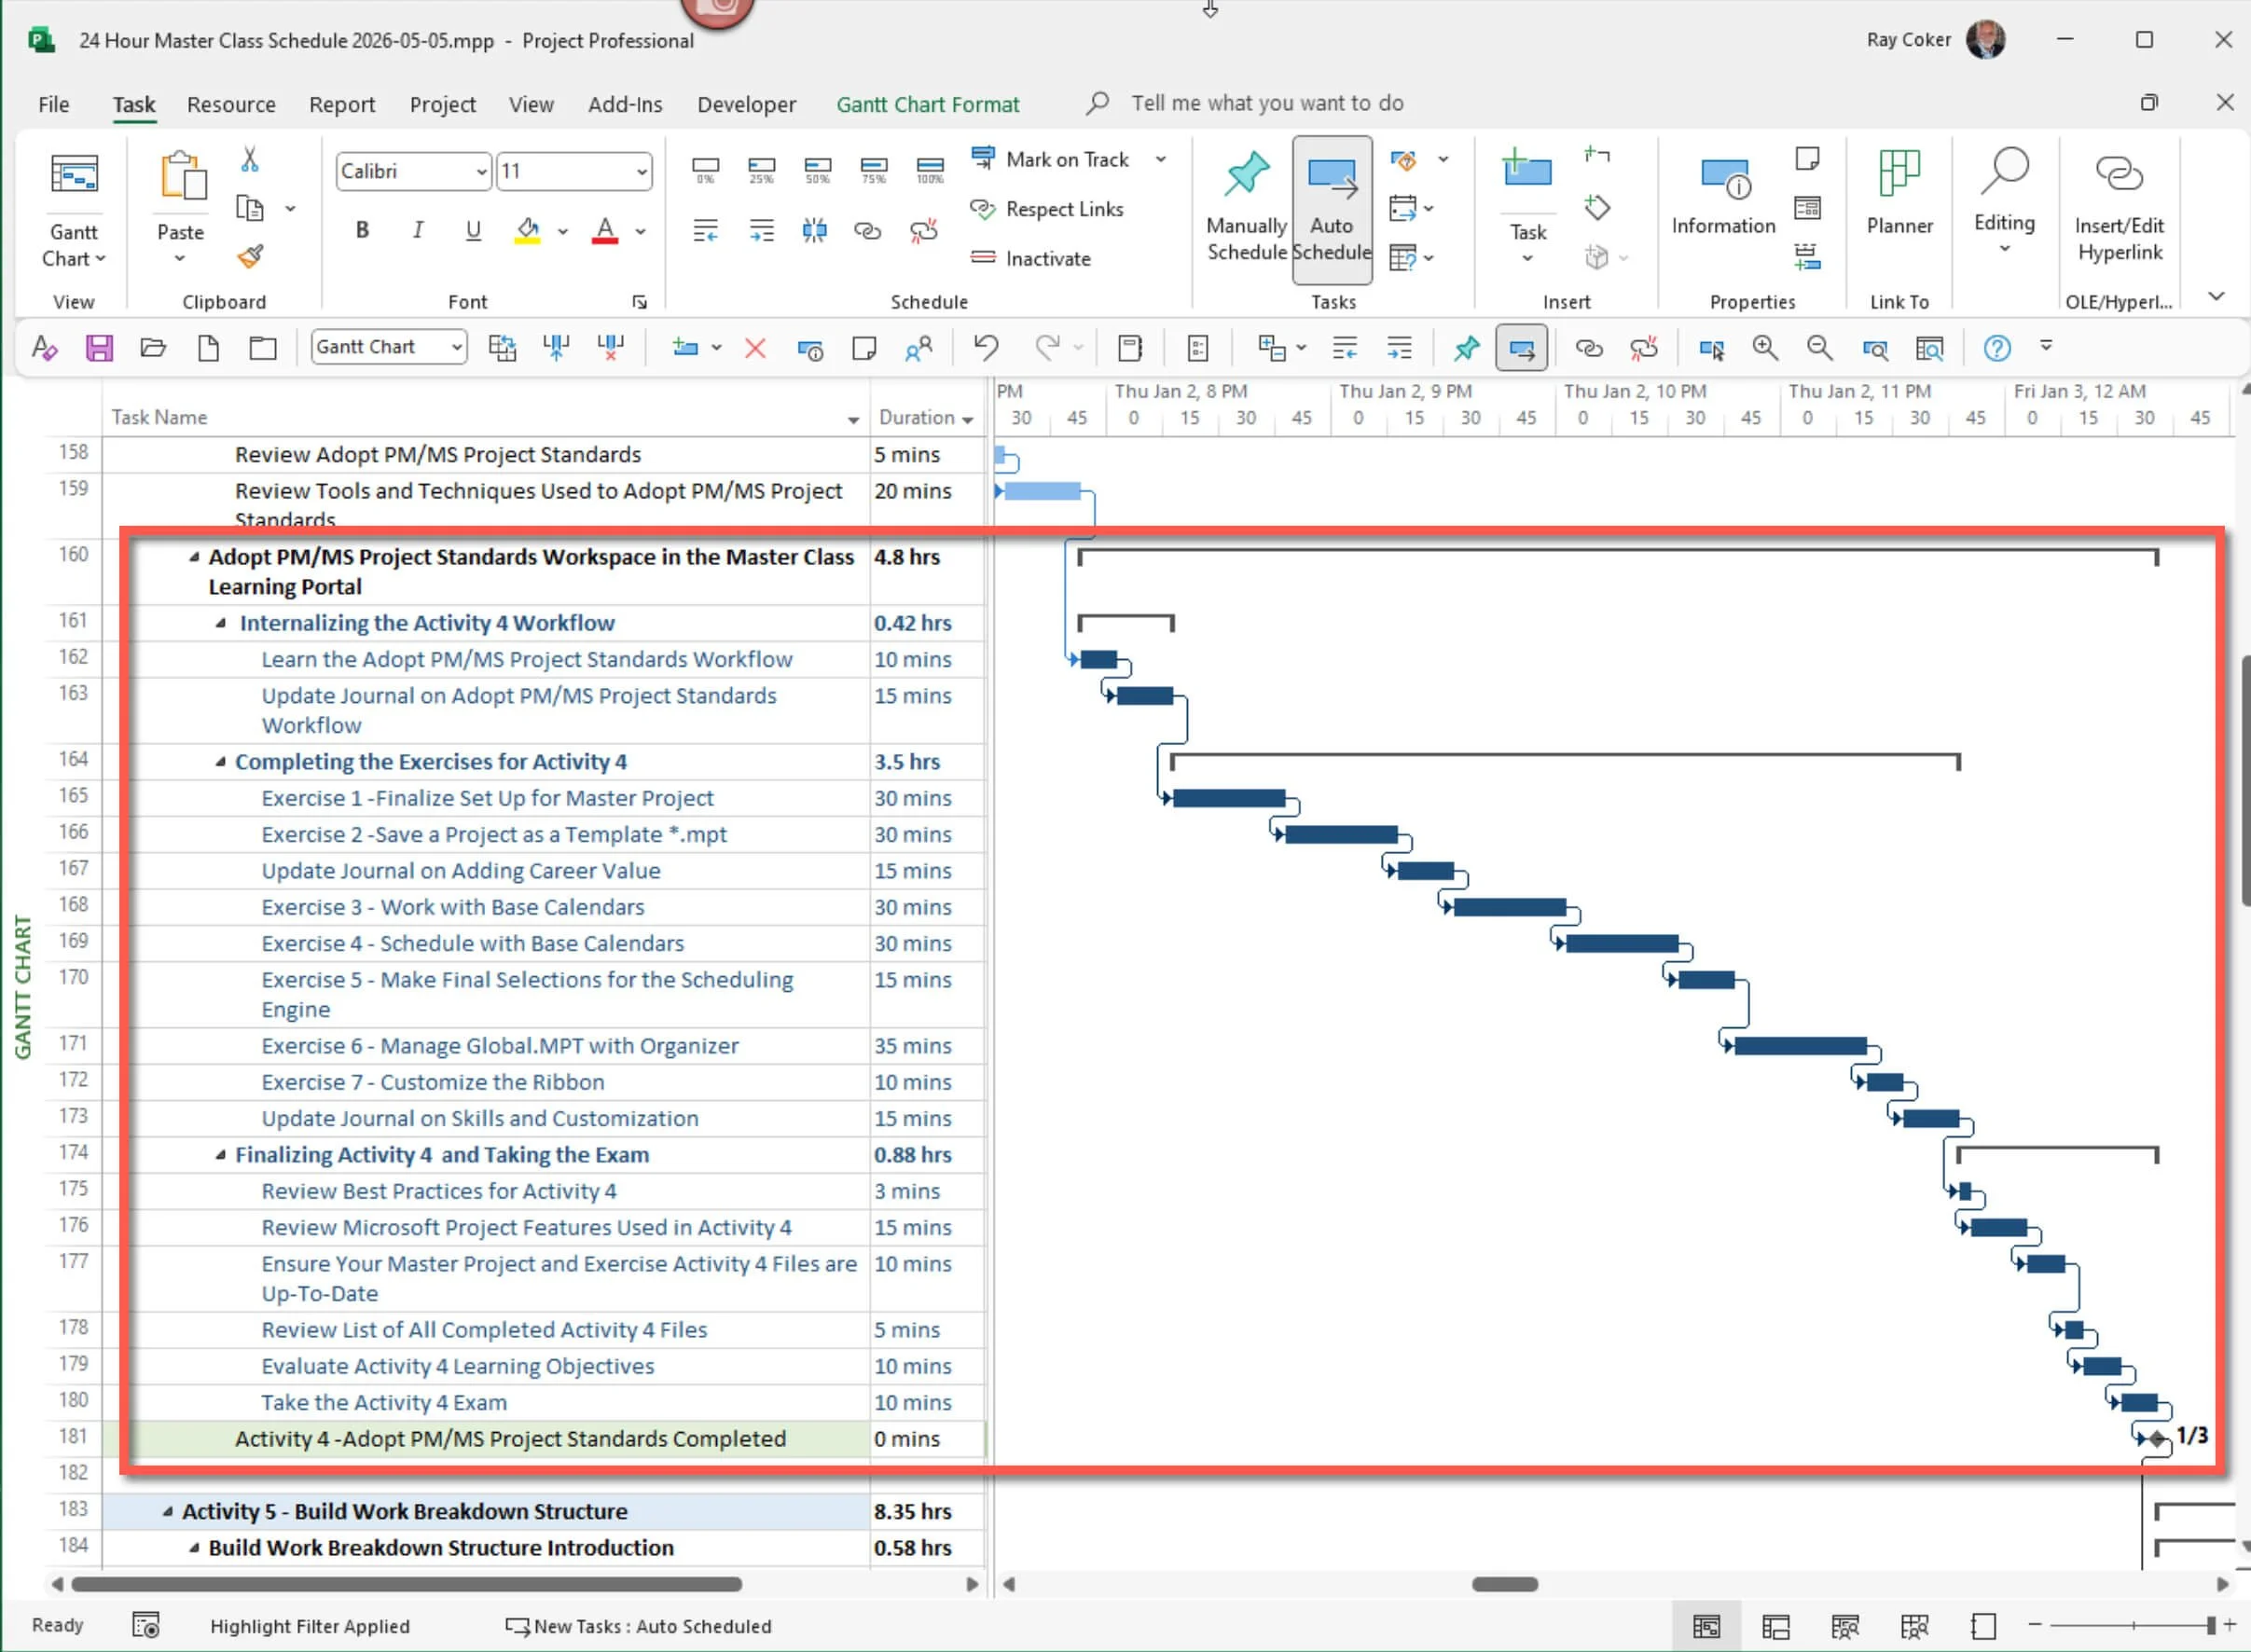
Figure 10.2. Activity Workspace schedule. This schedule shows the sequence and estimated duration of the Workflow, exercises, Master Project applications, final review, and Activity assessment.
The project team acquisition, resource management methods, and best practices shared in this Activity Workspace come from over 35 years of experience teaching Microsoft Project, training consultants, deploying Project Server, and helping professionals around the world.
Workflow
Internalizing the Activity 10 Workflow (25 minutes)
Overview and What You Will Learn
In this Activity Workspace, begin by making sure you understand the Acquire Project Team workflow. Notice how project managers move from planning to execution by assigning people to specific activities. Follow the same steps that experienced project managers use to replace generic resources with real team members, check workloads, solve resource conflicts, and balance assignments throughout the project.
Remember that generic resources represent required skills or roles rather than specific individuals. This approach is an important part of resource planning, allowing the project manager to determine what expertise is needed before deciding who will actually perform the work. Once the required skills have been identified, generic resources can be replaced with named team members who possess the appropriate qualifications and availability.
As you go through the workflow, notice how Microsoft Project helps identify overallocated resources, evaluate resource availability, adjust assignments and schedules, and build a realistic execution plan. You will also learn when to resolve conflicts manually, when to use the Resource Leveling tools, and how Resource Pools and Master Projects support resource coordination across multiple projects. Understanding both how these features work and why each step matters will help you create a technically sound schedule that reflects the people who will actually perform the work.
Learn Acquire Project Team Workflow (10 minutes)

Preparing the Crew: Acquiring the Team for the Voyage
Picture yourself as the captain of a ship getting ready for a long journey. You know where you’re going; the route is set; supplies are on board; and every part of the trip is planned. The charts are ready, but the ship hasn’t left the dock yet.
Why?
Because the crew has not yet been assembled.
When planning, you figured out which roles are needed for the trip: Captain, Navigator, Engineer, Cook, and Deckhands. These roles represent the required skills, not the actual people yet. Before the ship can leave, each spot must be staffed with a qualified person.
Like preparing a crew before a ship leaves the harbor, this Activity marks the transition from planning the work to preparing people to perform it. Within the Project MAP (Model, Activities & Phases) framework, the Acquire Project Team Activity is the first in the Executing Phase. The project now moves beyond generic resource requirements by assigning team members by name, confirming their availability, reviewing their workloads, and preparing the team to begin execution.

Signing On the Crew: Replace Generic Resources
The captain’s first job is to fill each planned role with a real crew member. Each sailor needs the right knowledge, certifications, experience, and time for their job. A good captain asks:
Who is the best person for each responsibility, and do they possess the skills needed to complete it successfully?
In the same way, Microsoft Project starts with generic resources that show what skills are needed. When the project begins, these placeholders are replaced with the people who will do the work.

Inspecting the Watch Schedule: Review Resource Workloads
After everyone is on board, the captain checks each crew member’s activities for the trip. Sometimes one sailor has too much to do, while another has too little. If the crew isn’t balanced, it can lead to fatigue, delays, mistakes, and increased risk.
The experienced captain asks:
Is every crew member carrying a reasonable workload throughout the voyage, or are some overloaded while others remain underutilized?
Project managers rely on proven resource management techniques to build effective teams and produce realistic schedules. The software provides powerful tools that support these techniques by assigning resources, identifying conflicts, balancing workloads, and evaluating the impact of staffing decisions on the project schedule.
Although balanced workloads are important, they are not the ultimate objective. The goal is to produce a realistic schedule that satisfies the project's objectives, constraints, and commitments while making effective use of available team members. Resource balancing is one of several tools used to achieve that goal.

Balancing the Crew: Balance Resource Workloads
If one crew member has too much to do, the captain needs to share out the work before leaving port. The goal is for everyone to help out without causing delays or overworking anyone.
The important question becomes:
How can responsibilities be redistributed so the entire crew works efficiently while still reaching the destination on schedule?
Microsoft Project helps with this by using Resource Leveling. This lets project managers reduce excessive workload for some people and keep the schedule realistic.
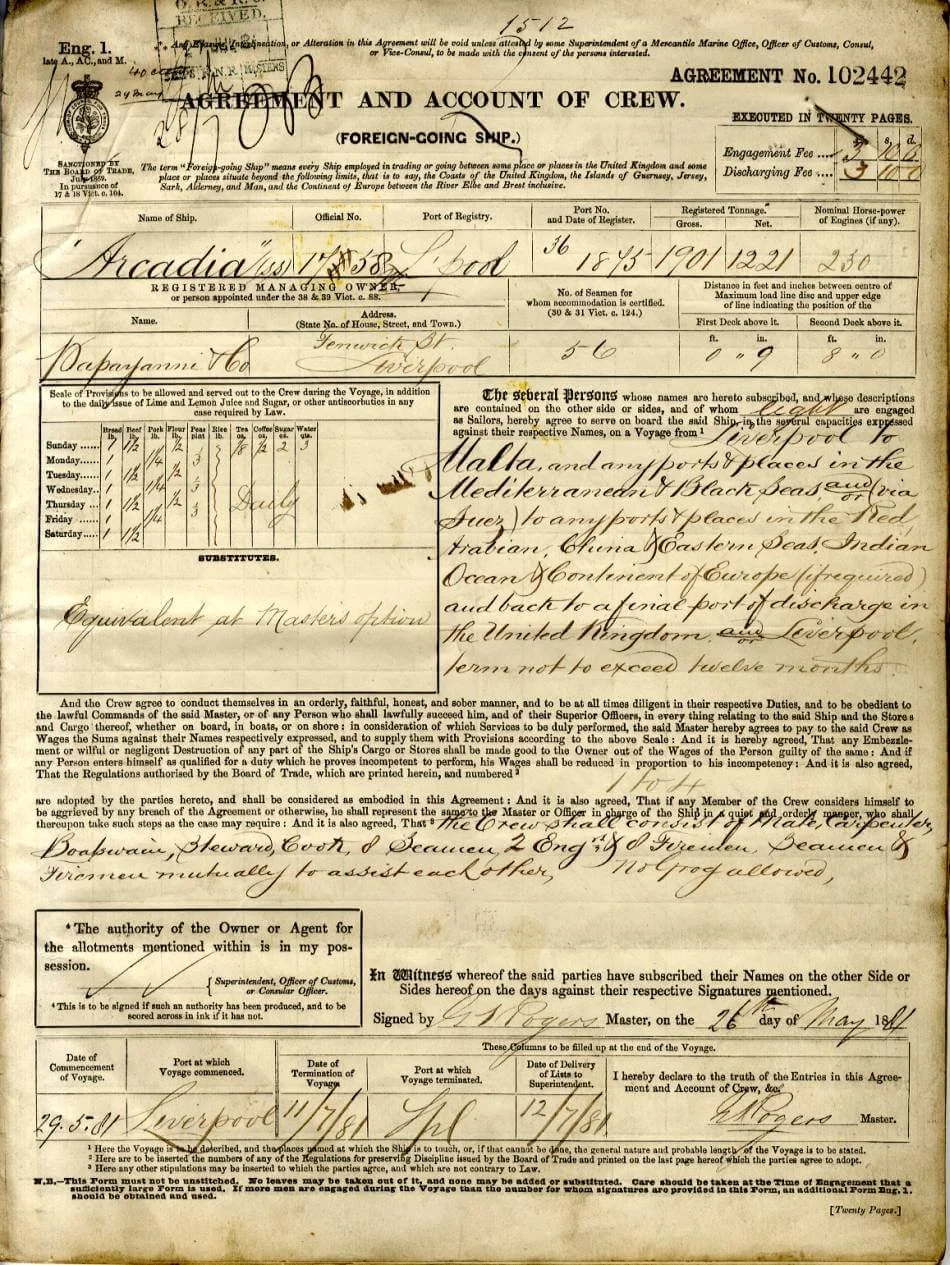
Sailing as One Crew: Establish Team Working Agreements
Unlike the other techniques presented in this Activity, working agreements are not created within Microsoft Project. They represent an important project management practice that complements the schedule by establishing expectations for communication, collaboration, accountability, and decision making among the project team.
A sailing crew agreement clarifies expectations, mitigates liability, and ensures a safe voyage for both the skipper and the crew. While non-commercial recreational trips rarely require a written contract, having one is highly recommended to outline responsibilities, cost-sharing, and emergency protocols.
Even the best crew will have trouble if they don’t know what’s expected. Before leaving, the captain explains how shifts will work, how decisions get made, how to share problems, and how everyone will work together during the trip.
An experienced captain always asks:
Does every crew member understand how we will communicate, coordinate our work, and resolve problems during the journey?
Good project managers set these expectations before the work starts. Clear communication, clear roles, and shared agreements help turn a group of people into a real team.
By the end of this Activity, you will start to see project staffing like experienced project managers do. It’s not just about assigning people to activities but about building a balanced, skilled team that can get the job done. Just like a ship needs the right crew to finish its journey, a project needs the right people working well together to succeed.

Activity 10: Acquire Project Team Workflow Chart
This workflow illustrates the overall process for acquiring and managing your project team. Although the steps are presented sequentially, experienced project managers often repeat portions of the workflow several times as staffing changes, workloads are balanced, and schedule adjustments are evaluated. Continue refining the schedule until the project team, assignments, and workload produce a realistic execution plan.
The Acquire Project Team Workflow gives you a clear path from finishing your project plan to getting your project ready to start. In the planning stage, you figured out what work needs to be done. Now, you will choose who will do each activity, check that they are available, and make sure their workloads are balanced so your schedule is realistic and achievable.
As you study this workflow, notice that each step builds on the decisions made earlier. Begin by replacing generic or skill-based resources with named team members. Then define their availability, review their workloads, and identify periods of overallocation or underutilization. Resolve conflicts by reassigning resources, changing assignments, adjusting Activity timing, or using Microsoft Project’s Resource Leveling tools when appropriate. Finally, establish Project Team Working Agreements so that team members understand how they will communicate, collaborate, make decisions, and resolve problems during execution.
Figure 10.3. Acquire Project Team Workflow. Use this workflow to replace generic resources with named team members, review and balance workloads, and establish Project Team Working Agreements before execution begins.
Study this workflow before beginning the exercises. It illustrates the sequence of decisions used to replace generic resources, evaluate workloads, resolve conflicts, and prepare the project team for execution.

Download
Click the Download icon above to open the Acquire Project Team Workflow.pdf file. Save the workflow with your Activity 10 files so you can refer to it while completing the exercises and applying the same process to your Master Project.

Update Journal on Acquire Team Workflow (20 minutes)
Before beginning the Activity 10 exercises, reflect on your previous experiences with team collaboration and resource management in professional, academic, volunteer, or personal projects. Consider how people were selected, how responsibilities were assigned, and how the team responded when workloads or availability changed.
Write a journal entry connecting those experiences to the Acquire Project Team workflow. Consider team acquisition, resource availability, workload balancing, resource reassignment, Resource Leveling, and collaboration. This reflection will help you relate your own experience to the project management principles and Microsoft Project techniques you are about to practice.
Journal Questions:
Team Dynamics: Think about a time when you were part of a team. What strategies did you and your team use to define roles, responsibilities, and communication channels? How did these strategies impact the team’s ability to work cohesively and achieve its goals?
Resource Management: Reflect on a project where you had to manage resources effectively. How did you handle changes in resource availability or constraints? What approaches did you use to reassign resources or modify activities to ensure the project stayed on track?
Balancing Workload: Have you ever faced challenges with workload and resource capacity? How did you address these challenges to balance the workload and ensure that resources were utilized efficiently?
Exercises
Complete the Activity 10 Exercises (3 hours, 10 minutes)
This exercise series is designed to reinforce the Acquire Project Team Workflow introduced earlier in this Activity. Rather than learning Microsoft Project commands in isolation, you will first practice each technique in a controlled exercise file and then consider how the same decision applies to your Master Project. The early exercises develop specific skills in resource replacement, availability, workload analysis, manual adjustment, automatic Resource Leveling, and cross-project resource management. Exercise 10.6 then brings those skills together in your Master Project. As you complete each practice exercise, identify the equivalent condition in your own project so that the final Master Project exercise becomes an application of decisions you have already considered rather than your first attempt to apply the workflow.
Complete these exercises in the order presented. The practice files provide a controlled environment for learning each technique, while your Master Project provides the environment for applying what you learned. After each practice exercise, complete the corresponding Master Project application before moving forward. This sequence will help you develop the project team gradually rather than postponing all staffing, availability, workload, and leveling decisions until the final exercise.
This exercise series follows the same workflow introduced earlier in this Activity. Each exercise reinforces a specific step in acquiring and preparing a project team for execution. You will begin by replacing generic or skill-based resources with named team members, then define their availability, evaluate workloads, resolve resource conflicts, share resources across multiple projects, and finally level your Master Project. Each exercise also produces a specific deliverable that becomes part of your Master Project, allowing your project to evolve from a planning document into a realistic execution schedule.

Definitions
Work: The Work field represents the total scheduled effort required from all assigned work resources to complete an Activity. Work is normally measured in hours and calculated from assignment units and duration, based on the Task Type and Effort-Driven settings. It does not include nonworking time, breaks, delays, or calendar exceptions. Reviewing Work helps the project manager understand labor demand, compare assignments, evaluate resource capacity, and determine whether the planned effort is realistic.
Work Avail.: The Work Availability field shows the amount of working time a resource can provide during the selected time period. Microsoft Project calculates this capacity from the resource’s calendar and Unit Availability. Existing assignments do not reduce Work Availability; they are considered when the software calculates Remaining Availability. Use this field to compare the resource’s total capacity with assigned Work and determine whether additional work can be assigned. Work Availability = Unit Availability * Time
Rem. Avail.: The Remaining Availability field shows the amount of a resource’s available working time that remains after assigned Work is subtracted from Work Availability for the selected time period. A positive value indicates unused capacity, zero indicates that the available capacity is fully assigned, and a negative value indicates overallocation. Use this field to identify opportunities to assign additional work or periods in which assignments exceed the resource’s capacity.
Overalloc.: The "Overalloc." field indicates whether a resource is assigned more work than can be completed within their available time. It shows whether a resource's assignments exceed its capacity, which is determined by the resource's calendar and maximum units. When a resource is overallocated, its assigned activities require more hours than the resource is available to work.
Unit Avail.: The "Unit Availability" field indicates the maximum percentage or number of units a work resource is available for activities during a specified period. This field reflects the resource's capacity to work, as determined by their calendar and any changes recorded in the Resource Availability table within the Resource Information dialog box.
Resource Leveling: Resource Leveling is one of Microsoft Project's primary techniques for resource optimization. Rather than simply identifying overloaded team members, the software can delay or split work where appropriate to create a more realistic schedule. Effective resource optimization helps project managers make better use of available people while reducing schedule conflicts, excessive overtime, and unnecessary project delays.
The process starts by identifying activities where resources are overallocated, meaning they have more work assigned than they can handle within the given timeframe. Once overallocations are identified, resource leveling adjusts the activity schedules accordingly. This can involve delaying the start of some activities until the resource becomes available or splitting activities to spread the work more evenly over time.
The software offers a range of leveling options, both automatic and manual, to cater to different project needs. This flexibility ensures that project managers can make adjustments based on their own analysis and judgment, making them feel accommodated and catered to.
Resource leveling can impact the project schedule by extending the project's duration, as activities may be delayed to resolve overallocation. This extension ensures that activities are completed without overloading any single resource, thus maintaining a manageable and realistic project timeline.
Master Project: In the MS Project Master Class, your Master Project is the primary project file you develop progressively throughout the Activities. Microsoft Project also uses the term master project for a separate software feature: a project file into which one or more linked project files, called subprojects, are inserted. In this Activity, the context determines which meaning applies. References to your Master Project mean the course project you are building; references to a master project file mean Microsoft Project’s consolidated-project feature.
The master project facilitates better coordination and oversight, providing a holistic view of all activities, resources, and dependencies across the included subprojects. It is beneficial for managing large programs or portfolios where multiple projects must be tracked together for resource sharing, scheduling, and performance monitoring. Additionally, it simplifies reporting and helps identify potential conflicts or dependencies between projects that might need to be evident when managing each project separately.
Master projects are essential for program managers who oversee multiple related projects and must ensure that resources are allocated efficiently and timelines are met without overlap or conflict. By using a master project, managers can streamline communication, improve coordination, and ensure that all aspects of the program are aligned with organizational goals and timelines.
Resource Pool: A resource pool is a centralized repository of resources that can be shared across multiple projects. This centralization allows for efficient resource management and allocation, ensuring that resource information such as availability, cost rates, and skills remain consistent across different projects. Using a resource pool, project managers can avoid resource overallocation, identify and resolve conflicts early, and ensure that resources are utilized effectively across the organization.
A resource pool simplifies the coordination of resources among various projects, making tracking and managing resource usage easier. When multiple projects link to a shared resource pool, any updates to the resource information are automatically reflected in all related projects. This ensures that all projects can access the most current resource data, leading to more accurate project planning and execution.
Additionally, a resource pool enhances reporting and analysis capabilities. Project managers can generate comprehensive reports on resource availability, usage, and costs across all projects that use the shared pool. This holistic view aids in making informed decisions about resource allocation and helps in optimizing resource utilization across the organization.
A dedicated project file containing resource information is set up and linked to other project files to create a resource pool. This setup allows the projects to share and update the common resource data seamlessly.

Exercise 10.1: Replace Resources and Replace Resource Assignments (15 minutes)
This exercise reinforces the first step of the Acquire Project Team Workflow: replacing generic or skill-based resources with named team members. Begin in Acquire Team Overview.mpp to practice replacing resources and resolving a simple assignment conflict in a controlled schedule. After completing the practice file, open your Master Project and identify every generic or skill-based resource that can now be replaced with a named team member. Make the replacements for which staffing decisions have been confirmed, and document any generic resources that must remain because the individual has not yet been selected.
Download
Click on the Download icon above to open the Aquire Team Overview.mpp file.
The project management idea is to plan with resource skills rather than people up to this point. Most of us don’t do that; we plan with the people on hand or in mind. The implications of planning with “skill in mind” are apparent. In the best-case scenario, we should ask, “What skill is required for this activity?” Not, “Who do I have available?”
The simple project you opened has five tasks and two skill resources assigned. The first step in the workflow is to replace these skill resources with actual people.
Open the Resource Sheet view and rename these resources with Ted, Susan, and Alice, in that order.
Ted replaces Project Manager
Susan replaces Software Engineer
Alice replaces Project Manager II

Best Practice
Get in the practice of thinking about the skills required for resource assignments. Then work to acquire a team that represents those skills.
Best Practice
A primary skill in project management is quickly leveling the cityscape of resource assignments. Resource workloads often look like a cityscape. Resource leveling smooths that cityscape, eliminating the peaks and valleys.

Illustration: Skyline Analogy for Leveling Resource Workloads
I grew up in Seattle and saw the skyline change a lot over the years. When the 38-story Smith Tower opened in 1914, it was the tallest building west of the Mississippi River. In the photo, you can see the Smith Tower as the small white building on the right with the pointed top. The Space Needle was built for the 1962 World's Fair, and after that, it felt like a new, taller skyscraper popped up every few years. Now, when I visit, the skyline is full of towers of all different heights, making it look unrecognizable if the Space Needle isn’t in the photo and clouds cover Mt. Rainer in the background.

A resource histogram can change in a similar way. As you schedule activities and assign resources, some time periods get overloaded while others are barely used. If you don't pay attention, the workload becomes uneven, creating "skyscrapers" of resource demand. This can lead to overworked team members, schedule delays, burnout, and wasted project resources.
Washington, D.C., is very different. The federal Height of Buildings Act of 1910 limits how tall most buildings can be, so the Washington Monument stands out on the skyline. When I taught Microsoft Project to federal agencies in Washington, I would tell students, "This is how you want your resource histogram to look." Instead of big peaks and valleys, a well-leveled project spreads work out more evenly, making the workload easier to manage, more predictable, and less likely to cause resource problems.

Field Note: Matching Skills to People
In my experience with Microsoft Project Server, many organizations kept large enterprise resource pools filled with hundreds or even thousands of generic, skill-based roles. Instead of naming a specific person early on, project managers would assign roles like Senior Web Developer, Database Administrator, Business Analyst, or Quality Assurance Specialist. This way, projects could be planned around the skills needed, not just who was available at the time.
Resource managers handled the real people behind these roles separately. Each employee had a detailed skills profile in a database. For instance, Jane Smith might speak both English and Spanish, be skilled in SQL Server database administration, have experience in web development, and hold several Microsoft certifications. Someone else might have similar technical skills but not the language abilities needed for an international project.
When it was time to staff the project, Project Server’s resource-matching tools helped identify employees whose skills matched the generic roles in the plan. The system would suggest one or more qualified people, and the resource manager would check each person’s availability by looking at workload graphs, resource histograms, and current project commitments. If someone had the right skills but was already busy with other projects, they might not be chosen.
A specific person was assigned to the project only after both their skills and availability were verified. This method lets project managers create accurate schedules early on, and it helps organizations use specialized talent more effectively across different projects.
IIn the Acquire Team Overview.mpp file, apply the Resource Graph view and use Zoom Entire Project. Select each resource in turn and review the graph to identify periods of overallocation, full utilization, and underutilization. This view provides a time-phased picture of the selected resource’s workload and helps you determine where schedule or assignment changes may be required.
Figure 10.4. Resource Graph view displaying daily resource workloads. Use this view to identify periods when a selected resource’s assignments exceed or fall below the resource’s available capacity.
Return to a Gantt Chart view.
Resource leveling means addressing periods a resource is over and under-allocated and leveling their workload, so they are not experiencing times of overallocation when the quality of work goes down, and delays are a common outcome of over-allocation. Resource leveling also means looking for ways to better or more fully utilize resources, enhancing potential project contributions before their time is squandered.
There are two ways to address overallocation: reschedule and reallocate.
In this project example, both Task 1 and Task 2 coincide, and it is easy to see why Ted is overallocated 100% during this period. Link those two tasks with a standard dependency. By rescheduling Task 2, the overallocation is resolved. However, linking does cause a scheduling change and perhaps that change is not acceptable.
Unlinke these two tasks.
The other general approach is to adjust assignments. First, select Task 2, and then open the Assign Resources dialog box and replace Ted on Task 2 with Alice as shown in the figure below.
Save the project.
When Finished with the Exercise
In Acquire Team Overview.mpp, the generic resources should have been replaced with Ted, Susan, and Alice, and Alice should replace Ted on Task 2 without creating another overallocation. In your Master Project, replace every generic or skill-based resource for which a named team member has been confirmed. Leave unresolved positions as generic resources and record what staffing decision is still required. Save both files before continuing.
Figure 10.5. Replace Resource dialog used to substitute Alice for Ted on an assignment. Reassigning the work resolves Ted’s conflict while retaining the Activity and its required Work in the schedule.
Field Note: Resource Planning at Hoover Dam

I fell in love with Hoover Dam as a young boy, so decades later I jumped at the opportunity to help modernize project management practices at one of the world's greatest engineering achievements. It was especially meaningful because Hoover Dam occupies a special place in project management history. The project is closely associated with the widespread use of the Gantt chart and demonstrates the importance of coordinating many large, interdependent projects simultaneously—an early form of what we now call portfolio management.

The International Association of Project Managers explains, "The Gantt chart is named after American engineer and management consultant Henry L. Gantt, who used it to provide a visual picture of the Hoover Dam project so that everyone involved could see when the individual construction phases were scheduled to take place." Even if Hoover Dam was not the first major project to use Gantt charts, it became one of the most famous examples of using visual schedules to organize thousands of workers, numerous activities, and highly complex logistics.
Frank Crowe was the Chief Engineer for the Six Companies group that built the dam. Besides his impressive engineering skills, Crowe stood out for his leadership and organizational skills. Building the dam was much more than just putting up a concrete wall across the Colorado River. The team first had to create roads, railways, tunnels, power systems, worker camps, and even a whole town in a remote part of the Southwest. Each of these was a big project on its own, and they all needed to be finished in the right order while sharing workers, equipment, materials, and money.

When I worked at Hoover Dam in 2007, I witnessed another interesting moment in its history. Michael Bay and Steven Spielberg were filming Transformers at the dam, while construction teams were building the nearby Mike O'Callaghan–Pat Tillman Memorial Bridge. At the bridge, a large bronze Gantt chart honors the planning and scheduling that made the years-long project possible.
My job was to plan maintenance for the generators. Hoover Dam's powerplant has 17 main turbines, with nine on the Arizona side and eight on the Nevada side. When a generator is shut down for maintenance, each hour it is offline affects how much electricity is produced and how much revenue is generated. That is why the maintenance schedule must be carefully planned and followed. A large printed Gantt chart is posted next to the generator so everyone—mechanics, electricians, supervisors, and contractors—can quickly see the schedule and know what needs to be done during each shift.
One of our main goals was to improve how they planned resources in the software. Like many other organizations, the usual reaction when a project started falling behind was to add more people. We could test this idea before actually bringing in extra workers. We created detailed schedules with expert activity orders, different work shifts, special skills, and other staffing options. This lets us see what would happen if we added or removed resources before making real decisions.
The results often surprised us. Sometimes, adding an extra shift raised project costs by about $20,000 but shortened the schedule by only 10 minutes. These tests showed that simply adding more people does not always make a project finish faster. The real challenge is to match the right people with the right skills to the right activities at the right time. That is exactly what resource planning, workload analysis, and resource leveling are meant to do.
Another important goal was to keep the organization's knowledge alive. The maintenance manager I worked with was considering retiring after more than 30 years at Hoover Dam. Together, we recorded much of his experience in detailed project plans. These plans showed not just the order of activities, but also the skills, decisions, and lessons learned from each maintenance project. In many ways, we were building a knowledge base for future maintenance planners.
One unexpected bonus for me was getting to spend time with someone who loved Hoover Dam as much as I did. After working there for decades, he knew almost every part of the facility and was happy to share its engineering history, how it operates, and many great stories. This remains one of the most memorable consulting jobs of my career.
Exercise 10.2: Define Resource Availability (15 minutes)
One of the most important responsibilities of a project manager is making sure enough resource capacity exists to complete the project successfully. Resource capacity planning compares the amount of work required with the time each resource is actually available to perform that work. Microsoft Project helps accomplish this by allowing you to define calendars, maximum units, availability dates, and working time for every resource. In this exercise, you will configure resource availability so your project schedule reflects the real capacity of your project team rather than ideal assumptions.
The next workflow step is determining when those people are actually available. Begin by using Acquire Team.mpp to practice changing a resource calendar and defining time-phased availability. Then open your Master Project and review each named team member’s working calendar, Max. Units, known absences, part-time commitments, and changes in availability over the life of the project. Enter every confirmed availability condition before continuing so that the Calculation Engine schedules work using realistic resource capacity.
Download
Click the Download icon above to download and then open the Acquire Team.mpp file.
Replace Generic or Skill Resources
The first thing to do is replace the “skill” resources with a team of people. Apply the Resource Sheet view and make these changes:
Sponsor = Wendy
PMO Director = Susan
PM Consultant = Ariel
PMO Staff = Floyd
Figure 10.6. Resource Sheet with generic or skill-based resources replaced by named team members. This change transforms planned staffing requirements into accountable assignments for project execution.
Defining an Actual Person’s Availability
After replacing “skill” resources with the actual people doing the work, define each person’s availability. Keep in mind that now you are dealing with resources that have commitments to other projects, line activities, time at the “water cooler,” conferences, training, and life experiences like vacations, maternity leave, and accidents and illnesses. Address resource availability by making the appropriate changes to their:
Calendar
Exceptions to the base calendar
Max Units
Contour of availability
Let’s make some adjustments to Wendy’s availability:
First, Wendy will not be back from the holidays until January 5th, so block off these dates in January (1/3-4/2022).
Next, Wendy is available full-time for meetings and to kick off the project by spending several days determining the outcomes and scope of the project and aligning those with the business. Still, she isn’t available more than a few hours a week. Leave her Max. Units at 100% against her Standard base calendar but then contour her availability to 25%, beginning 2/1/2022.
When finished, you get a message that the duration of a Fixed Duration activity has been changed to accommodate this change. The activity was 3.17 days in duration and it has been changed to 5.17 days to accommodate Wendy’s availability.
Save this project.
Figure 10.7. Scheduling message displayed after a resource-calendar change affects an Activity. Review this message before accepting the change because Microsoft Project may recalculate assignment dates, Work, Units, or Duration.
Figure 10.8 Activity duration recalculated after a resource-calendar exception reduces working availability. This result demonstrates how the Calculation Engine uses resource calendars when determining when assigned Work can be performed.

Warning
Do not assume that the label Fixed Duration prevents every scheduling change. Microsoft Project calculates the schedule from several interacting settings, including Activity Type, Effort-Driven scheduling, assignments, resource calendars, availability, and dependency logic. When resource availability changes, Project may recalculate Work, Units, assignment dates, or Activity duration depending on those settings. Always review the scheduling message and inspect the Activity after changing a resource’s availability rather than relying only on the Activity Type label.
When Finished with the Exercise
In Acquire Team.mpp, the generic or skill-based resources should have been renamed Wendy, Susan, Ariel, and Floyd. Wendy’s resource calendar should show January 3 and 4, 2022, as nonworking time, and her Resource Availability table should show 25% availability beginning February 1, 2022. In your Master Project, each confirmed named team member should have a reviewed resource calendar, appropriate Max. Units, and any known time-phased availability entered. Record any availability assumptions that still require confirmation, and save both files.
Figure 10.9 Resource availability defined by Max. Units, time-phased Resource Availability, and calendar exceptions. Together, these settings determine the resource capacity Microsoft Project uses when scheduling assigned Work.
Exercise 10.3: Examine Resource Workloads (30 minutes)
Before a project manager can balance workloads or resolve scheduling conflicts, they must first understand how project resources have been allocated. Resource allocation is the process of assigning people, equipment, materials, and other resources to project activities to ensure work is completed efficiently and on schedule. Microsoft Project provides several tools for reviewing resource allocation, identifying overallocated resources, measuring remaining capacity, and evaluating the realism of assignments. In this exercise, you will examine how resources have been allocated across your project, learn to recognize common workload problems, and prepare your schedule for effective resource leveling.
Use the same Acquire Team.mpp file used in the previous exercise for this one.
Insert the Peak field in the Resource Sheet view. In this exercise file, the resources displayed in red have at least one period in which their assigned Units exceed their available capacity, and the Indicators column displays the overallocation indicator. Remember that Peak reports the highest assignment Units reached during any time period; by itself, it does not show how long the conflict lasts or which assignments caused it.
The Resource Sheet can display summary fields such as Peak, Work, and Overallocation, but it does not show the detailed time-phased assignments needed to diagnose when and why an overallocation occurs. To analyze the conflict, use views such as Resource Usage, Task Usage, Resource Graph, Team Planner, or a split view that combines resource information with the Gantt Chart.
Figure 10.10 Peak field in the Resource Sheet showing the highest assignment Units reached by each resource. Compare Peak with Max. Units to identify resources whose assignments exceed their available capacity during at least one time period.
Apply the Gantt Chart view. The Gantt Chart view identifies which activities are associated with over allocations, and the dates of these activities tell us where to look.
Wendy needs to be there for this first activity, so we have no choice but to delay the project before it even starts. The best way to do that is to change the project start to 1/5/2022. We already know that Wendy isn’t coming back from the holidays until 1/5/2022, so we might as well make that change to the overall schedule.
Let’s first simulate general shifts in a schedule. Before changing the project Start date in Project Information to 1/5/2022, go to Options / Schedule and turn Calculation Off at the bottom. Then enter 1/5/22 in the Start date field in Project Information. Notice the schedule does not shift; the Project Start milestone is still 1/1/22. We know it did not change to 1/5 because we turned off Calculation.
When an activity or activities do not appear to be scheduled correctly, there are five things to initially check:
The project or task calendar.
Check whether Resource Leveling is set to Automatic.
Make sure Calculation is On in Options / Schedule.
Correct the problem by turning Calculation (a global setting that applies to all open projects) back On, and the Project Start milestone starts on 1/5. Then change the duration of Determine outcomes & scope that is changed to 5.17 days when Wendy’s availability was adjusted, back to 3.17 days.
Also, notice the timing constraint on PMO complete. There is a Must Finish On constraint of 5/3/22. If you insert the Total Slack field, you will note that the schedule has several days of negative slack, so let’s make that correction by delaying the finish date. For the PMO complete activity, go to Task Information / Advanced tab, and change the MFO date to 5/5/2022.
Figure 10.11 Project finish constraint adjusted to eliminate negative Total Slack. Removing an unrealistic finish restriction allows the schedule to reveal the completion date calculated from the current logic, estimates, and resource conditions.
From the Gantt Chart view in the figure below, we can see the activities involved in the over allocations and we get a pretty good sense of the general time period, in this example last part of February and the first part of March, we need to look at closely to resolve these resource conflicts.
Figure 10.12 Gantt Chart Activities displaying the resource-overallocation indicator. The indicator identifies Activities assigned to a resource who exceeds available capacity during at least part of the assignment period.
Apply the Resource Usage view. Adjust the time scale to week periods, because let’s say, that is the unit you are concerned about regarding over allocations. Then scroll to 1/30/2022 and make some of your observations and perhaps decisions.
Add these details and color the backgrounds so that the rows are distinctive and shown in the figure below:
Work
Work Avail.
Rem. Avail.
Overalloc.
Unit Avail.
For example, you might make these observations:
As you already know, the resources are overbooked in February.
Wendy shows a small overallocation during the first part of February. Before accepting it, determine the amount, duration, and cause of the conflict and confirm that the assignment is realistic. In this exercise, the project manager may decide to accept the limited overlap because Wendy’s involvement is brief and necessary, but that decision should be documented rather than ignored.
Susan and Ariel are significantly overallocated during 1/30 and slightly overallocated during 2/6.
Ariel is significantly overallocated during 1/30 and then not used at all beginning 2/20.
Susan and Floyd are seriously overallocated during 2/27.
Figure 10.13 Resource Usage view comparing time-phased Work, Work Availability, Remaining Availability, Overallocation, and Unit Availability. Use these values to determine when a resource conflict occurs, how large it is, and whether unused capacity is available elsewhere.
Select Wendy and then Apply the Resource Graph view. Zoom the Entire Project, set the timescale to weekly, and then scroll through the resources.
Susan has the clear-cut case of the bottlenecks. There is a two-week period that it is not humanly possible to complete her assignments.
Split the window and apply the Gantt Chart on the bottom view. Then scroll to 1/30.
It is clear which assignments contribute to Susan’s overallocation, as shown in the following screen.
Figure 10.14 Split window with the Resource Graph above the Gantt Chart. This combination connects a selected resource’s time-phased workload to the Activities and schedule logic responsible for the conflict.
Let’s start addressing some of these more severe resource conflicts. Susan is assigned to ID #6 and #7. These activities overlap.
Please take a minute to look at her assignments for both activities.
We will have to change the schedule, adjust her assignments, or a combination of both. Let’s say the best solution is to eliminate the overlap. Double-click on #7 to open Task Information and remove the lead for Determine process & procedures by entering 0 in the lag field under the Predecessors tab.
The scheduling message below appears. This message is poorly written but still lovely to get. This message would have told you where to look for the problem in previous versions of MS Project. For now, remember the scheduling message associated and remember to look at the schedule to determine what has happened.
Figure 10.15 Scheduling message displayed after an assignment or schedule adjustment. Review the message and the resulting schedule to confirm that the change resolves the resource conflict without creating an unacceptable effect elsewhere.
Before looking for the scheduling problem, notice that you have resolved the overallocation for Susan during this period.
As is almost always the case, when you address an issue, such as timing, cost, resources, or scope, you create another issue you must address. Poor project managers spend much of their time putting out fires. This could be because they lack skills or work for an organization that poorly plans or executes. Good project managers problem-solve. They realize there are constant changes, disasters, challenges, and obstacles. They are prepared, and they have confidence in their plans.

Note
This is the analytical behavior you want from project management software. A change to one project constraint can affect several others. Reassigning a resource may change Work or cost; changing Activity timing may affect the critical path or a committed finish date; and reducing scope or quality expectations may create schedule flexibility. To understand these tradeoffs, maintain the project’s schedule, resources, Work, cost, and scope-related decisions in Microsoft Project whenever practical, even when the official budget or scope documentation is maintained elsewhere.
Project Illustration: Planning for the Unexpected 1996 Summer Olympics

I lived in Atlanta during the 1996 Summer Olympics. In the months leading up to the opening ceremonies, newspapers and TV reports kept asking if the competition venues, transportation, and other facilities would be finished on time. To most people, it looked like everything was running late.
I remember seeing the program manager in charge of the Olympic projects being interviewed by a room full of reporters. They took turns asking tough questions about missed deadlines, construction delays, and whether the city would be ready for athletes from all over the world.
His answer stuck with me for almost thirty years. He calmly gave the same message to every question:
"We have looked closely at that. We have planned, and we are prepared. Even though it may not appear that we will be ready, we will finish on time."
What impressed me wasn’t just his confidence. It was the preparation behind it. He wasn’t just hoping things would work out. He knew the schedule, the critical path, the resources, the work left to do, and the backup plans already in place. He understood which activities had some wiggle room, which didn’t, where extra help could be used, and which changes would matter most.
That experience taught me an important lesson I’ve seen again and again in my consulting work. Experienced project managers are rarely caught off guard by problems because they’ve already thought through many of them. They keep asking questions like: What if this activity is delayed? What if we lose a resource? What if we add another crew? What if we change the order of activities? They consider different options before a crisis occurs.
That’s exactly what you’re learning to do in this activity. By examining resource workloads, swapping or reassigning resources, adjusting how activities connect, and seeing how those choices play out in the software, you’ll be ready to respond confidently when things change. The goal of resource planning isn’t just to make a schedule. It’s about understanding it well enough that, when problems come up, you already know your best options.
To address scheduling problems, the best view to apply is the Gantt Chart. In the project file, we are using, activities #6 and #7 are no longer overlapped in the Gantt Chart view, but what was the scheduling message trying to tell us? Look at the last WBS element and remember the constraint on that milestone. Then insert the Total Slack field, and the problem is more apparent; there are 4.45 working days of negative slack on the last WBS element created by the slip in the schedule. The project needs to be brought in to resolve this scheduling problem.
Typically, when you adjust one project constraint, such as having your budget trimmed or losing a valuable resource, you have to compensate elsewhere.
In this case, look at the lag between Establish performance metrics and Obtain feedback. Perhaps the initial thinking was to introduce that much lag to improve the quality of the input obtained. Reducing that lag would reduce the scope or quality of the project if it hinges on the quality of the feedback, but it seems to be the best way to address this scheduling problem. But how much do you reduce this lag? Well, the Total Slack field tells you 4.5 days.
Figure 10.16 Dependency lag adjusted to separate overlapping Activities assigned to the same resource. Modifying valid schedule logic can resolve an overallocation when the revised relationship still represents how the work should be performed.
Change the lag from 30 days to 25.5 days.
Notice the Total Slack is now zero, and the scheduling problem was corrected.
Go back to the Resource Usage view, with the Gantt Chart view on the bottom of a split window. Select Susan, and we can see that the next problem we need to address is her assignment to three activities coinciding. In addition, notice that Floyd is assigned to these three overlapping activities, too, and Ariel is available during this period.
Figure 10.17 Split window with Resource Usage above the Gantt Chart, comparing one resource’s overallocation with another resource’s available capacity. This analysis helps identify a qualified replacement before changing an assignment.
So let’s do these three things:
First, let’s remove the overlap between ID #12 and #13. It would be nice to do these together; we can’t staff the activities with the same people.
Insert the Total Slack field, and #13 has 0 days slack, so we know that changing/delaying that activity will delay the project. But go ahead, double click #13 and change the type of dependency from a Start to Start to a Finish to Start.
Then, with the Gantt Chart view selected below, open the Assign Resources floating dialog box (Resource tab / Assign Resources command) and do the following:
Replace Susan on #10 and #13 with Ariel. Susan’s overallocation is resolved. Ariel now has a heavy work week on 3/6, but it is low enough for her to level. The following week she has a low assignment, and then she is open.
Finally, select Floyd. He is overallocated the weeks of 3/6-3/13. Suppose both Susan and Floyd had wanted to work on Establish monitoring criteria, but now it doesn’t seem practical given the over allocations. Let’s let Susan do the bulk of the work. Reduce Floyd’s assignment on #12 and #13 to 10%. That keeps him involved but doesn’t require a lot of work. That brings down his overallocation to something he can manage.
Figure 10.18 Resource workloads after manual adjustments have reduced the most serious conflicts. Some limited overallocations remain, but the project manager has evaluated and consciously accepted them as realistic commitments.
In this exercise, we have resolved (to our satisfaction) the resource conflicts, and we have addressed some of Ariel’s underutilization. Let’s take a final look at the schedule by applying the Gantt Chart view. There are still over three days of negative slack. Shorten the lag of Obtain feedback to 22 days.
Now the schedule looks good.
In summary, the most serious resource conflicts have been resolved, and the revised schedule now finishes on May 5 rather than May 3. Confirm that the project no longer has negative Total Slack. You may then change Tasks are critical if slack is less than or equal to from 0 days to 1 day in File / Options / Advanced to highlight near-critical Activities. This setting changes which Activities are identified and formatted as critical; it does not change the schedule logic, create additional slack, or improve the critical path itself.
Save the project.
For each significant overallocation, record the affected resource, the conflicting Activities, the time period, the action selected, and the effect on the schedule. If a limited overallocation is consciously accepted, document why it is realistic and who approved the commitment. Your Master Project should now reflect deliberate workload decisions rather than unresolved software indicators.
When Finished with the Exercise
Your Acquire Team.mpp project should also look like the one in the following figure. It is 87 days long, starts on 1/5, and finishes on 5/5. The critical path is redefined, although the software still shows resources as overallocated. However, the project manager hypothetically does not view any over-allocations as serious.
Your Master Project should now reflect deliberate workload decisions rather than unresolved software indicators.
Figure 10.19 Revised schedule after resource conflicts have been addressed, showing a new critical path and no negative Total Slack. This view confirms that workload decisions can alter schedule timing and which Activities control the project finish date.
Best Practice
Think of resource leveling as playing a strategic game like chess. There are many moves you can make to accomplish your goal. Some sequences of moves are certainly better than others. In games like chess, you need to see the board in your head, and you need to be able to think ahead. It is the same in Microsoft Project. You have to see what is happening in the schedule as you make your moves, even though all of the data may not be available in the current view. The more you practice leveling resources, the better you will get.
Make notes of each move with a pen and pad as you make your moves to adjust the project to resolve resource workload issues.
Exercise 10.4: Automatically Level Resources (25 minutes)
By this point in the workflow, you understand how to identify workload conflicts and resolve many of them manually. Use Resource Leveling.mpp to learn how the automatic Resource Leveling tools change Activity timing and how to evaluate those changes. Then create a backup copy of your Master Project and test the same leveling options against it. Compare the leveled and unleveled versions before deciding whether to retain, revise, or clear the leveling changes. The purpose is not to force every Master Project into an automatically leveled schedule, but to understand what the Calculation Engine proposes and determine whether those changes support the project’s objectives and constraints.
Click the Download icon above to download the Resource Leveling.mpp file.
This Resource Leveling.mpp project is almost identical to the project we were working on above before we manually leveled resources.
We already know there is not much slack in the schedule, so the Must Finish On constraint has been removed on the last activity because we know leveling is likely to push out the project end date. Automatic Resource Leveling will delay the project and may only be an appropriate feature to try if the finish date can be reasonably extended.
A hybrid approach is the best one to take when using automatic Resource Leveling. First, if you have available resources, replace overallocated resources and then try automatic leveling. Make a few adjustments, level, remove leveling, make a few more adjustments, level again, and try a couple of iterations of this.
Best Practice
If you plan on using automatic Resource Leveling, take a hybrid approach, which involves manual adjustment to workloads and automatic Resource Leveling.
Note
We can do most of our work in a Gantt Chart view. By looking closely at our schedule, we can see the two areas where we have conflicts. Once we become familiar with Microsoft Project and see the board in our heads without looking at it (like in chess), we don’t have to hop around from view to view as much.
Figure 10.20 Activities displaying indicators because assigned resources are overallocated during part of their scheduled Work. Use these indicators to locate the assignments requiring further workload analysis.
Open the Assign Resources floating dialog box using the command on the Bridge Quick Access Toolbar and select activities #6 and #7.
Reduce Susan and Ariel’s assignment to each activity to 50%. We know Wendy is only available at 25%, and she really should be assigned to both activities, so assign her at 12%.
Floyd is available, so assign him to both activities at 50%.
That resolves the conflicts on these two activities. Notice the overallocation indicators are gone.
Figure 10.21 Assignments adjusted to resolve the identified resource conflicts while an overallocation indicator remains visible. Recalculate and inspect the underlying assignments before assuming that the indicator represents an unresolved current conflict.
Next, since we are trying to use resources more efficiently, let’s take this opportunity to shorten the schedule a bit. First, overlap the last two detail activities by making the dependency a 15FS-4 days. Wendy should be assigned to #15 and #16 at 12%. Assign Ariel to both activities at 50%, and reduce Susan's and Floyd's assignments to 50%.
These steps shorten the schedule by several days, and the assignments are improved. In addition, when thinking about it, it would be good for the entire team and the customer to be involved in these last two activities so an assumption might be that performance has increased.
Figure 10.22 Overlapping Activities before and after assignment adjustments. Reallocating Work to available team members can resolve an overallocation without changing valid dependency logic or delaying the project.
Select #12 and #13 and assign Wendy at 10%, Assign Ariel at 50% and change the assignments of Floyd and Susan to 50%.
Figure 10.23 Resource assignments revised to reduce or eliminate overallocations. Review the resulting Work, Units, cost, and Activity dates to confirm that the reassignment remains technically and operationally realistic.
Then automatically level the remaining overallocations.
First, add the Leveling Delay and Total Slack columns.
Notice the three activities under Implement PMO shown below that have resource overallocations. One activity has 22 days of Total Slack, but two activities have zero slack, so leveling could delay the project.
Click the Leveling Options command on the Resource tab and make the selections in Resource Leveling dialog box in the figure below.
Clicking the OK button will save your selections in this dialog box. In this case, select Level All to level.
Figure 10.24 Resource Leveling dialog with options controlling calculation, leveling range, leveling order, available slack, assignment adjustments, and Activity splitting. Review these settings before leveling because they determine how Microsoft Project changes the schedule.
All of the schedule changes made by Resource Leveling are temporarily highlighted in blue. The Leveling Delay field show how much an activity has been delayed by automatic Resource Leveling.
Figure 10.25 Resource workloads after manual adjustments and automatic Resource Leveling have been combined. The hybrid approach resolves the remaining conflicts, improves resource utilization, and produces an earlier acceptable finish than automatic leveling alone.
All resources are now leveled.
Format the Critical activities and save the project.
When Finished with the Exercise
The Resource Leveling.mpp project should no longer contain unresolved overallocations, although Activity timing may differ slightly depending on your version of Microsoft Project and the sequence of adjustments you made. In the backup copy of your Master Project, review the automatic leveling results and compare them with the unleveled schedule. Record which activities were delayed or split, whether the project finish date or milestone dates changed, and whether the proposed schedule still satisfies the project’s objectives and constraints. Retain the leveling changes only if they represent an acceptable execution plan; otherwise, clear the leveling changes and document why they were rejected.
Figure 10.26 Hybrid resource-leveling process combining project manager adjustments with automatic Resource Leveling. This approach uses professional judgment to resolve conflicts manually before allowing Microsoft Project to delay or split the remaining eligible Activities.
Exercise 10.5: Share and Level Resources Across Projects (30 minutes)
The Acquire Project Team Workflow may extend beyond a single project when the same people work across several schedules. This exercise uses practice files to teach Resource Pools, shared resources, and cross-project workload analysis. Complete the practice portion even if your Master Project is currently independent. Apply the technique directly to your Master Project only when it shares resources with other active projects or belongs in a consolidated master-project environment. Otherwise, record how the technique would be used if cross-project staffing conflicts later arise..
Download
Click the Download icon above to download
Resource Pool.mpp
HR Project.mpp
Deployment Project.mpp
New Software Project.mpp
Also, download the Status Presentation.pptx file from Activity 8, and open it in PowerPoint for this exercise.
Before we start the exercise, review each of the files.
Notice that Resource Pool.mpp contains four resources but no WBS Elements, while the three project files contain WBS Elements but no resources. Microsoft Project does not use a special file type for a resource pool; it is a standard .mpp file designated as the source of shared resource information. Although an existing project can technically serve as the pool, a dedicated resource-pool file is normally easier to control, maintain, secure, and back up.
Step1
The first step in sharing resources across projects is to create the resource pool file. Again, the resource pool file is a regular Microsoft Project *.mpp file. It has no unique characteristics. However, most people create a resource pool file and enter and define all of the resources in a Resource Sheet view.
Step 2
The Resource Pool.mpp file will be the resource pool in this exercise. To share those resources, select an existing project that you want to share the resources from the resource pool file, and then from the Resource tab, click the Resource Pool command and the Share Resources…command.
An individual project can still maintain its own local resources, but if there is a naming conflict, the defined resource in the pool should take precedence or be used instead of the resource in the project.
Figure 10.27 Share Resources dialog connecting a project to an open Resource Pool. This relationship allows several project files to use common resource names, calendars, availability, rates, and assignment information.
Step 3
To view workloads across projects, create a master project by opening a blank project file and then insert the projects that share resources into this file by going to the Project tab / Subproject command, checking Link to project, selecting the projects, and then clicking Insert.
Inserted subprojects may initially appear as collapsed Summary Elements in the master project. Expand a subproject to review or edit its detailed Activities. Keeping unnecessary detail collapsed can make a large master project easier to navigate and may improve responsiveness, but the source project remains linked whether the Summary Element is expanded or collapsed.
Projects can be inserted read-only or read/write. If you want to make changes in the master file, like leveling resources, changes you want to save back to the source projects, insert the projects as read/write.
Best practice
Assign one person to administer the resource-pool file, maintain resource calendars and availability, resolve update conflicts, and control when sharer projects connect to or disconnect from the pool. Because this is a linked-file system rather than an enterprise resource database, all project managers using it should follow the same file-location, naming, backup, opening, saving, and synchronization procedures.
Next, let’s share resources for the first project together, and then you can do the other two projects independently.
With the Resource Pool.mpp file open, open or select the Deployment Project.
Share the resources from the resource pool by selecting the Resource tab, click the Resource Pool command and Share Resources… Select the Resource Pool.mpp and make sure the pool has precedence.
Then open the Assign Resources floating dialog box and assign all four resources at 100% to the three detail tasks as in the next figure.
Figure 10.28 Assign Resources dialog used to assign shared resources to selected Activities. These assignments allow Microsoft Project to evaluate each team member’s workload within and across the connected projects.
Follow the same steps for the other two projects, HR Project and New Software Project.
When finished, save all three projects and close all projects including the resource pool.
Next, insert the three projects (not the resource pool) into a blank (Master) project as shown below.
Figure 10.29 Insert Project dialog used to add linked subprojects to a master project. Consolidating the schedules provides a combined view of Activity timing and shared-resource assignments across projects.
When you click Insert, by default these projects are inserted into the master project as read/write. Place the projects in the same order on the screen below.
Expand each project. As you do this you will be asked to open the resource pool file so that resources can be viewed across the sharer files. Click OK.
Figure 10.30 Microsoft Project message requesting that the Resource Pool be opened. Opening the pool makes current cross-project assignments available for consolidated workload analysis.
After expanding the projects, it is easy to assume there are resource over allocations or conflicts since the projects overlap. Let’s look at some of these allocations.
Apply the Resource Graph view, split the window and show the Gantt Chart on the bottom. In the Gantt Chart view, insert the Project field so that you can identify which tasks (since the names are the same) are associated with which project.
It is easy to see that Alice, for instance, is overallocated. Select the Format tab on the ribbon and note the different graphs that are available.
Figure 10.31 Shared-resource workloads displayed across the linked projects in the master project. This consolidated view reveals overallocations that may not be visible when each project is reviewed separately.
Return to the Gantt Chart view without a split window and insert the Leveling Delay and Priority fields.
These resource over allocations can be resolved in the master project in the same way they are resolved in a project. Automatic Resource Leveling can also be used. If you use automatic Resource Leveling, we recommend using a hybrid approach as illustrated above.
If you use automatic Resource Leveling the Leveling Delay field will let you know in elapsed time how much a task is delayed by leveling. The Priority field lets you assign a priority ranking to projects and activities during leveling. The ranking is from 0 to 1000; a ranking of 1000 means the task will not be leveled at all. A task with a ranking of 1, will be delayed before a task with a ranking or priority of 2.
Let’s give this a try. Give the Deployment Project a priority of 1000, make the same selections in Leveling Options as shown in the figure below, and then Level All.
Figure 10.32.Resource Leveling dialog configured for cross-project workload adjustment. The selected options determine how Microsoft Project delays or splits eligible activities assigned to shared resources.
You can apply a hybrid approach to this, but resource leveling across projects can go a long way toward preventing bottlenecks in an organization's project worktraffic flow.
Warning
Master projects and automatic Resource Leveling are restricted in scope by computing power. Do not assume these functions can be performed easily with more than a couple of dozen project files.
Figure 10.33 Master project displaying Leveling Delay values after shared resources have been leveled across projects. Review these delays to determine whether resolving cross-project conflicts has created acceptable project and milestone dates.
Close the master project and there is no reason to save any changes. A master project may be temporarily created for a specific purpose with no intent of using the file again. When closed, you will be asked if you want to save changes to the source projects, including the resource pool file. Save only the changes to the software project and then do these three things:
Open the New Software Project.mpp. Disconnect this project from the resource pool file. Resource / Resource Pool / Share Resources / Use own resources. Notice that you still keep the resources from the pool file that you assigned to activities. A possible scenario might be one in which an individual in the organization maintains the resource pool files, and project managers use this file only when building their team of resources for a project. After assignments are made, they use their pool, unlinking to the resource pool file.
Apply the Leveling Gantt view to this project. This view clearly identifies the schedule results of automatic leveling.
Save the project.
When Finished with the Exercise
The New Software Project.mpp project should be disconnected from your pool file. The Leveling Gantt view should show the leveling delays.
Figure 10.34 Share Resources dialog used to disconnect a project from the Resource Pool while retaining resource records already used in the project. This allows the project to continue using its assigned resources without maintaining the shared-pool connection.
Best Practice
Sharing resources and combining projects in a master project has some practical limitations. This feature is not enterprise-grade functionality and has a practical upper limit of a few dozen projects, each with a few hundred activities. But, on a small scale, an invaluable feature.
Exercise 10.6: Level Your Master Project (60 minutes)
This final exercise is your opportunity to review and complete the Acquire Project Team Workflow in your Master Project. Most of the required information should already have been added during the earlier exercises: named team members, realistic availability, workload analysis, and documented conflict-resolution decisions. Use this exercise to identify remaining gaps, test or refine Resource Leveling where appropriate, evaluate the effect of all staffing decisions on timing, Work, cost, milestones, and the critical path, and confirm that the resulting schedule is ready to support project execution.
When Finished with the Exercise
Your Master Project should contain named team members in place of every generic or skill-based resource that can be staffed at this time. Resource calendars, Max. Units, and availability should reflect confirmed working conditions. Significant overallocations should be resolved, while any accepted conflicts should be documented with their justification. Review the revised Start, Finish, Duration, Work, cost, Total Slack, critical path, and milestone dates to confirm that the staffing plan remains consistent with the project’s objectives and constraints.
Update Journal on Acquiring and Leveling the Project Team for Your Master Project (15 minutes)
Journal
Before completing your journal reflection, create or update the Project Team Working Agreements for your Master Project. Define how the team will communicate, make decisions, manage meetings, report availability changes, resolve conflicts, raise risks and issues, approve schedule changes, and maintain accountability for assignments. Save the agreement with your Activity 10 files, and add a reference to its location in the Project Summary Task Notes or another consistent document-control location in your Master Project. Then update your journal by reflecting on how the staffing, workload, and working-agreement decisions changed the project’s readiness for execution.
Journal Questions
What is the difference between the current timing, work, and costs for the project and what you had entered as the project’s primary constraints?
If there are differences, what are you going to do?
Final Steps
Finalizing Activity 10 and Taking the Exam (40 minutes)
In this last Application for Acquire Project Team:
Review the Activity Best Practices: Reinforce the project management principles and Microsoft Project techniques for acquiring and managing the project team.
Verify Your Master Project: Confirm that named team members have replaced generic resources, availability has been defined, workloads have been reviewed, and resource conflicts have been addressed.
Review and Organize Your Exercise Files: Make sure every Activity file is complete, correctly named, and stored in your Master Class folder structure.
Evaluate the Learning Objectives: Assess whether you can explain and apply the major concepts taught in this Activity.
Take the Activity Exam: Demonstrate your understanding of the Chapter and Activity Workspace content before proceeding to the next Activity in the Project MAP framework.

Review Best Practices for Activity 10 (3 minutes)
Best practices are proven methods and decision rules that improve the likelihood of achieving project objectives. In the MS Project Master Class, these practices support the Initiating, Planning, Executing, and Closing phases of Project MAP, while Controlling continues across the project. The following Activity practices help project managers assign the right people, evaluate capacity, resolve workload conflicts, and use Microsoft Project as a decision-support tool rather than as a substitute for professional judgment.
Resources first as Skills
Get in the practice of thinking about the skills required for resource assignments. Then work to acquire a team that represents those skills.
Cityscape
A primary skill in project management is quickly leveling the cityscape of resource assignments. Resource workloads often look like a cityscape. Resource leveling smooths that cityscape, eliminating the peaks and valleys.
Resource Leveling
Think of resource leveling as playing a strategic game like chess. There are many moves you can make to accomplish your goal. Some sequences of moves are certainly better than others. In games like chess, you need to see the board in your head, and you need to be able to think ahead. It is the same in Microsoft Project. You have to see what is happening in the schedule as you make your moves, even though all of the data may not be available in the current view. The more you practice leveling resources, the better you will get.
Make notes of each move with a pen and pad as you make your moves to adjust the project to resolve resource workload issues.
Automatic Resource Leveling
If you plan on using automatic Resource Leveling, take a hybrid approach, which involves manual adjustment to workloads and automatic Resource Leveling.
Resource Pool
Assign one person to administer the resource-pool file, maintain resource calendars and availability, resolve update conflicts, and control when sharer projects connect to or disconnect from the pool. Because this is a linked-file system rather than an enterprise resource database, all project managers using it should follow the same file-location, naming, backup, opening, saving, and synchronization procedures.
Sharing Resources Across Projects
Sharing resources and combining projects in a master project has some practical limitations. This feature is not enterprise-grade functionality and has a practical upper limit of a few dozen projects, each with a few hundred activities. But, on a small scale, an invaluable feature.

Review Microsoft Project Features Used in Activity 10 (5 minutes)
Resolving Resource Overallocations
No one has unlimited resources. The better people plan, the more they realize they must address resource overallocation and underutilization.
As a project is examined from various perspectives, the software does a great job of identifying resource allocations over time.
Four views are almost exclusively dedicated to viewing resource workloads:
Team Planner view
Task Usage view
Resource Usage view
Resource Graph view
Figure 10.35 Split window with the Resource Graph above the Gantt Chart. Use this combination to connect each resource’s workload pattern to the activities producing the assignment demand.
Field Note: The Promise and Reality of Automatic Resource Leveling
In the mid-1980s, personal computers started to change project management. Suddenly, we could run complex schedule calculations in minutes or hours, not days. Back then, I worked with Symantec's Timeline, which Breakthrough Software in Novato, California, originally developed. It was the first project management software for personal computers.

The introduction of automatic Resource Leveling was exciting for the company and industry. Reviewers were impressed that a computer could scan a whole project schedule and fix resource conflicts on its own. Early versions took almost 24 hours to process a schedule with about 1,200 tasks and a moderate degree of overallocation. Still, this was a big technical step forward.
As computers got more powerful, those calculations dropped to about 20 minutes, down from a whole day when I started working with project management software. The speed was impressive, but another issue appeared. While the software resolved many resource conflicts, the new schedules often stretched so far out that they no longer aligned with real business goals. The schedule was technically right, but not one anyone actually wanted to follow.
I remember working with a federal agency that was studying air traffic across the U.S. to help reduce congestion. Their method was simple: turn on automatic Resource Leveling and accept whatever schedule the software gave them. This surprised me, since in my experience, the software can't understand things like organizational priorities, contracts, customer needs, politics, or the many tradeoffs project managers deal with daily. Still, over the years, I've seen many organizations do the same, especially as projects get bigger and more complex, and manual workload balancing gets harder. As a consultant, I eventually set aside some of my general perspectives, and if a customer was determined to use the feature, I worked to help them get the most out of the tools.
I continue to believe that for most organizations, Resource Leveling is a powerful analytical tool, but it is not a substitute for project management judgment. The best project managers use it to explore alternatives, identify bottlenecks, and evaluate different staffing scenarios—not to make final scheduling decisions automatically. In this Activity, you are learning to think the same way: first, understand the resource conflict; then, use the software to evaluate possible solutions; and finally, apply your own professional judgment to select the approach that best supports the project's objectives.
At the same time, as the MS Project Master Class Book notes, some project managers have achieved impressive results using this feature.
Figure 10.36 Resource Leveling options. Review the settings and compare the leveled result with the original schedule before retaining any changes.
Like Resource Leveling, sharing resources has been a staple of project management software since the mid-1980s.
Sharing resources across multiple projects and then combining those projects into a master project has been a handy tool over the years.
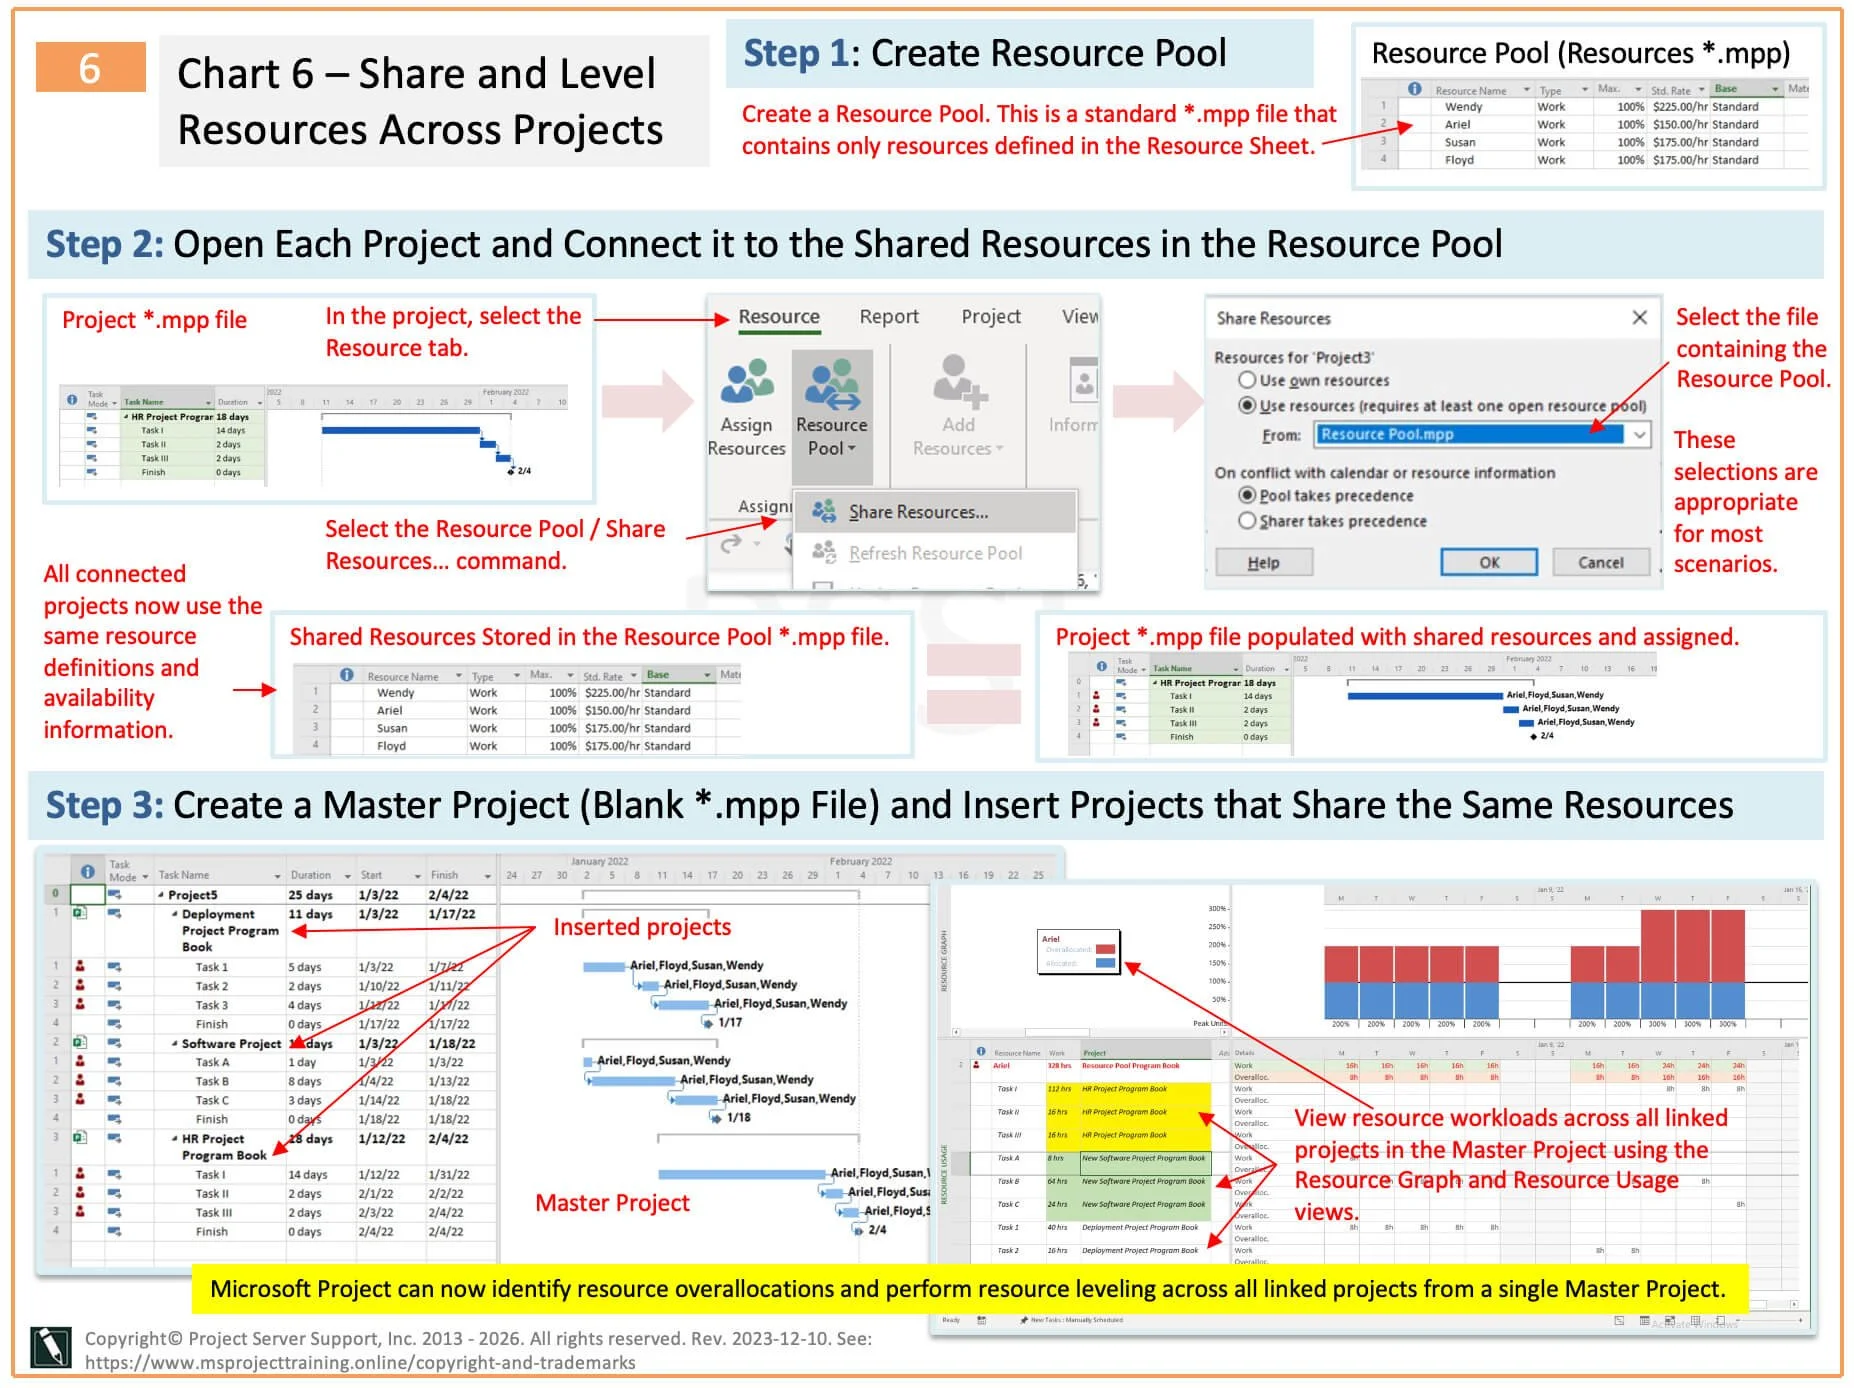
Figure 10.37 Workflow for creating a Resource Pool, connecting sharer projects, consolidating them in a master project, and reviewing shared workloads. Use these steps when the same team members perform work across multiple project schedules.

Ensure Your Master Project and Exercise Activity 10 Files are Up-To-Date (10 minutes)
Before evaluating the learning objectives and taking the Activity exam, verify that your Master Project reflects every applicable step of the Acquire Project Team Workflow. Confirm that generic resources have been replaced where staffing decisions are complete, resource calendars and availability are realistic, workloads have been reviewed, significant conflicts have been resolved or documented, and the resulting schedule still satisfies the project’s objectives and constraints. Also confirm that the Project Team Working Agreements have been completed, saved with the Activity files, and referenced from the Master Project. This final review should verify the project deliverables—not merely confirm that the practice files were completed.
In the Aquire Team Overview.mpp project, generic resources have been replaced with the project team. On Task 2, Alice replaced Ted. Ted is no longer overallocated, and Alice is less underutilized.
Figure 10.38 Completed Exercise 10.1 file with generic resources replaced by named team members and Alice reassigned to Task 2. Use this result to verify that Ted’s overallocation has been resolved without creating a new conflict for Alice.
In the Acquire Team.mpp project, the skill resources should have been replaced with the people doing the work. In addition, several adjustment should have been made to Wendy’s availability. There should be a change related to a holiday and then there are changes to here contour and shown in the figure below.
Figure 10.39 Completed Exercise 10.2 file showing Wendy’s capacity through Max. Units, time-phased Resource Availability, and resource-calendar exceptions. Use these settings to verify that the schedule reflects her actual working availability.
Your Acquire Team.mpp project should also look like the one in the following figure. It is 87 days long, starts on 1/5, and finishes on 5/5. The critical path is redefined, although the software still shows resources as overallocated. However, the project manager hypothetically does not view any over-allocations as serious.
Figure 10.40 Completed workload-analysis exercise showing resolved or consciously accepted resource conflicts, a revised critical path, and no negative Total Slack. Use this result to confirm that the schedule remains feasible after the manual adjustments.
The Resource Leveling.mpp project should no longer have any overallocation. Perhaps your timing may be slightly different than those in the figure below because of the version of Microsoft Project you are using and the steps you followed.
Figure 10.41 Completed Resource Leveling.mpp file after manual assignment adjustments and automatic Resource Leveling have resolved the remaining overallocations. Review the Leveling Delay, Activity dates, critical path, and project finish before accepting the revised schedule.
The New Software Project.mpp file should be disconnected from the resource pool while retaining the resource information copied from the pool. Apply the Leveling Gantt view and verify that the Activity bars and Leveling Delay values reflect the cross-project leveling decisions completed during the exercise.
Figure 10.42 Completed cross-project exercise with New Software Project.mpp disconnected from the Resource Pool while retaining its assigned resource records. Use this result to confirm that the project can operate independently without losing the resources already used in its schedule.


If you are working with a coach or plan to earn a certificate, use this file folder system to store your files.
Review List of All Completed Activity 10 Files (5 minutes)
The files used or created during this Activity Workspace should include:
Your updated Master Project.mpp.
Acquire Team Overview.mpp.
Acquire Team.mpp
Resource Leveling.mpp.
New Software Project.mpp.
Your updated Journal.
Completed evaluation of the learning objectives in Learning Objectives for Acquire Project Team.xlsx.
PDF of your exam results.

What to Do with Your Files
After you finish this Activity, remember to save your files and keep them organized.
If you are working with a Master Class Coach:
Put all the files listed above into your folder structure as suggested.
Zip these folders before your next session.
Email the zipped file to your Master Class Coach.
You don’t need to send your files to a Certified Master Class Reviewer to earn a certificate; your coach will review your work.
If you are NOT working with a Master Class Coach (Certificate Path):
Put all the files listed above into your folder structure.
Zip the files to archive them and keep everything organized.
When you’re ready, send all your Activity files together to a Certified Master Class Reviewer for evaluation.
Important
As you work through all Activities, you’re building a complete set of project files. Keep everything organized since you’ll need the full set for review.
Evaluate Activity 10 Learning Objectives (10 minutes)
To assess whether you have met the learning objectives outlined for the MS Project Master Class Book, you could review the following questions:
Understand the Role of Team Acquisition in Project Execution:
Why is acquiring a project team at the beginning of the execution phase crucial for project success?
How does team acquisition set the foundation for successful project implementation?
Identify and Assign the Right Resources:
What criteria would you use to identify the appropriate resources for a project task?
How would you ensure that the resources you assign to project activities are used to achieve optimal performance and efficiency?
Reassign Resources or Modify Activities Around Availability:
What strategies can be employed to reassign resources when there are changes in resource availability?
How would you modify project activities to accommodate resource constraints while meeting project objectives?
Utilize Resource-Leveling Tools:
How does Microsoft Project's resource-leveling feature help in optimizing resource allocation?
In what scenarios might the software's resource-leveling feature not be applicable or beneficial?
Establish a Cohesive Team Framework:
Why are clear guidelines, communication channels, and roles and responsibilities important for team collaboration?
How would you go about establishing a cohesive team framework for your project?
Enhance Team Collaboration and Productivity:
What strategies can be implemented to improve teamwork and enhance productivity within a project team?
How can you minimize conflicts and ensure alignment with project goals and objectives through well-defined teamwork approaches?
Align and Motivate the Project Team:
What techniques can you use to align and motivate your project team to maintain project momentum?
How would you drive the project team toward achieving and completing objectives?
These questions will help assess whether students have met the learning objectives by evaluating their understanding and ability to apply key concepts and strategies discussed in the chapter.

Before taking the following exam, click the Download icon above to open the Learning Objectives for Acquire Project Team.xlsx and complete this evaluation of the learning objectives.

Final Score
When you are finished, print your score and exam results as a PDF file if you are working with a Coach or plan to earn a certificate.
Take the Activity 10 Exam (7 minutes)
Complete this Activity by taking the exam. Take the exam by clicking on the Exams button below.
Here are some essential guidelines for taking the exam:
Approach the exam as a closed-book assessment, relying solely on your memory and grasp of the subject matter.
Always select the most appropriate answer.
Keep in mind that answers carry different weights.
Feel free to attempt the exam multiple times to refine your understanding.
To attain the MS Project 24 Hour Master Class Certificate of Completion, achieve a final score of 80% or higher.

Return to the Master Class Book, complete the Activity 10 Summary section, and then continue to Activity 11: Create Project Compliance Plan
Acquire Project Team FAQs
What Is Project Team Acquisition in Project Management?
Building your project team means matching the right people to the right activities at the right time. While making a schedule matters, you need qualified people ready to do the work before you can move forward. Experienced project managers know that resource planning is just as important as schedule planning for project success.
In the Project MAP (Model, Activities & Phases) framework, this Activity turns your project from a technically correct schedule into one you can actually carry out. Earlier steps defined the work, estimated the effort, set up the schedule, and looked at risks. Now, you decide who will do the work.
Microsoft Project helps with this process using resource and assignment views, resource assignments, workload analysis, calendars, availability settings, and Resource Leveling. These tools let you check if your plan can really be done with the people you have.
Instead of just assigning names to activities, experienced project managers keep checking if the team can actually finish the work within the project's time, cost, and scope limits.
What Is Resource Leveling in Microsoft Project, and Why Does It Matter?
Resource leveling means fixing resource conflicts by changing assignments or the schedule so that no one is asked to do more work than they can handle.
Microsoft Project can identify resource overallocations and suggest schedule changes using its Resource Leveling feature. It can delay activities, split work when needed, or reassign activities based on the options you choose.
However, experienced project managers usually review automatic leveling before accepting it. The software does not know about contracts, customer needs, company politics, or business strategy. Automatic leveling is a tool to help you decide, not the final decision.
In the Project MAP framework, you perform resource leveling only after the project is well-structured, estimated, logically linked, and risk-checked. Leveling a poor schedule just creates new problems. Always make sure your schedule is solid before trying to optimize workloads.
How Do I Know If My Project Team Is Overallocated?
Overallocation occurs when someone is assigned more work than they can complete within a given time. This often leads to schedule delays, missed deadlines, and team burnout.
Microsoft Project identifies overallocated resources using indicators in Resource views, Resource Usage, Team Planner (where available), workload graphs, and Peak Units calculations. These tools help project managers identify conflicts before work begins.
Experienced project managers know that not every overallocation needs to be fixed right away. A short fifteen-minute conflict might not matter, but several weeks of overallocation may mean you need to change the schedule, reassign activities, or add more staff.
The goal is not to eliminate every red warning. Instead, you need to know which workload problems could hurt the project and which ones you can handle through normal supervision.
Should I Replace Resources or Change the Schedule?
There is usually no single right answer. When resource conflicts come up, project managers often have several choices:
Replace the assigned resource.
Assign additional qualified resources.
Delay activities.
Modify activity sequencing.
Adjust working calendars.
Accept the temporary overallocation.
Microsoft Project lets you try out these options without changing the real project until you decide. This way, project managers can look at different scenarios before choosing what to do.
Experienced project managers do not just add more people when a project is behind. Adding staff raises costs, requires onboarding, and can lower productivity if coordination gets harder. The goal is to improve the whole project, not just add more people.
How Does Microsoft Project Help Manage Resource Availability?
Resource availability means knowing when and how much time someone can spend on project work. Every project manager should be aware of vacations, holidays, part-time work, other projects, and company priorities before creating a realistic schedule.
Microsoft Project lets you set up resource calendars, availability periods, maximum units, exceptions, and working times. These settings help the software assign work based on real availability instead of guesses.
Experienced project managers keep resource calendars up to date because effective schedules depend on accurate availability data. Even the best schedule will not work if the software thinks people are available when they are not.
In Project MAP, setting resource availability is one of the last steps to turn your plan into a real project schedule.
What Is a Resource Pool in Microsoft Project?
A Resource Pool is a shared list of resources that multiple Microsoft Project files can use simultaneously. Instead of keeping separate lists of the same people for each project, organizations use one shared resource list.
Microsoft Project uses Resource Pools to coordinate assignments across different projects. This helps project managers find resource conflicts that might be missed if projects are managed separately.
Experienced project managers know that most organizations run several projects at once, not just single projects. Someone who looks available in one schedule might already be busy in another. Resource Pools give a clearer view of what the organization can handle.
As projects get bigger and more complex, sharing resources and managing them across projects becomes even more important for keeping schedules realistic.
Why Is Team Collaboration Part of Project Team Acquisition?
Assigning people to activities is just one part of building a strong project team. Good project execution also needs clear expectations, defined roles, communication rules, and agreed ways of working together.
Microsoft Project helps organize activities, schedules, and workloads, but it does not create good teamwork on its own. That is up to the project manager.
That is why this Activity also covers Team Working Agreements and resource management practices. These outline how the team will communicate, solve problems, report issues, and support one another throughout the project.
Experienced project managers know that projects succeed when both the schedule and the people are managed well. Microsoft Project helps with the schedule, but it is leadership that builds the team.
Suggestions and Corrections
Please help us make this MS Project Master Class Book and the Master Class Online Applications better. Click on the Comments button below to send us suggestions and corrections.